Arena:Fang Lair (quest)
|

Quick Walkthrough[edit]
- Go to sleep and receive another vision from Ria Silmane.
- Travel to Hammerfell and talk to the Ruler of Rihad.
- Go to Stonekeep to retrieve a parchment.
- Give the parchment to the ruler of Rihad in exchange for the location of Fang Lair.
- Travel to Fang Lair and retrieve the first piece of the Staff of Chaos.
- Survive Jagar Tharn's retaliation.
Detailed Walkthrough[edit]
Another Vision[edit]
The first time you go to sleep after reaching level 2, you will be contacted in your dreams again by Ria Silmane. She will say:
"I see you have strengthened your arm, and your mind. It is time we began this journey. This is the Staff of Chaos, the one item that can open the door between this world, and the dimension to which the Emperor has been banished. Tharn used this item to destroy my corporeal form when I tried to warn the Council. He knew that the Staff of Chaos was nigh indestructable [sic], having been made from the essence of the Land itself. But in that he found the key. As the land is split, so did he shatter the Staff into eight perfectly formed pieces. These he scattered across the realm. I have been able to divine the location of the first piece, a place called Fang Lair."
"It is said that Fang Lair was originally built by the Dwarves of Kragen. Legend has it that a Great Wyrm drove the Dwarves from their home in the Dragon's Teeth, and took the Lair for itself. I only wish I knew the exact location. Perhaps there are sages, or scholars who would know of this place. Somewhere in its dank depths lies the first piece of the Staff of Chaos. I wish you well. I do not think Tharn knows of your escape, but I can do little else in this form. I have tried to obscure your identity with a spell, but I do not know how well it will hide you. Take care for Tharn may be searching. Go forth with the blessings of the true Emperor, and myself..."
If you reach level 3 but have not slept after reaching level 2, the next time you sleep, you will only receive the second paragraph of Ria's message.
Where Is Fang Lair?[edit]

Ria Silmane told you to find Fang Lair. But as she does not know where it is, it's up to you to find it. You do this by asking passers-by where it is. Some will tell you they've never heard of it; others will say they thought it was just a story. But eventually you will hear that maybe you should check out Hammerfell province. Go there; it's in the west of Tamriel.
Once you get to Hammerfell province, continue asking around about Fang Lair. Eventually, someone will tell you to check out Rihad, a city-state in the southern part of the province.
Once you get to Rihad, resume questioning the locals about Fang Lair. After a while, someone will tell you to go to the palace. Every palace is found on the city wall; if you have trouble finding it, ask someone for directions and they'll either give you a compass direction or, if you're near enough to it, they'll actually write "PALACE" on your map in the appropriate location.
Quid Pro Quo, Pt. 1[edit]
Talk to the ruler of Rihad, Queen Blubamka. She'll say that she'd love to tell you all about Fang Lair, but first there's the matter of this parchment stolen from her by Golthog the Dark, a goblin chieftain. She can't tell you about Fang Lair unless you take the trouble to bring back this parchment, because, as she claims, the parchment is necessary to help decipher the location of Fang Lair. She is nice enough to mark the location of Golthog's lair on your map: a ruined stronghold called Stonekeep. The stronghold is fairly close to Rihad, and looks like a rock-like cave entrance sticking out of the ground on your world map (right click on the picture of the map to bring up the world map). Before you go, though, you may want to purchase a Potion of Cure Disease.
Stonekeep[edit]
Stonekeep is a sprawling, single-level dungeon, and like all Arena dungeons is filled with all manner of monsters and plenty of treasure. It features plenty of water to swim in, and in fact you will get wet unless you can levitate.
There is an iron key on an island just a bit due south of the entrance (40,30). This key is not essential to getting the parchment. It can, however, open one of several locked doors in the residential area of Stonekeep.

The parchment is located on a ghoul island hideout southwest of the entrance. The best way to get to it is to walk straight ahead from the entrance and go into the second room on the right, it is to the right of the statue in the middle of the room. (Watch out for rats and wolves at this point). The third bedroom on the right has a hole in the wall which you must jump through using shift + j. After this, turn right and you will face half a dozen skeletons. They are worth decent experience points at this point if you can kill them. You can also lure them back to the hole in the wall and fight them one at a time but keep in mind that they are resistant to edged weapons such as swords.
In this room you will notice a large island in the center which is guarded by several ghouls. Then it's a short swim or flight to the ghoul island. The parchment itself is a curly brown piece of paper resting on the ground inside the ghoul hideout (72,23). Be very careful when dealing with the various ghouls on the island; they can be particularly hard to kill for lower level players and carry diseases. You may be better off simply grabbing the parchment and running, though a good amount of loot and experience may be gained looting other areas and specially in the Prison and Royal Bedchamber with their goblins and skeletons. Also keep an eye out for the piles of treasure on the island. When the parchment is in your hands, you will receive the message:
- You have found the Parchment the court at Rihad can use to discover the location of Fang Lair...
Throughout the dungeon, you may find out about the sinister tale of how the Stonekeep passed to the goblins through a series of messages popping up on your screen:
- A cracked sign, shrouded in dust, reads "Welcome to Stonekeep. Surrender all weapons to the guards, for we are the keepers of peace."
- The dank smell of mold and decay rise from the flooded dungeon...
- The chest is moldy, as if it had been submerged in water before being brought here.
- This room, and others nearby, were offices at one time, but looting and decay have left them mere shells...
- An old faded sign reads "The king and palace are lost. We, the last survivors of the court of Stonekeep, are heading south through the goblins' caves."
- An old faded sign reads "We are following the goblins' tunnels to the north to make our last stand."
Quid Pro Quo, Pt. 2[edit]
Return to Rihad palace with the parchment in your inventory and speak to Queen Blubamka. She will then mark the location of Fang Lair on your map as promised. The lair is the northeast corner of Hammerfell.
Before you go to Fang Lair, it is advisable to get a few Potions of Resist Fire, as the dungeon contains both lava and fire-breathing monsters. Also, you might want some Potions of Free Action, as there are creatures there that can paralyze you.
Fang Lair[edit]
"You stand before the dragon gate of Fang Lair, humbled before its majesty. The Dwarven Hold seems abandoned long ago, its stone walls cracking with age and neglect. Somewhere within its dank depths lies the first piece of the Staff of Chaos..."

Fang Lair is an abandoned Dwarven mine. You will see tram tracks, trams, enormous holes, trenches and tunnels, and ladders. The trams and tracks are just dungeon dressing, but everything else has to be dealt with, particularly the tunnels. The top level of Fang Lair is quite large, and can be a challenge to explore given all the tunnels, mine shafts enumerated alphabetically from Mine Shaft A to F. Throughout this level you may receive numerous messages on your screen including:
- You stand in Fang Lair. It's Dwarven hewn passages run for miles under the earth...
- These tunnels seem to stretch on endlessly, but the tracks you have come across usually lead to the mine shafts...
- From somewhere near you can hear strange scrapes and clicks...
You may also find an interesting walled structure inhabited by spiders and ghouls where a statue and some loot can be found. Curiously, coming near this place triggers the message:
- You see a temple, a structure nearly as ancient as the rock from which it was hewn ...
You will have to traverse the tunnels to reach the ladder down to the second level of Fang Lair (unless you have the Passwall spell at your disposal). You can find this ladder in the extreme southwest part of the level.
To reach the ladder, however, you have to pass a magically locked door, and to get the key to that door, you need to correctly answer the first of many puzzles and riddles you will encounter throughout the main quest. This one is intended to be a logic puzzle. First you receive a warning:
.jpg)
- You come upon a strange sight. A room with cells down either side. In each cell seems to be a hungry spider. You see three more cells along the southern wall. Next to them stands a dark portal...
As you approach the "portal" (the magically locked door), you receive another warning:
- Thou must prove thy worthiness to proceed to the Underdark. The correct answer will open the cell to the gold key, which will open the portal.
- -
- Rush not to answer mortal. The wrong choice will open the cell doors to the spiders...
Finally, at the portal, you receive the riddle itself:
- As you near, the door itself speaks:
- -
- Listen to my puzzle, foolish mortal and prove that you are worthy of my service...
- -
- If Cell 3 holds worthless brass, Cell 2 holds the gold key.
- If Cell 1 holds the gold key, Cell 3 holds worthless brass.
- If Cell 2 holds worthless brass, Cell 1 holds the gold key.
- -
- Knowing this brave fool, and knowing that all that is said cannot be true, which cell contains the gold key?
You are only given three options, so if you get it wrong, you can try again and you will eventually get it. Note, however, that if you get it wrong, the spiders in the cages you just passed will find themselves free to open their doors and come after you. The correct answer are: 2, cell 2, cell2, the second cell, the 2nd cell and c2. A correct answer is confirmed by the following message:
- Thou art correct mortal. The key within cell 2 is yours...
On the other hand, a wrong answer results in another message...
- You hear the groan of metal as the cell doors that hold the spiders unlock, and open...
Your answer will unlock one of three different cage doors just to the west of you, and in fact will open the cage corresponding to the number you guess (walk in front of the cages and a note will pop up telling you which is which). In each cage is a key you can use to open either the magically locked door in front of you or one of the magically locked doors just north of the spider cages. Those doors lead to cages that hold piles of treasure (95,78; 91,78). The idea is to unlock the cage containing the gold key. One strategy is to give the two wrong answers before giving the correct answer to ensure easy access to the treasure keys; note that of course by doing so you will have to deal with the spiders. If you have Passwall, you can have your cake and eat it, too: just open the correct cage first, then use Passwall to destroy the walls leading to the other keys.
Once you obtain the gold key (94,98), open the magically locked door (88,96) and take the ladder down to the second level.
.jpg)

In the center of this level is a room with a door locked by a riddle:
- A simple question for thee,
- -
- What is neither fish nor flesh,
- feathers nor bone,
- But still has fingers,
- and thumbs of its own?
- -
- What is thy answer, mortal?
The riddle has a number possible correct answers: gauntlet, gauntlets, glove, gloves, a glove and a gauntlet. The room is almost impossible to miss, as this level is not large in area and there isn't a lot to look at. Answer the riddle to unlock the door to get to a couple of fire-breathing hell hounds and the first Staff Piece (64,75). Upon answering correctly, you'll receive the message:
- Thou hast truly the wit to continue. Thou may proceed...
A wrong answer results in another message:
- Thou art wrong mortal. Think carefully before thou ventures another reply...
The hell hounds can cause a lot of damage, especially if you are a low level. To avoid their attack, you can open the door and immediately take cover behind the wall. After a few seconds they will vanish. Sometimes they won't vanish, a good strategy is to use an invisibility spell to get close to them so they don't use their long range attack (which is their most powerful attack). When the First Staff Piece within this room is recovered, you'll receive the message:
- The first piece of the Staff of Chaos flashes once before turning to a dull piece of ebony in your hand. You can feel it perceptibly throbbing as if waiting to be connected to the other seven pieces...
Ambush[edit]
After collecting the staff piece, you may soon be greeted by a vision from Jagar Tharn, who is using the same power Ria is to talk to you. This may occur any time a random monster encounter might occur. This may be while camping outside or in dungeons, or anytime in the wilderness or while wandering the city streets at night.
"I do not know who you are, but you have made a fatal mistake. Ria Silmane and her feeble powers are no protection for you. I should have discorporated her when I had the chance. I will not make the same mistake again. I will use the same dream bridge that she uses, sending my minions across time and space. Already they arrive, ones worthy of the attention you deserve. They will relieve you of the burden of the Staff piece you now hold. Give it to them and I will order your death painless and quick. Resist and I shall see you in such suffering that you will grovel for the sweet release of death..."
After the vision has ended you will be attacked by one of his minions.
Notes[edit]
- In her description of what you have to do in Stonekeep, Queen Blubamka makes a passing mention about the goblin leader, Golthog, being in Stonekeep. This is just talk and has nothing to do with your quest. You will not have to fight Golthog nor are you even able to encounter him.
- There is a potentially Dwarven temple on the first level of Fang Lair which contains a lot of treasure.
- There is also a secret treasure room in the southeast corner of the first level of Fang Lair.
- On the second level of Fang Lair is a hidden room containing a lot of treasure and some ghouls to fight for it. The way to get to the treasure is to swim a long distance in lava. Normally this would kill you quickly. But if you have a couple of Potions of Resist Fire, you can make the trip to the area on the first potion and, having collected the treasure and dealt with the ghouls, make the trip back on the second. Alternately, if you have a passwall spell or item, you can create a tunnel directly to the room and avoid the lava swim.
- Given the abundance of treasure rooms in Fang Lair, it makes a great place to farm for valuables, especially if you've brought a lot of Potions of Resist Fire. After you loot the lava river room on the second level, return to the first level and revisit the spider cages, the temple, and the secret room to the southeast. You can keep respawning the treasure until you run out of inventory space.
- If you are having trouble solving the last Fang Lair riddle try this.
- Fang Lair can be found in the Lore section for more information and references in future games.
Glitches & oversights[edit]
- For the riddle about the doors, if the player simply puts no answer in, it will be considered correct.
- In the CD version (1.07), after retrieving the parchment from Stonekeep, and returning it to queen Blubamka, if you return to Stonekeep you can find the parchment again. Picking it up a second time will give you the first piece of the Staff of Chaos. This will put you one step ahead for the rest of the game (i.e. the first piece of the staff retrieved from Fang Lair becomes the tablet revealing the location of Labyrinthian and so on). This exploit can also be repeated in Stonekeep until picking up the parchment counts as retrieving the Jewel of Fire, after which the game will end. This is true for each of the quest items and staff pieces, however, by taking advantage of this, the locations will not be added to your map and you will not be able to visit them.
- Though not really a glitch, there is a small inconsistent manner of story telling found during this quest. A player is very likely to receive the omninous threat by Jager before Ria's dream vision, wherein she states that Tharn is not as concerned with the player as she thought and theorizes Jagar considers the player dead. This makes no sense as you received a threat so naturally Jagar is concerned
Maps[edit]
-
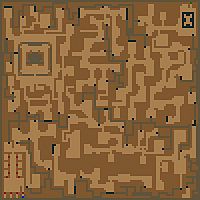
First Level
-
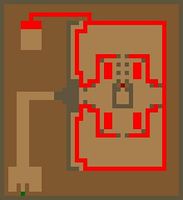
Second Level


Quest Log[edit]
| Fang Lair () | ||
|---|---|---|
| Stage/ Index |
Finishes Quest | Journal Entry |
| 0 | The ruler of Rihad has marked Stonekeep on your map of the province of Hammerfell... | |
| 1 | The ruler of Rihad has marked your map to show the dwarven mines of Fang Lair in the province of Hammerfell... | |
| Prev: Imperial Dungeons | Up: Main Quest | Next: Labyrinthian |