Lore:Staff of Hasedoki
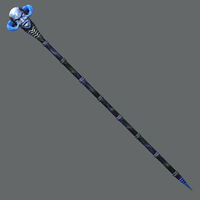
The Staff of Hasedoki belonged to the wizard Hasedoki, who was, to the best of all knowledge, the greatest wizard of his time. It is said that he felt so lonely and isolated because so many feared his power, that he bonded his soul into his very own staff, where it remains. Magic users all over Tamriel have been searching for it ever since to benefit from its magical protection.[1] In appearance, the Staff of Hasedoki is an engraved metallic staff decorated with a horned blue head at its tip. Defensively, the staff grants its wielder powerful resistance against magicka.[2] When used offensively, the staff fires a projectile that applies an overwhelming force, knocking back the target upon impact. Lastly, the staff applies a soul trap effect on its target.[3]
History[edit]
The last living dwarf, Yagrum Bagarn, at one point befriended the sorcerer Divayth Fyr.[4] At Fyr's behest, Yagrum Bagarn wrote a book that would later be known as Tamrielic Lore[5]:241 from the notes that he gathered over the centuries, listing the Staff of Hasedoki among various items of "unimaginable significance".[1] By the Interregnum, copies of this book circulated throughout Tamriel, providing some general information on the artifact to its readers.[6]

At some point in time, the staff appeared in Morrowind in the possession of tomb-dwelling Orc necromancers known as the Gilgar family.[7]
Ufkul Gilgar was one of the earliest known to own the staff, having been given the staff by her father, and much like the great wizard, she faced the same hardships Hasedoki did. The staff made her become too powerful, and with none able to challenge her, her contentment quickly became boredom. Additionally, the power of the staff made others fear her, resulting in her becoming lonely. Sadly, although she was a necromancer who had the tools to defy death, she lacked a similar solution for life. Eventually she became a mother, and her loneliness would fade, and the staff was to be passed on to her son, Koffutto Gilgar.[7]
Circa 3E 427, Koffutto Gilgar sealed himself and the staff within the master burial chamber of the undead-infested Gimothran Ancestral Tomb in the Molag Amur region of Vvardenfell. A pair of adventuring knights named Vulpriss Denisson and Morty sought to claim the staff, but Morty was then slain in the Baram Ancestral Tomb far to the northwest. Vulpriss attempted to enter Gimothran Tomb alone but perished while attempting to disarm a trap.[8][9] The Nerevarine subsequently recovered the staff and sold it to a Dunmer noblewomen by the name of Torasa Aram, who put it on display in her Museum of Artifacts in Mournhold.[10]

By 4E 201, the staff was smuggled into Skyrim along with other black market items.[11] After hearing of this, the Last Dragonborn investigated the area around Whiterun to see what could be uncovered. Another descendant of Ufkul Gilgar, Modig Gilgar had come to Skyrim to recover the staff, and by the time he made contact with the smugglers, they had already sold the staff. After buying information about the clients, the smugglers attempted to ambush and rob Modig, who quickly dispatched them, and soon after, the Last Dragonborn came onto the scene of a recently finished battle. While Modig's exact fate is unknown, the Last Dragonborn recovered the note from him and learned the details about the staff's purchasers, Ivara of Olenveld and Lushak gra-Ragdam, and discovered that they took residence in Brittleshin Pass. The clients were actually necromancers and, within their lair, attempting to open a portal to the Soul Cairn. They sought to sell Hasedoki's soul that was contained in the staff to the Ideal Masters, but the Last Dragonborn managed to disrupt the ritual and recovered the Staff of Hasedoki.[12]
Previous Owners:[edit]
- Hasedoki
- Ufkul Gilgar
- Koffutto Gilgar
- Nerevarine
- Torasa Aram
- Ivara of Olenveld
Gallery[edit]
-

Morrowind
-
Skyrim Creation Club
-

ESO


See Also[edit]
References[edit]
- ^ a b Tamrielic Lore — Yagrum Bagarn
- ^ Staff of Hasedoki's appearance in Morrowind
- ^ Staff of Hasedoki's appearance in Skyrim
- ^ Yagrum Bagarn's dialogue in Morrowind
- ^ The Morrowind Prophecies Game of the Year Edition
- ^ Tamrielic Artifacts
- ^ a b To Raise the Living — Shagrub Gilgar
- ^ A scrawled note — Vulpriss Denisson
- ^ Koffutto Gilgar in Morrowind
- ^ Events of The Museum quest in Tribunal
- ^ Smuggler's Ledger
- ^ Staff of Hasedoki Creation for Skyrim Special Edition