Oblivion:Bramblepoint Cave
|
|||
|---|---|---|---|
| # of Zones | 3 | ||
| Occupants | |||
| Monsters (1 boss-level Monster) |
|||
| Important Treasure | |||
| Lithnilian's Research Notes 1 boss-level Chest |
|||
| Console Location Code(s) | |||
| BramblepointCaveExterior, BramblepointCave, BramblePointCave02, BramblePointCave03 | |||
| Region | |||
| Nibenay Basin | |||
| Location | |||
| Northeast of Bravil, across the Niben Bay | |||
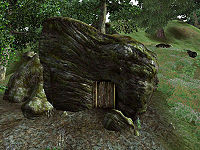
Bramblepoint Cave is a medium-sized cave east of Bravil containing monsters (quest-related). It contains three zones: Bramblepoint Cave, Inner Bramblepoint Cave, and Deep Bramblepoint Cave.
Related Quests[edit]
- No Stone Unturned: Help an Altmer Sorcerer at the Imperial Bridge Inn recover his research notes.
Notes[edit]
- This cave contains 5 Cairn Bolete plants and 23 Wisp Stalk plants.
Exterior[edit]
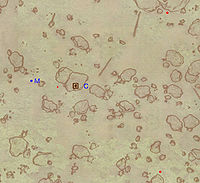
- The exterior is located at coordinates: Tamriel 28, -4
- This location's map marker (M on map) is named Bramblepoint Cave (editor name BramblepointCaveMapMarker). The entrance door is E of the marker, 90 feet away.
- 0-1 Monster is near the entrance
- 2 Wilderness Creatures (Valley variety) are near the entrance
- The following plants can be found near the entrance: 4 Flax plants, 9 Fly Amanita plants, 11 Foxglove plants, 2 Ginseng plants, 2 Lady's Smock plants, 14 Lavender plants, 23 Monkshood plants, 2 Peony plants, and 7 Summer Bolete plants
Zone 1: Bramblepoint Cave[edit]
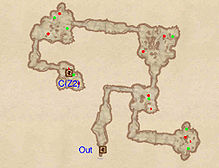
This zone is very straightforward and largely linear: there is no way you will get lost. At the first, small room you enter is an intersect: heading left will lead you to the main part of the current level while heading right will bring you to a room with up to two enemies and two minor loot chests. In the second, larger room, you might be able to fight the two enemies separately; skill, especially Sneak, and a bit of luck will help. Exit this zone to Inner Bramblepoint Cave via door C.
Occupants:
Treasure:
- 5 Chests 02 (2 locked)
- 2 Chests 03
- The following plants will always be found: 7 Wisp Stalk plants
Doors and Gates:
- There are two doors in/out of this zone
- 1 door (at Out) leads outside
- 1 door (at C) leads to the zone Inner Bramblepoint Cave
Zone 2: Inner Bramblepoint Cave[edit]
This zone is slightly more complex than the first one. You enter it from Bramblepoint Cave through door C and can exit to Deep Bramblepoint Cave through doors D or E. It is recommended to use door D, since you will only have to face one guaranteed enemy on the other side. Use door E to backtrack from the third zone but make sure you take out the enemies next to it beforehand, to avoid ugly surprises when coming back.
In the case of this zone, however, there is no way you will escape a fight with up to two enemies in an enclosed space just as you enter. At the third room you enter is the intersect: left leads to door D while right leads to door E. If you take the recommended route, the last room may contain up to five enemies, so sneak and caution will prevent you from fighting with more than two enemies at one time.
Occupants:
Treasure:
- 1 Chest 01 (locked)
- 1 Chest 02
- 4 Chests 03 (1 locked)
- 1 Chest 04
- The following plants will always be found: 2 Cairn Bolete plants and 11 Wisp Stalk plants
Doors and Gates:
- There are three doors in/out of this zone
- 1 door (at C) leads to the zone Bramblepoint Cave
- 2 doors (at D and E) lead to the zone Deep Bramblepoint Cave
Zone 3: Deep Bramblepoint Cave[edit]
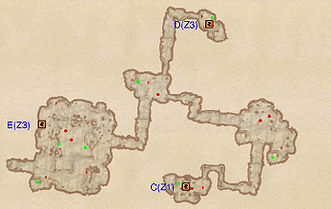
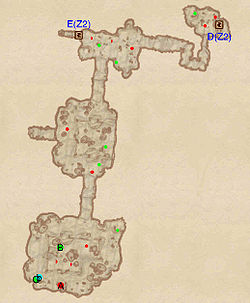
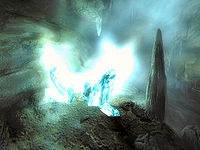
Depending on which route you chose in the previous zone, you may enter this one from door E or door D. If you chose the recommended path, turn right from the first room; if you chose the other, follow the tunnel and then head left. In the next large room you enter, try and fight the two enemies one at a time, as one tends to wander around the entrance to the tunnel on the other side. The last room can be quite challenging: you may find yourself fighting with up to three enemies and the boss-level monster (A), so try dealing with them separately. Next to the boss you will find a bedroll (b) to rest, the chest (Q) containing the notes needed for the related quest, and the natural crystal formations that have Lithnilian so excited.
Occupants:
- 1 boss-level Monster at location A on map
- 6-10 Monster Enemies (each 80% probability Monster, 20% Rat)
Treasure:
- 1 Chest containing Lithnilian's Research Notes, 10% chance enchanted weapon at location Q on map
- 1 boss-level Chest (Necromancer variety; locked) at B
- 2 Chests 01
- 2 Chests 02 (1 locked)
- 2 Chests 03
- The following plants will always be found: 3 Cairn Bolete plants and 5 Wisp Stalk plants
Doors and Gates:
- There are two doors (at D and E) in/out of this zone, both leading to the zone Inner Bramblepoint Cave
Other:
- 1 bedroll at location b on map
