Oblivion:Fort Redman
|
|||
|---|---|---|---|
| # of Zones | 2 | ||
| Occupants | |||
| Vampires (1 boss-level Vampire) |
|||
| Important Treasure | |||
| 1 boss-level Chest | |||
| Console Location Code(s) | |||
| FortRedmanExterior, FortRedman01, FortRedman02 | |||
| Region | |||
| Blackwood | |||
| Location | |||
| North of Leyawiin, on the east bank of the Lower Niben | |||
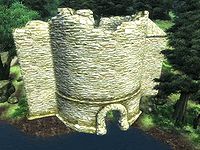
Fort Redman is a medium-sized fort between Bravil and Leyawiin containing vampires. It contains two zones: Fort Redman and Fort Redman Hall of Judges.
Related Quests[edit]
- Final Justice: Beneath an Old Bridge lies the next drop, requesting judgment on a known psychotic.
- A Matter of Honor: Alval Uvani, a traveling Dunmer merchant skilled in Destruction, makes a perfect target for a forest ambush.
Notes[edit]
- In the first zone, there is a giant skull that may be of interest to collectors. It is located behind a statue on a ledge that can be accessed after returning from the second zone through door D.
- Fort Redman appears in ESO as Fort Redmane.
Exterior[edit]
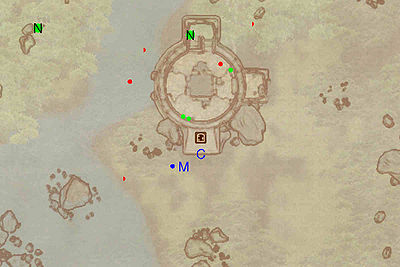
- The exterior is located at coordinates: Tamriel 22, -25
- This location's map marker (M on map) is named Fort Redman (editor name FortRedmanMapMarker). The entrance door is NE of the marker, 40 feet away.
- 1 Melee campsite Bandit is near the entrance
- 0-2 Mud Crabs are near the entrance
- 2 Nirnroots are at locations N on map
- 1 Chest 02 is near the entrance
- 1 Jewelry Box (contains 1-3 unenchanted jewelry, 10% chance enchanted jewelry, 25% potion; non-respawning) is near the entrance
- 1 Wilderness Chest 01 (non-respawning) is near the entrance
- The coffin at the entrance ends Final Justice and starts A Matter of Honor.
Zone 1: Fort Redman[edit]
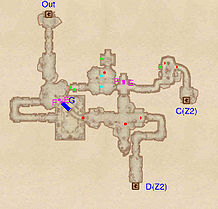
Fort Redman contains some vampire opposition but the chests inside make it worth exploring. Upon entering, head through a short passageway to find yourself in a large room with a drawbridge (G) that conveniently lowers upon your arrival. Ignore the path to the right as it only leads to the flooded lower level of the room where no treasure can be found. Instead, head left across the drawbridge guarded by a nearby foe; watch out for the Pressure Plate at E that activates a Swinging Mace trap (F). After crossing the bridge, you will find yourself in a chamber guarded by at least one foe. After taking care of the opposition, you will have three paths to choose from. Without a very high Acrobatics skill, you will not be able to currently reach the path to the east which leads to door D and the next zone, but it will serve as a quick exit later on. The path to the south is a dead end, so head north; do not go too far north or you will activate a Pressure Plate at E that will cause you to get hit by a Swinging Mace (F). At the intersection, turn left to find yourself in a small room guarded by one enemy; take care of this foe and loot the locked chest in the northern room and the two chests in the western room. Once you have obtained the minor loot from all these chests, backtrack to the intersection and proceed east through a tunnel to reach a crypt area guarded by up to two foes; be sure to search the last coffin on your left as it contains some loot. Locate door C and enter it to reach the next zone, Fort Redman Hall of Judges.
Occupants:
- 0-2 Vampire Beasts (level-dependent Rat, Wolf, or Timber Wolf)
- 2 Vampires
- 1-2 Nuisance Animals
Treasure:
- 2 Chests 01 (1 locked)
- 1 Chest 03
- 1 Coffin 01
- The following weapons will always be found: 1 Steel Dagger
Traps:
- 2 Pressure Plate triggers at locations E on map
- 2 Swinging Mace traps at F
Doors and Gates:
- There are three doors in/out of this zone
- 1 door (at Out) leads outside
- 2 doors (at C and D) lead out of dungeon to Fort Redman Hall of Judges and Fort Redman Hall of Judges
- 1 Drawbridge (initially raised) at G
Zone 2: Fort Redman Hall of Judges[edit]
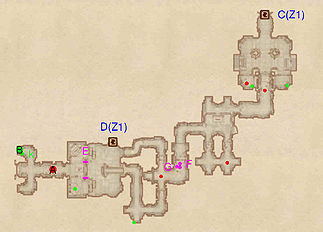
This zone primarily consists of narrow passageways, so using some stealth is recommended as it can allow you to obtain some powerful sneak attacks on your foes. Upon entry, you will find yourself in a fairly large room guarded by a nearby foe. After taking care of this enemy, loot the two chests in the room; both contain minor loot but the chest in the southeast corner is locked. Proceed forward into a narrow hallway where you will shortly meet another foe; take care of this foe and proceed forward into a small room with a coffin in the center. If you want to fight another foe, head left and up the steps to the south. Otherwise, you will want to continue through the narrow halls by heading west; watch out for the Pressure Plate at F that will activate two Swinging Maces (G). After passing this trap, you will reach an intersection; it is advisable to head south as this path contains a locked minor loot chest and will take you to the upper part of the next room, providing an excellent vantage point for ranged attacks. Once you take care of the boss-level vampire (A) or if you prefer the more direct route, jump down from the upper level and climb up the southern set of steps, avoiding the Darts trap at E. Once you reach the top of the steps, loot the coffin in the southern part of the room and proceed forward to reach an intersection; head right to find a boss-level chest at B and another chest at k containing the Fort Redman key. Once you have looted these chests, backtrack to the previous room and locate door D and unlock it with the key you just found to head back into Fort Redman.
Occupants:
- 1 boss-level Vampire (50% chance Vampire Matriarch, 50% chance Vampire Patriarch) at location A on map
- 2 Vampire Beasts (level-dependent Rat, Wolf, or Timber Wolf)
- 2 Vampires
Treasure:
- 1 boss-level Chest (Vampire variety) at location B on map
- 1 Chest (contains Fort Redman Key, 25% chance soul gem) at k
- 1 Chest 01 (locked)
- 2 Chests 02 (1 locked)
- 1 Coffin 02
- The following weapons will always be found: 1 Fine Steel Dagger
Traps:
- 2 Darts traps at location E on map
- 1 Pressure Plate trigger at F
- 2 Swinging Mace traps at G
Doors and Gates:
- There are two doors (at C and D) in/out of this zone, both leading to the zone Fort Redman (locked, opened by Fort Redman Key)


