Oblivion:Hame
|
|||
|---|---|---|---|
| # of Zones | 3 | ||
| # of Welkynd Stones | 24 | ||
| # of Varla Stones | 1 | ||
| Occupants | |||
| Necromancers, Undead (1 boss-level Necromancer) |
|||
| Important Treasure | |||
| 2 boss-level Ayleid Reliquaries | |||
| Console Location Code(s) | |||
| HameExterior, Hame, Hame02, Hame03 | |||
| Region | |||
| Nibenay Basin | |||
| Location | |||
| North of the source of the Silverfish River; east of the Reed River and Fort Facian; southeast of Boethia's Shrine | |||
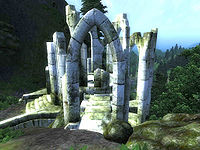
Hame is a medium-sized Ayleid ruin southeast of Cheydinhal containing necromancers. It contains three zones: Hame, Hame Wendesel, and Hame Silasel.
Notes[edit]
- This dungeon has a key, Hame Dungeon Key, hidden on the lowermost level of the dungeon. Until you find that key, there are sections of all zones that are inaccessible.
- Unlike most undead dungeons, which have a random mix of bones, ethereal, and zombie undead, some of this dungeon's undead are always guaranteed to be of specific types.
Bugs[edit]
- One of the Welkynd Stones in the second zone is far outside the accessible area.
The Unofficial Oblivion Patch fixes this bug.
Exterior[edit]
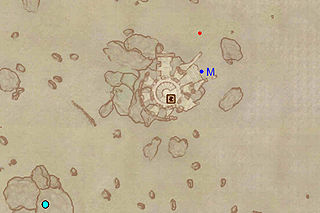
- The exterior is located at coordinates: Tamriel 40, 8
- This location's map marker (M on map) is named Hame (editor name HameMapMarker). The entrance door is SW of the marker, 50 feet away.
- 1 Wilderness Creature (Mountains variety) is near the entrance
- The following plants can be found near the entrance: 1 Motherwort plant and 20 Tinder Polypore plants
- 1 Oblivion Gate may appear at location O on map
- Getting to Hame can be tricky since it is surrounded by slopes and mountains. You may need to cut sideways across the mountain until you find some gentler slopes to ascend.
Zone 1: Hame[edit]
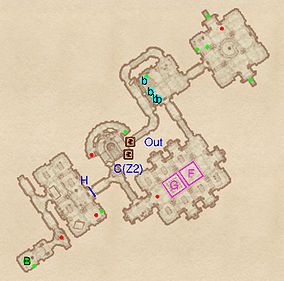
You enter this zone through the front door (Out) and work your way to door C for access to the second zone.
In the first room you enter you will find one bed (b), three bedrolls (also at b) and some non-random loot. If you go northeast (the passage furthest from the bedrolls) you will enter a chamber with an enemy and four minor loot chests: be sure not to miss the Ayleid Cask in a niche on the right side of the chamber. To the southeast is the way to door C. Along the way, watch out for one Spike Pit trap (G) and one Ceiling Spike trap (F) — which can possibly be used to your advantage in fighting the necromancer at the far end of the room.
On your first time through, you will be unable to open gate H. However, be sure to open the gate on your way back, after obtaining the Hame Dungeon Key in the third zone. Behind the gate is a boss-level Ayleid Reliquary (B), plus two standard variety chests.
Occupants:
- 2 Necromancers
- 2 Bones Undead (both in the section behind gate H)
- 1 Zombie (always standard, low-level zombie)
Treasure:
- 1 boss-level Ayleid Reliquary (Necromancer variety; locked) at location B on map
- 1 Ayleid Cask 01
- 1 Ayleid Cask 02 (locked)
- 1 Chest 01 (locked)
- 1 Chest 02
- 1 Chest 03
- 2 Restoration Ayleid Chests
- 1 Restoration Chest
- 6 Welkynd Stones (all of which are mounted on elevated pedestals in the central trap room)
- The following weapons will always be found: 1 Silver Dagger
Traps:
- 1 Spike Pit trap at location G on map
- 1 Ceiling Spikes trap at F
Doors and Gates:
- There are two doors in/out of this zone
- 1 door (at Out) leads outside
- 1 door (at C) leads to the zone Hame Wendesel
- 1 Gate at H (locked, key required, opened by Hame Dungeon Key, found in the third zone)
Other:
- 1 bed at location b on map
- 3 bedrolls at b
Zone 2: Hame Wendesel[edit]
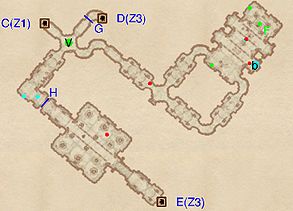
You enter from the first zone through door C. You need to head to door E to reach the third zone; door D is only accessible after you have been to the third zone (until then, access to the door is blocked by the locked gate at G). While here, you will want to grab the varla stone (V); the activation switch is on the far wall of the corridor to your right.
At the beginning of this level is an intersection: forwards leads you to a chamber with two enemies, a bedroll (b), a full set of Novice Alchemy equipment, four Welkynd Stones and some other non-random loot. If you turn right you will come to a chamber with an enemy and five Welkynd Stones (see Treasure section) that will lead you to door E.
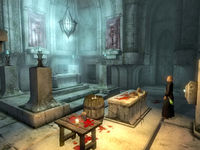
The northeast chamber contains quite a few oddities: on a small altar in front of the main one is a headless corpse; to the right is another table with the corpse's head (which can only be grabbed). In a barrel next to the table is a Silver Warhammer.
One obstacle in this zone is gate H. If you tend to compulsively activate every push block you see, this gate is likely to end up closed and apparently inoperable. The trick in that case is to work your way back to the northeastern room, where there is a push block near F that you previously activated; activate it one more time.
Occupants:
- 3 Necromancers
- 1 Undead
Treasure:
- 1 Varla Stone (in a Varla Stone Cage) at location V on map. The cage is opened using the Push Block (cyan dot on map) mounted on the wall at the end of the corridor leading southwest from the cage.
- 1 Chest 01 (locked)
- 1 Restoration Ayleid Chest
- 9 Welkynd Stones (4 are on pedestals near F, 4 are on pedestals in the last room before door E, the final one is on the floor in the west corner of the same room)
- The following alchemy equipment will always be found: 1 Novice Alembic, 2 Novice Calcinators, 2 Novice Mortar & Pestles, and 1 Novice Retort
- The other following items will always be found: 2 empty lesser soul gems, 1 empty petty soul gem, 1 Bonemeal, and 1 Silver Warhammer
- Some of the above items are clustered at the altar in location F: 1 Bonemeal sample, 1 Novice Calcinator, 2 Novice Mortar & Pestles, 2 empty lesser soul gems, and 1 empty petty soul gem. The Silver Warhammer is near the altar in an open barrel.
Doors and Gates:
- There are three doors in/out of this zone
- 1 door (at C) leads to the zone Hame
- 2 doors (at D and E) lead to the zone Hame Silasel
- 1 Gate at G (locked, key required, opened by Hame Dungeon Key)
- 1 Iron Gate at H. It will be activated once (but only once) when you first step on the pressure plate in front of it (cyan dot on map). It is also controlled by a Push Block found on the back of a column near F (the cyan dot for this push block is obscured under a red dot for the necromancer also found in that location). If you have used the Push Block (in other words, if stepping on the pressure plate closes the gate or does nothing), you need to go back and activate the Push Block one more time.
Other:
- 1 bedroll at location b on map
Zone 3: Hame Silasel[edit]
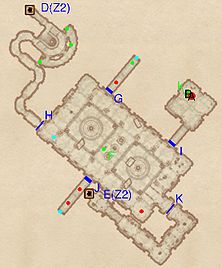
This is an unusually tricky zone. You are forced to enter through door E. But as soon as you enter the main room, gate K closes shut behind you. Exploration reveals that the other gate out of the room (H) is locked and requires a key. To open gate H (and get to the exit door at D), you need to find the key, except it is not in the main room.
To find the key, you need to activate a series of push blocks, each of which opens one hidden door (and reveals the next push block in the sequence):
- The first push block is on the wall opposite the exit gate (H), which opens door G in the northeast corner of the room, releasing one enemy.
- The second push block is at the end of the corridor behind door G. This block opens door J in the middle of the main room's southwest wall, releasing two enemies
- The third push block is at the end of the corridor behind door J. This block opens door I in the southeast corner of the main room.
Door I leads to the room with the boss-level Necromancer Adept (A), the boss-level Ayleid Reliquary (B), and the key (k). You may want to draw the boss out of his room instead of charging in and fighting him/her: fighting in the boss' room can cause the critical key to get knocked out of place, making it far more difficult to find it.
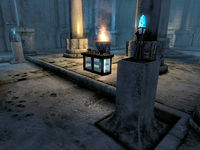
This level also contains some oddities. Similar to Wendesel, there is an iron claymore in an open barrel. In the middle of the final chamber is a small, chapel-like altar which is in flames. Next to it are two Mages Guild like counters which contain some novice alchemy equipment. Finally, another out-of-place piece of furniture, a bookshelf with some non-random loot, can be found in the northeast corner.
With key in hand, you can now escape through gate H. Don't forget to loot the dungeon's other boss chest as you return through the first zone.
Occupants:
- 1 boss-level Necromancer at location A on map
- 2 Bones Undead
- 1 Ethereal Undead
- 1 Zombie Undead (always best possible level)
Treasure:
- 1 boss-level Ayleid Reliquary (Necromancer variety; locked) at location B on map
- 1 Chest 01 (locked)
- 1 Chest 03
- 2 Chests 04
- 2 Counters (each contain 1-3 pieces of novice alchemy apparatus)
- Hame Dungeon Key at k (near A and B on the map). It is initially sitting on a crate on top of a copy of the Manual of Spellcraft, but it can easily get knocked elsewhere. This is the all-important key that releases you from this zone (opens gate H) and also opens one gate in each of the other zones.
- 9 Welkynd Stones (8 are on pedestals in the main room, the final one is on the floor near gate K)
- The following alchemy equipment will always be found: 1 Novice Alembic, 2 Novice Calcinators, 3 Novice Mortar & Pestles, and 2 Novice Retorts
- The other following items will always be found: 1 Flawed Pearl, 1 Flawed Topaz, 1 Iron Claymore, and 1 Iron Dagger
- Some of the above items are clustered at location F: 2 Counters (actually two halves of one piece of furniture), 1 Novice Alembic, 2 Novice Calcinators, 3 Novice Mortar & Pestles, and 2 Novice Retorts
Doors and Gates:
- There are two doors (at D and E) in/out of this zone, both leading to the zone Hame Wendesel
- 1 Gate at H (locked, key required, opened by Hame Dungeon Key)
- 3 Hidden Doors at G, I, and J:
- G is opened by the push block (cyan dot) that is out in the open, near gate H
- J is opened by the push block (cyan dot) hidden in the corridor behind door G
- I is opened by the push block (cyan dot) hidden in the corridor behind door J
- 1 Iron Gate (initially open) at K. This gate closes behind you as soon as you walk through it. It is possible, though, to get trapped in the newly-sealed-up space between here and Wendesel gate H, located through the connecting corridor in Hame Wendesel. This could happen when backpedaling or when paying Hame a second visit with its key already in-hand. To escape, camp out for 72 hours in the Wendesel portion of your prison to reset the Silasel gate, K.
