Oblivion:Moranda
|
|||
|---|---|---|---|
| # of Zones | 3 | ||
| # of Welkynd Stones | 16 | ||
| # of Varla Stones | 2 | ||
| Occupants | |||
| Monster Enemies | |||
| Important Treasure | |||
| 1 Ayleid Statue 1 boss-level Ayleid Coffer 1 boss-level Ayleid Reliquary |
|||
| Console Location Code(s) | |||
| MorandaExterior, Moranda, Moranda02, Moranda03 | |||
| Region | |||
| Great Forest | |||
| Location | |||
| North of the Orange Road, roughly halfway between Chorrol and Bruma | |||
Moranda is a medium-sized Ayleid ruin between Chorrol and Bruma containing monsters (quest-related). It contains three zones: Moranda, Moranda Aratasel, and Moranda Abaspania.
Related Quests[edit]
- The Collector: Help Umbacano, a collector of ancient artifacts, recover the "Ten Ancestors", a set of ancient Ayleid statues.
Notes[edit]
- This ruin can be entered, fully explored and all items retrieved without starting the related quest. Selling the Ayleid Statue found in Moranda is one way to start the quest.
- Moranda is not marked on the maps in some editions of the Official Strategy Guide.
- Moranda also appeared in ESO.
Exterior[edit]
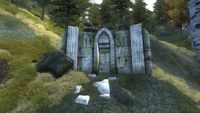
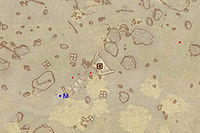
- The exterior is located at coordinates: Tamriel -6, 30
- This location's map marker (M on map) is named Moranda (editor name MorandaMapMarker). The entrance door is NE of the marker, 100 feet away.
- 0-2 Monsters are near the entrance
- 1 chest is above the entrance
- 1 Wilderness Creature (Forested Mountains variety) is near the entrance
- The following plants can be found near the entrance: 80 Bergamot plants, 11 Clouded Funnel Cap plants, 12 Green Stain Cup plants, 10 Monkshood plants, 6 Motherwort plants, 6 Steel-Blue Entoloma plants, and 2 Viper's Bugloss plants
Zone 1: Moranda[edit]
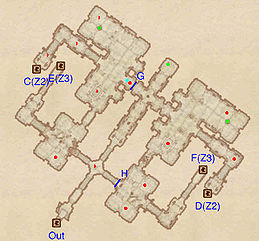
This zone is quite complex, with a considerable number of intersects and looping corridors. More than half of this zone is initially inaccessible: the whole north and western half can only be reached from Moranda Aratasel; while the southeastern portion is more easily reached from Moranda Abaspania.
You enter from door Out and are immediately faced with an intersect. The left passage, leading to the western half of the ruin, is blocked by a cave-in. To the right you can access the southeastern section (through a Hard-locked gate at H). The key can be found in Moranda Abaspania and it is therefore advisable to explore this portion later; since it only contains two enemies and can be used as a fast-track back from that zone.
Your best option is to continue straight ahead, where you will find yet another intersect: to left, the access to the northern area is again blocked, this time by the gate at G. This gate is opened by a pressure plate (cyan dot on map) which is unfortunately located on the other side. Straight ahead is a dead-end with an Ayleid Cask. To the right, in the large room, the next corridor leading to the southeastern portion has again caved in and you can only take the stairs up to door D for Moranda Aratasel.
The northern section can be accessed from door C from the second zone of this ruin and only contains a few enemies and a minor loot chest; its two main functions being that you can access Moranda Abaspania through door E and remove the gate at G, providing easy access back to the exit.
Occupants:
Treasure:
- 1 Ayleid Cask 01
- 2 Ayleid Casks 02 (1 locked)
Doors and Gates:
- There are five doors in/out of this zone
- 1 door (at Out) leads outside
- 2 doors (at C and D) lead to the zone Moranda Aratasel
- 2 doors (at E and F) lead to the zone Moranda Abaspania
- 1 Gate at H (locked, hard lock, opened by Moranda Gate Key)
- 1 Iron Gate (opened remotely) at G
Zone 2: Moranda Aratasel[edit]
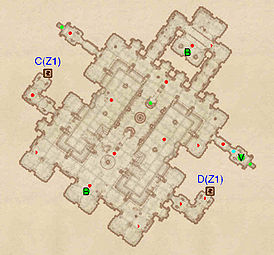
This zone mainly consists of one, large chamber with a series of short corridors departing from its sides. There are two levels in this chamber, and you start off on the lower one. The higher one can be easily reached by using the stairs in front of you.
The enemies in this chamber are quite scattered but when fighting one it is possible for others to be alerted to your presence. It is therefore advisable to attack each enemy separately, stealth being quite useful.
This chamber also contains all of the Welkynd Stones of this ruin, which are located around the higher level of the room. A boss chest (B) can be found inside a column in the southeastern side and a minor loot one is well hidden in the shadow of one of the columns in the middle of the room.
Four corridors depart from this room: the one in the northwest contains an enemy and a minor loot chest and the one departing from the eastern side contains a Varla Stone; its cage activated by the pressure plate (cyan dot on map) in front of it. The other two corridors in the northern part of the room both lead to the room containing another boss chest (B).
You will have to go down in the lower level on the western side to reach door C, which leads to Moranda 's northern section.
Occupants:
Treasure:
- 1 boss-level Ayleid Coffer (Monster variety) at location B on map
- 1 boss-level Ayleid Reliquary (Monster variety; locked) at B
- 1 Varla Stone (in a Varla Stone Cage) at V
- 1 Ayleid Cask 01
- 1 Ayleid Cask 02 (locked)
- 1 Chest 03
- 16 Welkynd Stones, all conveniently located on easily accessible pedestals around the higher level of the large chamber
Doors and Gates:
- There are two doors (at C and D) in/out of this zone, both leading to the zone Moranda
Zone 3: Moranda Abaspania[edit]
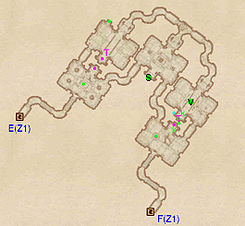
Similar to the first zone, this one is also quite complex, with a good deal of winding corridors. However, this level is also perfectly symmetrical, which means that, which ever way you go, you eventually end up in the same place. Depending on your progress in Moranda, you can enter from either door E or F.
In the room from door E is a minor loot chest and a Gas Trap at T. Most of the rooms in this zone have gas traps and a halo of green engulfs most of the level. Follow the looping corridors until you enter the middle room, where, in an alcove, is Ayleid Statue (S) needed for the related quest.
The next room contains a Varla Stone (V) whose cage is opened by the block (cyan dot on the map) found inside an alcove that also contains a minor loot chest (k). Inside is the key to open the gate in Moranda 's southeastern section.
Treasure:
- 1 Ayleid Statue at location S on map
- 1 Varla Stone (in a Varla Stone Cage) at V
- 2 Ayleid Casks (contains Moranda Gate Key and two potions; non-respawning) at k
- 2 Restoration Ayleid Chests
- 1 Restoration Chest
Traps:
- 3 Gas traps at locations T on map
Doors and Gates:
- There are two doors (at E and F) in/out of this zone, both leading to the zone Moranda
