Oblivion:Nornalhorst
|
|||
|---|---|---|---|
| # of Zones | 2 | ||
| # of Welkynd Stones | 34 | ||
| # of Varla Stones | 2 | ||
| Occupants | |||
| Vampires, Bones Undead (2 boss-level Vampires) |
|||
| Important Treasure | |||
| 1 boss-level Ayleid Coffer 1 boss-level Coffin |
|||
| Console Location Code(s) | |||
| NornalhorstExterior, Nornalhorst, Nornalhorst02 | |||
| Region | |||
| West Weald | |||
| Location | |||
| South of Greenmead Cave, east from Skingrad | |||
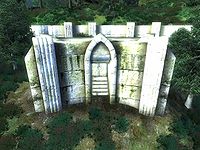
Nornalhorst is a medium-sized Ayleid ruin east of Skingrad containing vampires. It contains two zones: Nornalhorst and Nornalhorst Sel Gandrevla.
Exterior[edit]
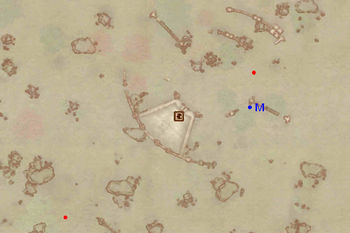
- The exterior is located at coordinates: Tamriel -6, -1
- This location's map marker (M on map) is named Nornalhorst (editor name NornalhorstMapMarker). The entrance door is W of the marker, 80 feet away.
- 2 Wilderness Creatures (Forest variety) are near the entrance.
- 1 chest is above the entrance (on the roof).
- The following plants can be found near the entrance: 12 Alkanet plants, 2 Bergamot plants, 5 Columbine plants, 2 Dragon's Tongue plants, 4 Emetic Russula plants, 28 Flax plants, 1 Fly Amanita plant, 10 Lady's Smock plants, 13 Motherwort plants, 4 Nightshade plants, 2 Peony plants, and 11 Viper's Bugloss plants
Zone 1: Nornalhorst[edit]
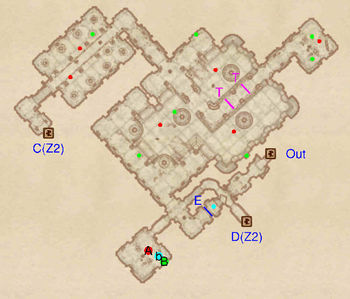
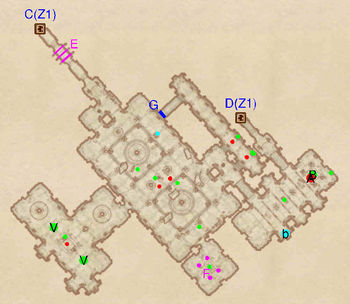
Make your way down the stairs and step onto the press plate to open the iron gate at G. You may notice a raised corridor above you, and you may be detected by the boss vampire at A, although it is unlikely to be able to reach you just yet. The boss area can only be accessed from the next zone (door D) and holds a boss chest (B) and a stone bed (b).
If you press on you will find yourself in the upper section of a large, two-level room, from where you can snipe at the three enemies below. In this first section there are four Welkynd stones on easily accessible pedestals and a minor loot chest, while the lower level houses two minor loot chests. Once you've crossed the lower section, head up the stairs to find yet another minor loot chest and three more Welkynd stones laying near their pedestals. Head across the causeway; be careful of the falling blades at T. You arrive in a small room with two minor loot chests, a bottle of Surilie Brothers wine, an iron dagger and a bread loaf, all guarded by a vampire enemy.
Backtrack across the causeway and this time head down the corridor. You will arrive in a lengthy room where a minor loot chest and eight Welkynd stones on easily-accessible pedestals are guarded by two enemies. Dispatch them and enter Sel Gandrevla via door C.
Occupants:
- 1 boss-level Vampire (50% chance Vampire Matriarch, 50% chance Vampire Patriarch) at location A on map
- 1 Vampire
- 5 Vampire Enemies (each 50% probability Vampire, 33% Undead, 17% Vampire Beast)
Treasure:
- 1 boss-level Ayleid Coffer (Vampire variety; locked) at location B on map
- 2 Ayleid Casks 01
- 2 Ayleid Casks 02 (1 locked)
- 2 Coffins 02
- 1 Restoration Ayleid Chest
- 16 Welkynd Stones
- The following weapons will always be found: 1 Bread Loaf and 1 Iron Dagger
- The following drinks will always be found: 1 Surilie Brothers Wine bottle
Traps:
- 2 Falling Blade traps at locations T on map
Doors and Gates:
- There are three doors in/out of this zone
- 1 door (at Out) leads outside
- 2 doors (at C and D) lead to the zone Nornalhorst Sel Gandrevla
- 1 Iron Gate (opened remotely) at E
Other:
- 1 sleeping slab at location b on map
Zone 2: Nornalhorst Sel Gandrevla[edit]
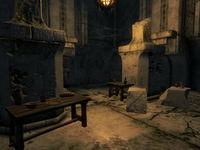
Upon emerging from door C, negotiate the swinging blades at E and you arrive at what is the central room of this zone. It hosts two vampire enemies, four minor loot chests and ten Welkynd stones, the majority of which have fallen off their pedestals. Right at the back is an area with a fallen Welkynd stone, a table (upon which sit an iron dagger and a bottle of Surilie Brothers wine) and the entrance to a small room with a minor loot chest set within a gas trap (F).
From the center of the room, head southwest to enter the room beyond. It holds a minor loot chest, two easily-accessible Varla stones and three Welkynd stones high-up on pedestals. They are guarded by a single enemy. Return to the previous room and find the press button (light blue dot on map) that activates the secret door G. This gives you access to a corridor with two enemies guarding three minor loot chests.
Finally, return to the room and use either of the two metal gates to the northeast to access the boss room. Here a boss vampire (A) guards the boss chest (B), two minor loot chests and four easily-reached Welkynd stones. A bedroll (b) is also nearby. Head back to the previous zone via door D for access to that zone's boss area and for a quicker exit.
Occupants:
- 1 boss-level Vampire (50% chance Vampire Matriarch, 50% chance Vampire Patriarch) at location A on map
- 2 Vampires
- 1 Vampire Enemy (each 50% probability Vampire, 33% Undead, 17% Vampire Beast)
- 2 Bones Undead
Treasure:
- 1 boss-level Coffin (Vampire variety) at location B on map
- 2 Varla Stones at V
- 3 Ayleid Casks 01 (1 locked)
- 1 Ayleid Cask 02 (locked)
- 1 Chest 02 (locked)
- 1 Chest 03
- 1 Chest 04
- 2 Coffins 01
- 1 Coffin 02
- 1 Restoration Ayleid Chest
- 18 Welkynd Stones
- The following weapons will always be found: 1 Iron Dagger
- The following drinks will always be found: 1 Surilie Brothers Wine bottle
Traps:
- 4 Gas traps at location F on map
- 3 Swinging Blade traps at E
Doors and Gates:
- There are two doors (at C and D) in/out of this zone, both leading to the zone Nornalhorst
- 1 Hidden Door at G
Other:
- 1 bedroll at location b on map
