Oblivion:Temple of the Ancestor Moths (dungeon)
| This article could benefit from an image of: interior imagery See Help:Images for information on how to upload images. Please remove this template from the page when finished. |
|
||
|---|---|---|
| # of Zones | 5 | |
| Occupants | ||
| Blind Moth Priests, Undead (3 Blind Moth Prelates) |
||
| Important Treasure | ||
| 1 Savilla's Stone | ||
| Console Location Code(s) | ||
| TempleOfTheAncestorMothExterior02, TempleOfTheAncestorMothCrypt, TempleMothCatacombs, TempleMothCatacombs02, TempleMothCatacombs03, TempleMothCatacombs04 | ||
| Region | ||
| Jerall Mountains | ||
| Location | ||
| Far north of Cheydinhal | ||
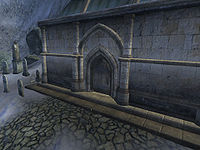
The Temple of the Ancestor Moths is a large cave north of Cheydinhal (quest-related). It contains five zones: Ancestor Moth Crypt, The Temple of The Moth Halls, Catacombs of The Temple of The Moth, The Caverns of The Moth, and Shrine of The Moth.
Related Quests[edit]
- Turning a Blind Eye: Steal a stone for the Gray Fox.
Notes[edit]
- This cave contains 21 Cairn Bolete plants and 67 Wisp Stalk plants.
Bugs[edit]
- If you open door D in The Temple of The Moth Halls before starting the Turning a Blind Eye quest it will execute the command
SetStage TG08Blind 6, starting the quest prematurely. As a result, the next time you talk to Methredhel she will give you a message assigning you the quest, whether or not you are in the Thieves Guild.The Unofficial Oblivion Patch fixes this bug.
- If you are not in the Thieves Guild when this quest has started you will not be able to receive further detail from the Gray Fox; all he will say is "Don't you have something to do?" and close the conversation.
- It is not recommended to proceed to complete the Thieves Guild quest line this way, as it can cause a major bug and freeze your game at the end of The Ultimate Heist quest; see that quest's bugs for details.
Exterior[edit]
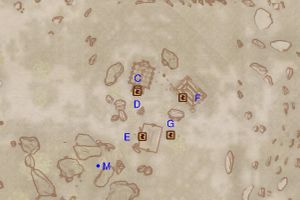
- The exterior is located at coordinates: Tamriel 29, 35
- This location's map marker (M on map) is named Temple of the Ancestor Moths (editor name TempleoftheAncestorMothMapMarker). The entrance door is ENE of the marker, 110 feet away.
- The following plants can be found near the entrance: 11 Clouded Funnel Cap plants, 3 Milk Thistle plants, 2 Motherwort plants, and 1 Wormwood plant
Zone 1: Ancestor Moth Crypt[edit]
The Crypt merely functions as the gateway to the secret catacombs, home of the retired Blind Moth Priests; it contains little of interest except for a barrel with a few torches, an inactive altar and a roll of cloth. During the related quest, Brother Holger can be persuaded to unlock both the entrance and door C, leading to the zone The Temple of The Moth Halls.
Doors and Gates:
- There are two doors in/out of this zone
- 1 door (at Out) leads outside
- 1 door (at C) leads to the zone The Temple of The Moth Halls (locked, opened by Ancestor Moth Temple)
Zone 2: The Temple of The Moth Halls[edit]
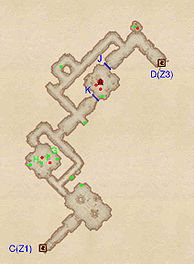
The Moth Halls functions as the dining and work areas for the Blind Moth Priests and is completely covered in darkness. This is where they manufacture rolls of cloth spun from the silk harvested from the Ancestor Moths, often praying in the very first room of the zone. Upon entering from door C, a hallway leads down to the first room, where up to two priests can be found praying; they will protect the Moths at all costs and attack you, so make sure to go into sneak mode before proceeding. Go through to wooden door and make a choice at the intersection; the door straight ahead leads to the dining area with plenty of food and a potion chest, but also the chance of more priests, depending on the time of day; regardless of your choice you will end up in another tunnel leading north. The next intersection presents you with a similar choice; the locked door straight ahead leads to the working area where a Blind Moth Prelate resides at A, while the tunnel to the left provides a workaround and access to a better loot chest (green dot on map) than that in the working area. Avoid or kill the unique rat residing in the tunnels, and proceed forward, claim the contents of the chest inside the broken wall, then enter the next zone, Catacombs of The Temple of The Moth, through the locked door at D.
Occupants:
- 1 Blind Moth Prelate at location A on map
- 4 Blind Moth Priests
- 1 Rat (location-specific variety; non-respawning)
Treasure:
- 3 Chests 01
- 2 Chests 02
- 1 Chest 03
- 1 Chest 04
- The following books will always be found: 3 The Argonian Account, Book 2
- The following ingredients will always be found: 2 Bread Loaves, 2 Leeks, 4 Lettuces, 13 Potatoes, and 2 Pumpkins
- The following plants will always be found: 3 Cairn Bolete plants and 8 Wisp Stalk plants
- Some of the above items are clustered at the following locations:
- At G: 1 Leek and 3 Potatoes
- At H: 2 Bread Loaves, 2 Lettuces, 7 Potatoes, and 1 Pumpkin
- At I: 1 Leek and 3 Potatoes
Doors and Gates:
- There are two doors in/out of this zone
- 1 door (at C) leads to the zone Ancestor Moth Crypt
- 1 door (at D) leads to the zone Catacombs of The Temple of The Moth (locked, opened by Catacombs Key)
- 2 Old Wooden Doors at J and K (both locked, opened by Ancestor Moth Key)
Zone 3: Catacombs of The Temple of The Moth[edit]
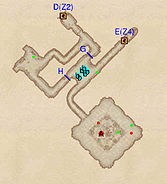
The Catacombs are where the Moths are bred and also functions as the sleeping area for the residing priests and prelates. Upon entering from The Temple of The Moth Halls through door D you are immediately faced with an intersection; continuing straight ahead will bring you near to the locked wooden door at G, while taking the right tunnel will lead you through a storage room with various foods, a chest with potions and access to the locked door at H. Regardless of your choice, you will end up in the sleeping area (b) of the priests and access to a minor loot chest. While optional, the southeastern tunnel leads to the breeding spot of the Moths; the insects are buzzing above a concentration of Cairn Bolete plants and Wisp Stalk plants, overseen by a priest and a prelate. The pile of crates hides a chest and provides access to the upper level where another chest rests against the northern wall. Back in the sleeping area, locate the northeastern tunnel leading to door E and use your lockpicking skills or the Catacombs Key to unlock the door to the next zone, The Caverns of The Moth.
Occupants:
- 1 Blind Moth Prelate at location A on map
- 1 Blind Moth Priest
- 1 Rat (location-specific variety; non-respawning)
Treasure:
- 1 Chest 01
- 1 Chest 02
- 1 Chest 03
- 1 Chest 04
- The following plants will always be found: 16 Cairn Bolete plants and 11 Wisp Stalk plants
Doors and Gates:
- There are two doors in/out of this zone
- 1 door (at D) leads to the zone The Temple of The Moth Halls
- 1 door (at E) leads to the zone The Caverns of The Moth (locked, opened by Catacombs Key)
- 2 Old Wooden Doors at G and H (both locked, opened by Ancestor Moth Key)
Other:
- 6 beds at locations b on map
Zone 4: The Caverns of The Moth[edit]
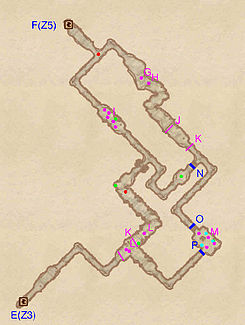
No priest or prelate ever set foot in the Caverns and rightfully so, as it is loaded with traps and functions purely as a passageway to their most guarded treasure, Savilla's Stone. Upon entering from door E, make your way through the narrow tunnel and beware of the tripwire at K, triggering a set of swinging maces (L) just before the first intersection. For the easiest exploration, proceed forward and fight the leveled enemy blocking your path. At the next intersection, take a quick detour to the right and loot the chest near the rock wall at N. Ignore the wall and backtrack to the intersection then take the other path towards a room filled with Spikes (I). Jump over the spikes, loot the chest and proceed to the last intersection and another enemy; pick the left path which leads to door F, the entrance to the last zone, Shrine of the Moth.
Occupants:
- 1 Bones Undead
- 1 Ethereal Undead (always best possible level)
Treasure:
- 1 Chest 01
- 2 Chests 02
- 1 Chest 03
- 1 Chest 04
- The following plants will always be found: 41 Wisp Stalk plants
Traps:
- 1 Falling Log trap at location J on map
- 4 Gas traps at M
- 1 Pressure Plate trigger at H
- 5 Spike Pit traps at I
- 1 Swinging Log trap at G
- 3 Swinging Mace traps at L
- 3 Tripwire triggers at K
Doors and Gates:
- There are two doors in/out of this zone
- 1 door (at E) leads to the zone Catacombs of The Temple of The Moth
- 1 door (at F) leads out of dungeon to Shrine of The Moth (locked, opened by Catacombs Key)
- 1 Rock Wall (initially open; controlled remotely) at P
- 2 Rock Walls (opened remotely) at N and O
Zone 5: Shrine of The Moth[edit]
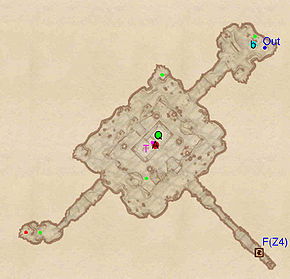
The Shrine is a big underground chamber where the Priests keep Savilla's Stone (Q), and it is guarded by a Blind Moth Prelate at A and a Dark Welkynd Stone (T) that will fire at you as soon as you jump into the lower level near the altars. There are several strategies for grabbing Savilla's Stone (see this section for details). A chest with potions rests in the northwestern corner of the upper level, while a tunnel leads west from the lower level, to a room with a minor loot chest. After claiming the Stone, locate the northern tunnel which leads to a bedroll (b), a few common books and a chest holding the informative Instructions: the Gray Cowl. Finally take the ladder at Out, which will bring you back outside.
Occupants:
- 1 Blind Moth Prelate (carries an enchanted ring or amulet) at location A on map
- 1 Ethereal Undead (always best possible level)
Treasure:
- 1 Savilla's Stone at location Q on map
- 1 Chest 01
- 1 Chest 02
- 1 Chest 03
- 1 Chest 04
- The following plants will always be found: 2 Cairn Bolete plants and 7 Wisp Stalk plants
Traps:
- 1 Dark Welkynd Stone trap at location T on map
Doors and Gates:
- There are two doors in/out of this zone
- 1 door (at Out) leads outside. You emerge at the well behind the monk's quarters. It is one-way, you cannot use it to re-enter the Shrine of the Moth.
- 1 door (at F) leads to the zone The Caverns of The Moth
Other:
- 1 bedroll at location b on map
