Oblivion:The Claw Monolith
| Oblivion Tower: The Claw Monolith |
|
|---|---|
| # of Zones | 5 |
| Important Treasure | |
|
|
| Console Location Code | |
| OblivionRDCitadel03 OblivionRDCitadel03Hall01 OblivionRDCitadel03Hall02 OblivionRDCitadel03Hall03 OblivionRDCitadel03Lord |
|
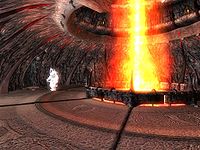
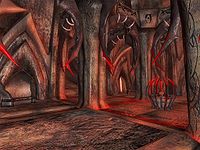
The Claw Monolith is a large Sigil tower, and one of five randomly chosen Sigil Keeps.
This tower can be visited when accessing the Main Tower from Oblivion Worlds 1, 3, 5, 6 or 7. In order to reach the Sigil Stone on top of this tower, you are required to pass through several hallways before reaching the Sigillum Sanguis. There is not loot to be found in the hallways, but there is in main tower section and the Sigillum Sanguis.
Zone 1: The Claw Monolith[edit]
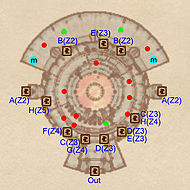
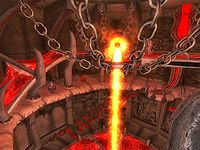
This tower consists of four levels. One ground level and three upper levels. You will have to pass through the open area to reach one of the doors leading to the Rending Halls. At the niche in the back you can find some more Daedra, but also two The Punished and two Magicka Essences.
You can either turn left or right on this level, but you will eventually reach the same point. There are a few Daedra on this level. The two doors to the Dead Halls are right next to each other, but both lead to their opposite ends of those halls.
There is a small balcony right underneath the second level, but it can only be reached via the Dead Halls.
Depending on where you exited the Dead Halls you may be right next to a ramp, or have to walk a bit first. Upstairs the ramp you can find a Daedra and the door to the Corridors of Dark Salvation.
The upper level consists of a long platform with a ramp leading upwards. You will encounter a few Daedra here, before you reach the doors to the Sigillum Sanguis.
Occupants:
- Ground level: 3 Daedra creatures
- First level: 2 Daedra creatures
- Second level: 2 Daedric occupants (Daedra creatures or Dremora)
- Third level: 1 Daedric occupant and 2 Dremora
Treasure:
Traps:
- Falling in the pool of lava in the middle of the ground level will result in instant death.
- Touching the fire pillar in the middle of the room will result in instant death.
Doors and gates:
- There are fifteen doors in/out of this zone
- 1 door (at Out, ground level) leads outside to the Planes of Oblivion
- 2 doors (at A, ground level) lead to Rending Halls
- 2 doors (at B, first level) lead to Rending Halls
- 2 doors (at C, first level) lead to Dead Halls
- 2 doors (at D, balcony) lead to Dead Halls (only reachable via Dead Halls)
- 2 doors (at E, second level) lead to Dead Halls
- 1 door (at F, second level) lead to Corridors of Dark Salvation
- 1 door (at G, third level) lead to Corridors of Dark Salvation
- 2 doors (at H, third level) lead to Sigillum Sanguis
Other:
- 2 Magicka Essences at locations m on map
Zone 2: Rending Halls[edit]
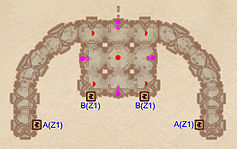
Depending on which you entrance you chose back in The Claw Monolith you are either on the eastern or western end of these Halls. In both cases you need to take the ramp upwards, where you arrive at a room where all the Daedra are. If you're fortunate you will only encounter a few, but up to five Daedra may reside here.
Occupants:
- 1 Dremora
- 0-4 Daedric occupants (Daedra creatures or Dremora)
Traps:
- 4 Citadel Spikes at locations s on map
Doors and gates:
- There are four doors in/out of this zone
- 2 doors (at A) lead to The Claw Monolith, ground level
- 2 doors (at B) lead to The Claw Monolith, first level
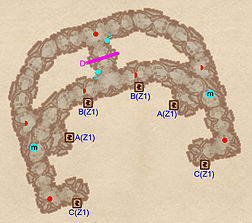
Zone 3: Dead Halls[edit]
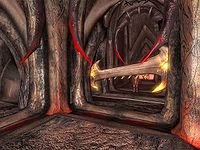
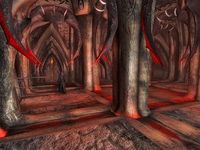
You will start in a small room with a Magicka Essences and possibly one Daedra in it. The ramp that leads upwards brings you to a corridor that is trapped with a Citadel Guillotine. You can try luring the Daedra on the other end to it, and activate the trap with the Claw Lever next to it. After passing the trap you can see two doors that lead to a small dead-end balcony in The Claw Monolith. The detour is certainly worth it, as you will meet no resistance and it brings you to a The Punished. Finally, ascend via one of the ramp left and right of you. They will both lead to a door the next level of the Claw Monolith.
Occupants:
- 3-7 (Daedra creatures or Dremora)
Traps:
- 1 Citadel Guillotine Blade at location D on map
- 2 Claw Levers (activate Citadel Guillotine Blades) at locations s on map
Doors and gates:
- There are six doors in/out of this zone
- 2 doors (at A) lead to The Claw Monolith, first level
- 2 doors (at B) lead to The Claw Monolith, balcony
- 2 doors (at C) lead to The Claw Monolith, second level
Other:
- 2 Magicka Essences at locations m on map
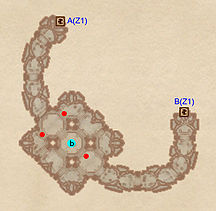
Zone 4: Corridors of Dark Salvation[edit]
The final halls are smaller than the previous two. You only need to ascend a single corridor with a room halfway. You will encounter a few Dremora and a Blood Fountain there.
Occupants:
- 3 Dremora
Doors and gates:
- There are two doors in/out of this zone
- 1 door (at A) leads to The Claw Monolith, second level
- 1 door (at B) leads to The Claw Monolith, third level
Other:
- 1 Blood Fountain at location b on map
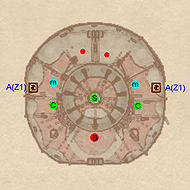
Zone 5: Sigillum Sanguis[edit]
Ascend the ramp and pass through the opening to find yourself in the room that contains the Sigil Stone. You can find two Magicka Essences, two Daedra, two boss-level The Punished on the next level. At the top platform you can find a boss-level Daedra. Be careful if you are sneaking that the Daedra can spot you easier than that you're used to, due to the openness of the area. Once you have reached the top you can grab the Sigil Stone to close the Oblivion Gate.
Occupants:
- 1 boss-level Daedric occupant (Daedra creatures or Dremora) (always best possible level) at location B on map
- 2 Daedric occupants (always best possible level)
Treasure:
- 2 boss-level The Punished at locations C on map
- 1 random Sigil Stone at location S on map
Traps:
- Touching the fire pillar in the middle of the room will result in instant death.
Doors and gates:
- There are two doors in/out of this zone
- 1 door (at A) leads to The Flesh Spire, third level
Other:
- 2 Magicka Essences at locations m on map
