Shivering:Aichan
|
|||
|---|---|---|---|
| # of Zones | 1 | ||
| Occupants | |||
| Grummites, Scalons | |||
| Important Treasure | |||
| 1 Madness Ore Deposit | |||
| Console Location Code(s) | |||
| XPAichanExterior, XPAichan01 | |||
| Region | |||
| Mania | |||
| Location | |||
| On The Laughing Coast, west-northwest of Wretched Camp | |||
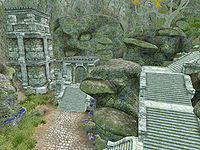
Aichan is a small ruin on The Laughing Coast where the law-breakers of Mania are sent. It contains only one zone, Aichan Prison.
It is a prison guarded by Grummites, similar to Corpserot Passage. This is where the Golden Saints will throw you if you are arrested.
Notes[edit]
- This ruin contains 18 Flame Stalk plants, 3 Screaming Maw plants, 4 Watcher's Eye plants, and 17 Root Stalk plants.
- To get past the doors at K and L you must commit a crime in Bliss then go to jail. You will then appear in the sealed-off section.
Exterior[edit]
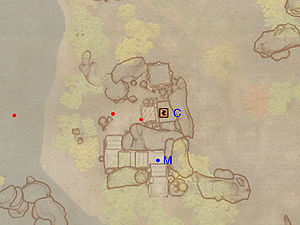
- The exterior is located at coordinates: SEWorld -12, 9
- This location's map marker (M on map) is named Aichan. The entrance door is N of the marker, 60 feet away.
- 2 Grummites (Mania) are near the entrance
- 1 Aquatic Monster (Mania) is near the entrance
- The following plants can be found near the entrance: 8 Alocasia plants, 8 Hydnum Azure plants, and 4 Worm's Head plants
- A bowl-shaped object labeled
0007131acan be seen floating high above the ruin's entrance. Its position is likely an error and its intended purpose is unknown.
Zone 1: Aichan Prison[edit]
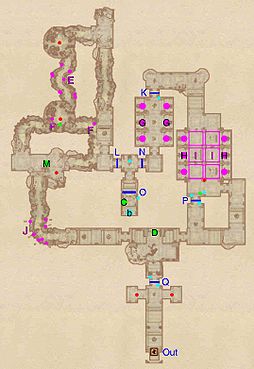
After being arrested by a Golden Saint you will find yourself in a cell near the bedroll at b, stripped of all your weapons and armor. Loot the urn (C) for a weapon and locate the push button that will lower the wall at O. In the next room you will have to decide whether to go through gate L or N, as it will close behind you. Whichever route you take, you will be able to backtrack and claim any loot you may have missed.
Through door L, the path is fairly linear: just make your way through the root tunnel, taking care to avoid the concentrated root worm traps at E, the occasional spore pod trap at F and the once-again concentrated root spikes traps at J. Loot the madness ore deposit at M and prepare for a fight with the prison guard. If you went through door N, the path is again linear. Avoid the fire from the four hunger statues at G and jump across the trapped floors at H. If you do fall down, you will be hit by dart traps (I) and face a grummite; but you will be able to loot an urn.
Before entering the final room, make sure to heal as you are about to face the prison guard. Immediately make a run for the Evidence Chest at D and claim all of your belongings back, making it much easier to dispose of the guard. Once the fight is over, open gate Q by activating the push block nearby (cyan dot on map) and proceed up the stairs to your freedom at Out.
Occupants:
- 2 Envious Grummites
- 1 Grummite (Mania)
- 3 Scalons (at low levels will be a Young Baliwog) (Mania)
- 1 Golden Saint Turnkey
Treasure:
- 1 Madness Ore Deposit (1-4 Madness Ore; non-respawning) at location M on map
- 1 Battered Chest (is actually an urn; contains two weapons) at C
- 1 Chest
- 1 Evidence (chest; non-respawning) at D
- 1 Hollowed Stump (Healing)
- The other following items will always be found: 1 Madness Ore
- The following plants will always be found: 18 Flame Stalk plants, 3 Screaming Maw plants, 4 Watcher's Eye plants, and 17 Root Stalk plants
Traps:
- 11 Root Worm traps at locations E on map
- 2 Spore Pod traps at F
- 6 Hunger Statues (weaker variant of normal Hunger Statue) at G
- 6 Hunger Statue traps (normal variety) at H
- 6 Trapped Floors (drops you down into Dart Traps) at I
- 7 Root Spikes traps at J
Doors and Gates:
- There is one door (at Out) in/out of this zone, leading outside
- 5 Metal Gates (initially closed bar gates) at K, L, N, P, and Q
- 1 Secret Wall at O
Other:
- 1 bedroll at location b on map


