Shivering:Brellach
|
|||
|---|---|---|---|
| # of Zones | 4 | ||
| Occupants | |||
| Golden Saint Warriors, Knights of Order | |||
| Important Treasure | |||
| 2 Crystal Chests | |||
| Console Location Code(s) | |||
| XPBrellachExterior, XPBrellach01, XPBrellach02, XPBrellach04, XPBrellach05 | |||
| Region | |||
| Mania | |||
| Location | |||
| On the north coast of Saints Watch, northwest of Highcross | |||
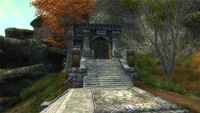
Brellach is a ruin that also serves as the Golden Saints base and is initially inaccessible (quest-related). It contains four zones: Brellach, Hall of Honor, Brellach, Hall of Reverence, Brellach, Hall of Devotion, and Brellach, Font of Rebirth.
Brellach is the home of the Aureal in the Shivering Isles, located in the north of Mania on the Saints Watch peninsula. It is the most sacred place to the Golden Saints, as it contains the Wellspring of the Aureal. The souls of fallen Aureals are called back to the Isles from the Waters of Oblivion to the Font of Rebirth by use of ceremonial chimes. The stronghold was given to the Aureal by Lord Sheogorath and no mortals are usually permitted to pass inside the sacred halls.
People[edit]
|
Related Quests[edit]
- The Helpless Army: Save the Mazken/Aureal from the Knights of Order.
Notes[edit]
- The interior of Brellach is almost identical to that of Pinnacle Rock, the only difference being the interior decoration.
- Before the related quest, this ruin cannot be accessed as the entry door requires a non-existent key.
- After the related quest, the forces of Order in the ruin will respawn. Also, the Golden Saint in the last room of the Hall of Honor will be found alive, as her scripting fails.
This bug is fixed by the Unofficial Shivering Isles Patch.
- Two test cells related to this ruin did not make it to the game. "XPBrellach" is the console code for a totally empty area called "Dummy Cell" and "XPBrellach03Extra" leads to an Ayleid Ruin-like area called "Brellach", which does not lead anywhere else.
- If you break into Brellach with the console after completing the expansion, having chosen the Manic path and aided the Dark Seducers at Pinnacle Rock, Knights of Order will still spawn. Staada will appear, but the only topics she has are the "New Sheoth" and "Shivering Isles" topics generic to her race and a mistitled "Wellspring of the Mazken" topic, where she thanks you for unblocking the Wellspring.
- For more information on Brellach and the Wellspring, see the Lore article.
Exterior[edit]
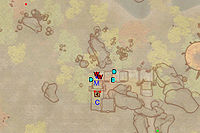
- The exterior is located at coordinates: SEWorld 6, 21
- This location's map marker (M on map) is named Brellach (editor name XPBrellachMapMarker). The entrance door is S of the marker, 30 feet away.
- Issmi (non-respawning) is near the entrance
- 2 Golden Saint Guards are near the entrance
- 2 Golden Saint Warriors (non-respawning) are at locations W on map
- 1 Monster (Mania) is near the entrance
- 1 Chest (Wilderness; non-respawning) is near the entrance
- The following plants can be found near the entrance: 6 Alocasia plants, 8 Hydnum Azure plants, 4 Red Kelp plants, 3 Mushroom Tree Sapling plants, and 7 Worm's Head plants
- 1 dead Golden Saint is at location E on map
- 2 dead Knights of Order are at D
Zone 1: Brellach, Hall of Honor[edit]
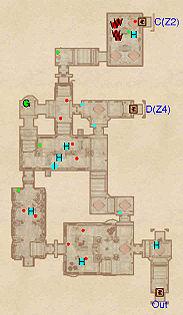
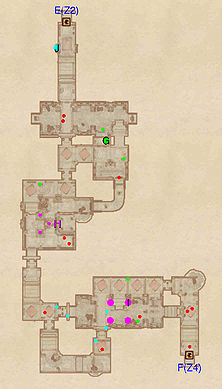
As you enter escorted by Issmi and two other Aureals, the corpse of a dead Saint (H) suggests a tough battle ahead. The zone however, is very linear: just make your way to C, battling the Priests and Knights of Order you encounter on the way. In the third room, make sure to sound the chime at I, which will reveal a Crystal Chest at G. Loot all of the urns and chests and proceed to the next zone, the Hall of Reverence.
When you return to this zone from the fourth one through door D, you will access the areas that were previously sealed off by gates. This allows for a quick route to the exterior.
Occupants:
- 4 Golden Saint Warriors (non-respawning) at locations W on map
- 7 Knights of Order
- 3 Priests of Order
Treasure:
- 1 Crystal Chest (requires Heart of Order to open; non-respawning) at location G on map
- 1 Chest
- 1 Urn (locked)
- 2 Urns (Healing)
Doors and Gates:
- There are three doors in/out of this zone
- 1 door (at Out) leads outside
- 1 door (at C) leads to the zone Brellach, Hall of Reverence
- 1 door (at D) leads to the zone Brellach, Font of Rebirth (locked, says 'key required' but there is no key)
Other:
- 1 Chime at location I on map
- 6 dead Golden Saints at H
Zone 2: Brellach, Hall of Reverence[edit]
Once again, this zone is easy to navigate, so just fight your way to the final room, where Staada is being held prisoner surrounded by crystal walls (G). Sound the chime at J to free her and once you're done talking to her, lead the group to the next zone through door E.
Occupants:
- Staada (non-respawning)
- 8 Knights of Order
- 3 Priests of Order
Treasure:
- 1 Chest (locked)
- 1 Chest (Healing)
- 1 Urn
- 1 Urn (Healing)
Doors and Gates:
- There are two doors in/out of this zone
- 1 door (at C) leads to the zone Brellach, Hall of Honor
- 1 door (at E) leads to the zone Brellach, Hall of Devotion
- 4 Crystal Walls (sound a nearby Chime to shatter) at G
- 1 Metal Door at H (locked, says 'key required' but there is no key)
Other:
- 5 dead Golden Saints at location I on map
- 1 Chime at J
Zone 3: Brellach, Hall of Devotion[edit]
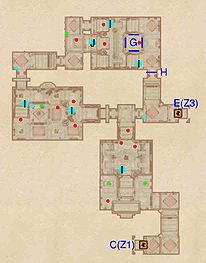
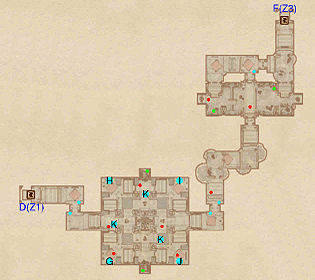
As soon as you enter, the Golden Saints escorting you will fall petrified as Order has managed to shut down the font. Dispatch of the crystal wall blocking your path by sounding the nearby chime (J) and press forward. Once you arrive on a bridge, use this elevated position to snipe at the two Knights in the room below. Jump down and locate the crystal chest (G) on the southern wall; jump onto the ledge from the stairs close by. Head south and once again use your higher position to snipe at a priest below. Jump down and follow the corridor to a room with four chimes placed inside a cage, head up the stairs to the north and loot the urn, while avoiding the cave in traps at H.
At the next intersection, head right until you arrive on a bridge. This makes an excellent sniping position to attack the enemies in the room below, and the push block nearby (cyan dot on map) activates the hunger statue traps at I, giving you an edge in the fight. Once you dispatched him and the two patrolling knights, head for door F.
Occupants:
Treasure:
- 1 Crystal Chest (requires Heart of Order to open; non-respawning) at location G on map
- 2 Chests
- 3 Urns (Healing)
Traps:
- 3 Cave In trap at locations H on map
- 4 Hunger Statue traps at I
Doors and Gates:
- There are two doors in/out of this zone
- 1 door (at E) leads to the zone Brellach, Hall of Reverence
- 1 door (at F) leads to the zone Brellach, Font of Rebirth
Other:
- 1 Chime at location J on map
Zone 4: Brellach, Font of Rebirth[edit]
Although there is an intersection just as you arrive from door F, the gate can only be opened from the other side, forcing you into the lower level of the next room, where an enemy on a bridge is likely to spot you. Work your way up the stairs on the far side and across the bridge until you arrive at the large room holding the Font of Rebirth. You will have to activate the chimes at the four sides of the room (G, H, I and J) and defeat the knights and priests guarding them. Picking off individual knights through stealthy sniping is possible, although challenging. Once you have received your reward from the now-resurrected Staada, head to door D for a quick exit to the first zone.
Occupants:
Treasure:
- 2 Urns (1 locked)
- 2 Urns (Healing)
Doors and Gates:
- There are two doors in/out of this zone
- 1 door (at D) leads to the zone Brellach, Hall of Honor
- 1 door (at F) leads to the zone Brellach, Hall of Devotion
Other:
- 1 Chime at location G on map
- 1 Chime at H
- 1 Chime at I
- 1 Chime at J
- 3 dead Golden Saints at K
