Shivering:The Howling Halls
|
|||
|---|---|---|---|
| # of Zones | 3 | ||
| Occupants | |||
| Apostles Ciirta, Ra'keran, Luminary Kaz. (Zealots when Symbols of Office is not active, including 1 boss-level Zealot.) |
|||
| Important Treasure | |||
| Pelvis of Pelagius 1 boss-level Chest 1 Alms Collection Chest |
|||
| Console Location Code(s) | |||
| XPHowlingHallsExterior, XPHowlingHalls01, XPHowlingHalls02, XPHowlingHalls03 | |||
| Region | |||
| Dementia, [12,-2] | |||
| Location | |||
| Southeast of Deepwallow | |||
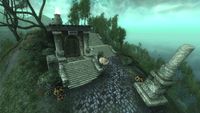
The Howling Halls is a medium-sized ruin southeast of Deepwallow containing Apostles or Zealots (quest-related). It contains three zones: Howling Halls, Narthex, Howling Halls, Congregation Chambers, and Howling Halls, Antechamber.
Emperor Pelagius Septim III died on the 2nd of Sun's Dawn, 3E 153 in the Temple of Kynareth on the Isle of Betony. This Temple was destroyed promptly after the Emperor's death. Not long after, residents of the Shivering Isles came to Tamriel, stole the stones of the ruined Temple, brought them to the Isles, and rebuilt the Temple in exact detail. This structure became known as the Howling Halls, as it was said that one could still hear Pelagius' screams echoing down the corridors. The Halls are now occupied by Ciirta and her Apostles of Light.
People[edit]
|
Related Quests[edit]
- The Museum of Oddities: Una Armina wants you to find "Oddities" for her museum.
- Symbols of Office: Procure the two items needed to craft the Staff of Sheogorath.
Notes[edit]
- Until the Symbols of Office quest has started, you will only be able to proceed up to gate G in the first zone.
- After the related quest, all Apostles will disappear, to be replaced by common Zealots. All three zones will be accessible.
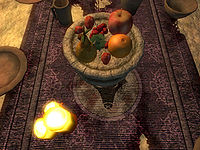
- The table cloth in the dining room of the Congregation Chambers is revealed to be the Kvatch banner, with the wolf insignia on it.
- Two test zones related to this ruin didn't make it to the game. XPHowlingHalls04 and XPHowlingHalls05 are console codes for two Ayleid Ruin-like areas both called "Howling Halls" that link to each other but nothing else.
- For the background story of the Howling Halls, along with information of the current residents, see the Lore article.
- When asked about The Howling Halls, Apostles will say that the original temple where Pelagius III died was in Cyrodiil. However, according to The Madness of Pelagius, he died in the Temple of Kynareth on the Isle of Betony between High Rock and Hammerfell.
Exterior[edit]
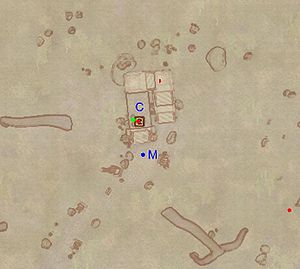
- The exterior is located at coordinates: SEWorld 12, -2
- This location's map marker (M on map) is named The Howling Halls (editor name XPHowlingHallsExteriorMARKER). The entrance door is N of the marker, 40 feet away.
- 1 Zealot (always best possible level) is near the entrance
- 0-1 Zealot Enemy (at level 9 or higher, 25% chance Flesh Atronach, otherwise Zealot) is near the entrance
- 1 Wilderness Creature (Shoreline variety; Dementia) is near the entrance
- 1 Chest (Wilderness; non-respawning) is near the entrance
- The following plants can be found near the entrance: 7 Putrid Gigantea plants, 4 Fungus Stalk plants, and 4 Mushroom Tree Sapling plants
Zone 1: Howling Halls, Narthex[edit]
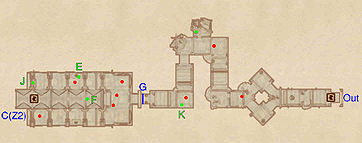
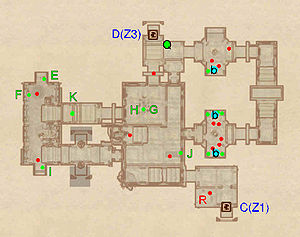
When you enter during the related quest, you will find three apostles to greet you. One can be found at the end of the second corridor, while two more are in the final room. At K you will find various shoes and two apostle robes; wearing the robes will protect you from the initially hostile Apostles. The final room is a large, cathedral-like chamber full of gifts and alms brought to the apostles. At E are various ingredients and a few gold nuggets, while a good deal of precious gems can be found at the throne at F. The Alms Collection Chest in the northwest corner (J) also contains a random selection of excellent loot, including a good chance of enchanted weapons and madness matrices.
Occupants:
- 3 Apostles (non-respawning)
- 5 Zealot Enemies (at level 9 or higher, 25% chance Flesh Atronach, otherwise Zealot)
Treasure:
- 2 Apostle Robes
- 1 Alms Collection Chest at J (locked)
- 1 Urn (Healing)
- The following ingredients will always be found: 2 Aster Bloom Cores, 1 Gnarl Bark, and 1 Withering Moon
- The other following items will always be found: 4 Flawed Diamonds, 3 Gold Nuggets, 4 Rubies, 4 Topazes, and 1 The Madness of Pelagius
- Some of the above items are clustered at the following locations:
- At E: 2 Aster Bloom Cores, 1 Gnarl Bark, 3 Gold Nuggets, and 1 Withering Moon
- At F: 4 Flawed Diamonds, 4 Rubies, and 4 Topazes
- At K: 2 Apostle Robes
Doors and Gates:
- There are two doors in/out of this zone
- 1 door (at Out) leads outside
- 1 door (at C) leads to the zone Howling Halls, Congregation Chambers
- 1 Metal Door at G (locked, says 'key required' but there is no key; unlocks during the Symbols of Office quest)
Zone 2: Howling Halls, Congregation Chambers[edit]
As soon as you enter the Congregation Chambers, Ra'kheran (R) will try and attract your attention and lay out his plan to kill Ciirta. Helping him and his fellow conspirators will be useful in the next zone. Six apostles will patrol the area randomly, so prepare for surprise appearances, unless you are wearing the appropriate robes. If you are hunting Apostle Daggers for Ra'kheran, make sure you don't kill the two traitors. To best explore the zone, hug the eastern wall of the central room, gather the various ingredients at J and head east. In the next room you will find two beds (b) along with four chests, two of them locked. Pass the horrid spectacle of four bloody zombies hanging from the ceiling and press on, pass a room with a bed (b) and a chest, until you arrive at Q. Here you will find various gems, a copy of The Madness of Pelagius and the pelvis of the late Emperor himself, which you'll need for the quest The Museum of Oddities.
Re-enter the central room from the north and head for the corridor departing from the southwest corner. In the next room you will find a counter full of ingredients, alchemical equipment and potions (I) and a large amount of books and a few other items at E and F. On top of the stone beam in the corridor leading to the dining room are two scrolls and a potion (K). With a decent level of Acrobatics, you can jump off the top of the stairs and grab the items one by one as you fall down. The dining room is on a higher level of the central room and is occupied by a large table laden with food (G and H). From here, head north to door D to enter Ciirta's antechamber.
Occupants:
- Ra'kheran (non-respawning) at location R on map
- 4 Apostles (non-respawning)
- 2 Apostles (traitor; non-respawning)
- 7 Zealot Enemies (at level 9 or higher, 25% chance Flesh Atronach, otherwise Zealot)
Treasure:
- 1 Pelvis of Pelagius at location Q on map
- 1 Apostle Dagger and 1 Apostle Robes
- 5 Chests (2 locked)
- 2 Cupboards (non-respawning)
- 2 Fire Ball scrolls
- 1 Lake Stride scroll
- The following alchemy equipment will always be found: 1 Novice Alembic, 2 Novice Calcinators, 1 Novice Mortar & Pestle, and 1 Novice Retort
- The following books will always be found: 2 16 Accords of Madness, v. IX, 2 16 Accords of Madness, v. VI, 1 16 Accords of Madness, v. XII, 5 Bark and Sap, 1 Fall of Vitharn, 9 Myths of Sheogorath, and 1 The Madness of Pelagius
- The following ingredients will always be found: 2 Apples, 1 Black Tar, 6 Blackberries, 1 Blister Pod Cap, 1 Bone Marrow, 1 Bonemeal, 2 Congealed Putrescence, 4 Fungus Stalks, 2 Grapes, 2 Letifer Orca Digestive Slimes, 1 Mort Flesh, 2 Oranges, 2 Pears, 1 Rot Scale, 6 Strawberries, 5 Thorn Hooks, and 2 Withering Moons
- The following potions will always be found: 1 Strong Poison of Catastrophe, 1 Strong Potion of Agility, 1 Weak Potion of Alacrity, 1 Potion of Healing, 1 Strong Potion of Healing, 1 Weak Potion of Insulation, and 1 Weak Potion of Intelligence
- The other following items will always be found: 1 Flawed Topaz, 1 Ruby, and 1 Sapphire
- Some of the above items are clustered at the following locations:
- At E: 1 Novice Calcinator, 1 Novice Mortar & Pestle, 1 16 Accords of Madness, v. IX, 1 16 Accords of Madness, v. VI, 1 16 Accords of Madness, v. XII, 4 Bark and Sap, and 8 Myths of Sheogorath
- At F: 1 Weak Potion of Intelligence, 1 16 Accords of Madness, v. IX, 1 Bark and Sap, 1 Fall of Vitharn, and 1 Myths of Sheogorath
- At G: 2 Apples, 4 Blackberries, 1 Grapes, 2 Oranges, 1 Pear, and 4 Strawberries
- At H: 2 Blackberries, 1 Grapes, 1 Pear, and 2 Strawberries
- At I: 1 Black Tar, 1 Blister Pod Cap, 4 Fungus Stalks, 1 Letifer Orca Digestive Slime, 1 Novice Alembic, 1 Novice Calcinator, 1 Novice Retort, 1 Rot Scale, 2 Thorn Hooks, 2 Withering Moons, 1 Strong Poison of Catastrophe, 1 Weak Potion of Alacrity, 1 Potion of Healing, 1 Strong Potion of Healing, and 1 Weak Potion of Insulation
- At J: 2 Congealed Putrescences, 1 Letifer Orca Digestive Slime, and 3 Thorn Hooks
- At K: 1 Strong Potion of Agility, 2 Fireball Scrolls
- At Q: 1 Flawed Topaz, 1 Pelvis of Pelagius, 1 Ruby, 1 Sapphire, and 1 The Madness of Pelagius
Doors and Gates:
- There are two doors in/out of this zone
- 1 door (at C) leads to the zone Howling Halls, Narthex
- 1 door (at D) leads to the zone Howling Halls, Antechamber
Other:
- 3 beds at locations b on map
Zone 3: Howling Halls, Antechamber[edit]
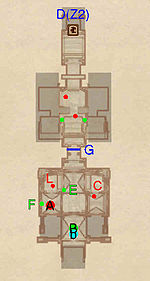
Head down the long corridor and open door G with the howling chamber key, which can be obtained from any apostle. You will find yourself in a room reminiscent of a cathedral and occupied by Ciirta (C) and her lieutenant: Luminary Kaz (L). Once both are dead, you can loot the various valuable items found at E and F as well as the boss chest at B. Remember to search the narrow ledges underneath the ceiling for more loot. In the southeast corner you will also find various canvases where Ciirta attempted to depict the Greymarch.
Occupants:
- Ciirta (non-respawning) at location C on map
- Luminary Kaz (non-respawning) at L
- 1 boss-level Zealot at A
- 2 Zealot Enemies (at level 9 or higher, 25% chance Flesh Atronach, otherwise Zealot)
Treasure:
- 1 boss-level Chest (Zealot variety; locked, opened by Ciirta's Key) at location B on map
- 1 Apostle Dagger
- 1 Jewelry Box (contains 1-2 unenchanted jewelry, 10% chance enchanted jewelry, 10% potions; non-respawning)
- 1 Jewelry Box (contains 1-3 unenchanted jewelry, 10% chance enchanted jewelry, 25% potion; non-respawning)
- 2 Urns (Healing)
- 1 Heart of Order
- The following books will always be found: 1 Feyfolken III, 1 Bark and Sap, 1 Myths of Sheogorath, 2 The Madness of Pelagius, and 1 The Predecessors
- The other following items will always be found: 1 Flawless Diamond, 2 Flawless Pearls, 1 Madness Ore, 1 common soul gem with common soul, and 1 petty soul gem with petty soul
- Some of the above items are clustered at the following locations:
- At E: 1 Flawless Diamond, 2 Flawless Pearls, and 1 Jewelry Box (contains 1-2 unenchanted jewelry, 10% chance enchanted jewelry, 10% potions; non-respawning)you have to climb to reach these.
- At F: 1 Jewelry Box (contains 1-3 unenchanted jewelry, 10% chance enchanted jewelry, 25% potion; non-respawning), 1 Apostle Dagger, 1 Heart of Order, and 1 Madness Ore
Doors and Gates:
- There is one door (at D) in/out of this zone, leading to the zone Howling Halls, Congregation Chambers
- 1 Metal Door at G (locked, opened by Howling Chamber Key)
Other:
- 1 bed at location b on map
