Shivering:Xeddefen
|
|||
|---|---|---|---|
| # of Zones | 5/2 | ||
| Occupants | |||
| Before related quest: Grummites (1 boss-level Grummite) During related quest: Knights of Order, Priests of Order, Refugees (1 boss-level Knight of Order) |
|||
| Important Treasure | |||
| 1 boss-level Chest 1 boss-level Urn 3 Madness Ore Deposits 1 Crystal Chest |
|||
| Console Location Code(s) | |||
| XPXeddefenExterior, XPXeddefen01, XPXeddefen02, XPXeddefen03, XPXeddefen04, XPXeddefen05, XPXeddefenRearDestroyed, XPXeddefenDestroyed01 | |||
| Region | |||
| The Fringe | |||
| Location | |||
| Southeast corner of The Fringe | |||
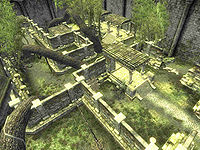
Xeddefen is a medium-sized ruin located inside The Fringe containing monsters and Forces of Order (quest-related). Outside of the related quest, it contains five zones: Xeddefen, Xeddefen, Fane, Xeddefen, Great Chamber, Xeddefen, Felles, and Xeddefen, Fales. During the related quest, two additional zones are added: Xeddefen, Fales (destroyed) and Xeddefen, Ruins.
Related Quests[edit]
- Retaking The Fringe: Defend The Fringe and stop the attackers.
Notes[edit]
- The only areas accessible before the related quest are most of Xeddefen and most of Xeddefen, Fane. The same two zones will be accessible after the quest, in a slightly destroyed version. After the Main Quest is completed, the entire ruin will be reduced to Xeddefen, Ruins.
- After the Main Quest, when The Fringe is restored to its former glory, the map marker for Xeddefen will disappear, making it possible to discover it "twice".
- This ruin contains 22 Withering Moon before the related quest and 6 Grummite Egg Mound plants and 25 Withering Moon plants during the related quest.
Exterior[edit]
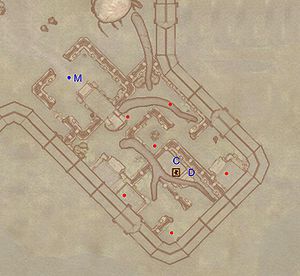
- The exterior is located at coordinates: SETheFringe -11, -5
- This location's map marker (M on map) is named Xeddefen (editor name XPXeddefenMapMarker). The entrance door is SE of the marker, 200 feet away.
- 2 Grummites (Dementia) are near the entrance
- 4 Grummite Enemies (40% chance melee Grummite; 20% archer Grummite; 20% Magus Grummite; 20% Baliwog) are near the entrance
- The following plants can be found near the entrance: 3 Black Tar plants, 2 Blister Pod plants, 3 Putrid Gigantea plants, 2 Grummite Egg Mound plants, 1 Letifer Orca Planta plant, and 4 Mushroom Tree Sapling plants
Zone 1: Xeddefen[edit]
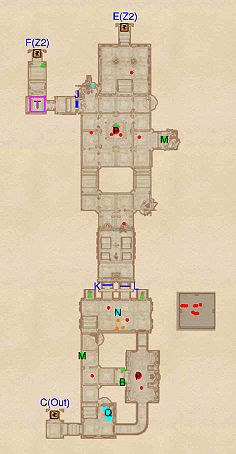
If you enter Xeddefen before the related quest, you will find a large grummite clan to greet you. Upon entering, you will immediately be faced with an intersection - both ways lead you to the second room but heading left gives you access to a boss-level urn at B and a madness ore deposit at M. After picking the lock on either door K or L, you will arrive in a room with a few grummites and another madness ore deposit (M). Make sure to pick up the hard-to-notice flawed diamond located in the western corridor. Proceed to the next zone via door E, as F is not accessible.
Order's presence is immediately palpable upon entering during the related quest: three grummites lay dead at Q. In addition, regular three-strong groups of Knights will flow continuously until the main obelisk is de-activated. This time you may want to consider also heading straight ahead at the first intersection, since the priest of order at P holds the key to the doors in the second room. In the final room, you will be confronted with a Priest (P) and three Knights. At this point you may choose to enter the next level via door E or F. The former is easily accessible while to reach the latter you will have to open the secret wall at J by activating the pushblock on the wall to the right (cyan dot on map) and then brave a fall down a trapped floor (T) into a pond surrounded by Grummite Egg Sacs. Both doors will take you to the same area in the next zone, Xeddefen, Fane.
Occupants:
- Before related quest:
- During related quest:
- 3 Refugees (non-respawning; non-hostile; orange circles on map)
- 11 Knights of Order (non-respawning; located in inaccessible holding area until quest starts)
- 2 Priests of Order (non-respawning) at locations P on map
Treasure:
- 1 boss-level Urn (Grummite variety) at location B on map
- 2 Madness Ore Deposits (1-4 Madness Ore; non-respawning) at M
- 1 Chest (locked)
- 1 Chest (Healing)
- 1 Urn
- 2 Urns (Healing)
- The other following items will always be found: 1 Flawed Diamond
- During the related quest, the following plants will always be found: 6 Grummite Egg Mound plants
Traps:
- 1 Trapped Floor trap at location T on map
Doors and Gates:
- There are four doors in/out of this zone
- 1 door (at C) leads outside
- 2 doors (at E and F) lead to the zone Xeddefen, Fane
- 2 Metal Doors at K and L (both locked, opened by Xeddefen key)
- 1 Secret Wall at J (switch inaccessible until quest starts)
Other:
- 1 dead Dark Seducer or 1 dead Golden Saint at N
- 3 Dead Grummites at locations Q on map
Zone 2: Xeddefen, Fane[edit]
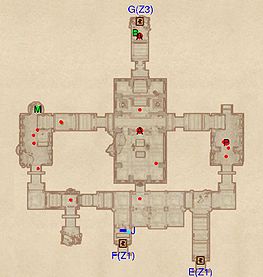
You will be able to enter this zone before the related quest but cannot access door G to the next zone. Upon entering from door E, you will find yourself at an intersection. Heading right leads you to a bridge overlooking the central room. Taking this route first is advised since it will allow you to snipe from the bridge onto the enemies below. In the western room is a madness ore deposit (M) and an unlikely area consisting of a table and a chair. High above ground, on the southern wall of the central room, is a statue covered with ten withering moons which is inaccessible due to its location under the ceiling. A boss-level grummite (A) guards the boss chest at B; while a pile of debris covers door G.
When you enter this zone during the related quest, the grummites will have been replaced with Knights of Order; the major changes being a priest (P) in the eastern room, a boss-level Knight (A) in the central room and the disappearance of the boss near door G and his chest at B. If you arrive through door F, you will have to activate the push button (cyan dot on map) to lower the secret wall at J. The central bridge will be inaccessible due to two closed iron gates, so your only choice is to face the boss-leveled Knight in the central room. After the battle, head up the stairs and enter Xeddefen, Great Chamber through door G.
Occupants:
- before related quest:
- during related quest:
- 1 boss-level Knight of Order (non-respawning) at location A on map
- 2 Refugees (non-respawning; located in off-map holding cell until quest starts)
- 8 Knights of Order (non-respawning; located in off-map holding cell until quest starts)
- 1 Priest of Order (non-respawning) at P
- Due to a bug, the Priest will resurrect as though he were an obelisk priest.
Treasure:
- 1 boss-level Chest (Grummite variety) at location B on map (only before related quest)
- 1 Madness Ore Deposit (1-4 Madness Ore; non-respawning) at M
- The other following items will always be found: 1 Madness Ore
- The following plants will always be found: 22 Withering Moon plants
Doors and Gates:
- There are three doors in/out of this zone
- 2 doors (at E and F) lead to the zone Xeddefen
- 1 door (at G) leads to the zone Xeddefen, Great Chamber
- 1 Secret Wall at J (inaccessible until quest starts)
Zone 3: Xeddefen, Great Chamber[edit]
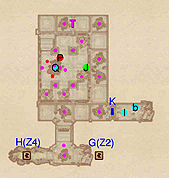
Your objective in this zone is the large Obelisk of Order at Q. Upon entering from door G, you will find yourself on a balcony overlooking the obelisk. At this point the secret wall (K) to your right will open and you will be greeted by Shelden, who has been in hiding since Passwall was overrun. In his hide-out is a burgundy shirt and a bedroll at b. It is recommended to accept Shelden's help for the task ahead, as he will suffer a scripted death if you let him run along on his own. Due to his essential status, Shelden can prove helpful in the upcoming battle since you will have to face two Knights, a Priest (P) and the continuous flow of Knights the Obelisk produces. Once you deactivate it, the whole ruin starts to collapse, with most of the ceiling breaking off in chunks. Before you make your escape, make sure to loot the crystal chest at J. Hasten back up to find that door G is blocked and your only chance is through door H to Xeddefen, Felles.
Occupants:
- Shelden at location I on map
- 1 Priest of Order (non-respawning) at location P on map
- 2 Knights of Order
Treasure:
- 1 Crystal Chest (requires Heart of Order to open; non-respawning) at location J on map
- The following ingredients will always be found: 1 Smoked Baliwog Leg
- The following plants will always be found: 3 Withering Moon plants
Traps:
- 20 Cave In traps at magenta circles (T)
Doors and Gates:
- There are two doors in/out of this zone
- 1 door (at G) leads to the zone Xeddefen, Fane
- 1 door (at H) leads to the zone Xeddefen, Felles
- 1 Secret Wall at K
Other:
- 1 Obelisk at location Q on map
- 1 bedroll at b
Zone 4: Xeddefen, Felles[edit]
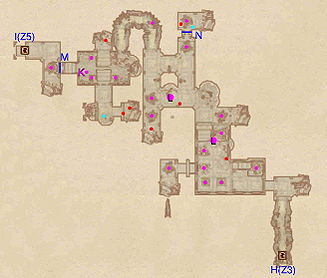
Your priority in this zone is definitely door I and the relatively linear style of this level helps with that. While intersections won't be a problem, you will need to fight your way through a few Knights and dodge the perennially crumbling ceiling. Beware the Hunger Statue traps at L in the first and second rooms and the Cave In trap at K in the final chamber. The northernmost room should be avoided because it is merely a trap; activating the push button (cyan dot on map) will cause the iron gate at N to lower and the ceiling to fall part above you. The gate at M is opened by pressing the push-block up the stairs to the left. Once you go through it, the gate will close itself, effectively separating you from Shelden, if he was following you. While he will run in a different direction, proceed to door I and enter Xeddefen, Fales.
Occupants:
- 13 Knights of Order (non-respawning; some located in off-map holding cell)
Treasure:
- The following plants will always be found: 5 Withering Moon plants
Traps:
- 1 Cave In trap at location K on map
- 2 Hunger Statue trap at L
- 17 Cave In traps (all unlabeled traps on map)
Doors and Gates:
- There are two doors in/out of this zone
- 1 door (at H) leads to the zone Xeddefen, Great Chamber
- 1 door (at I) leads to the zone Xeddefen, Fales
- 2 Metal Gates (Initially open bar gate) at M and N
Zone 5: Xeddefen, Fales[edit]
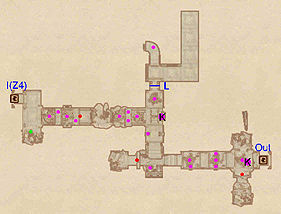
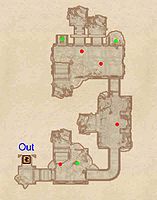
Like the previous zone, this one is quite simple to navigate through, although the large number of cave-in traps along the way pose a serious threat. Be sure not to miss out on the only treasure in this zone: a sideways urn to the right when entering. Make your way through the debris and avoid the unfriendly fire from the Hunger Statue at K. The gate at L is permanently locked; you may see Shelden (depending on whether he was acting as your follower) on the other side. Dodge the final hunger statue trap (K) and exit Xeddefen through door Out, which opens on a previously concealed entrance in the lagoon near Passwall.
Occupants:
- 3 Knights of Order (non-respawning)
Treasure:
Traps:
- 2 Hunger Statue traps at K
- 18 Cave-In traps (all unlabeled traps on map)
Doors and Gates:
- There are two doors in/out of this zone
- 1 door (at Out) leads outside
- 1 door (at I) leads to the zone Xeddefen, Felles
- 1 Metal Gate (closed bar gate) at L
Zone 6: Xeddefen, Fales[edit]
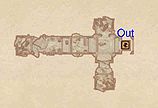
There is absolutely nothing in this zone except for rubble and debris, plus an overturned obelisk. This zone can only be accessed by re-entering the Fales once you have emerged in the lagoon outside Passwall from the previous zone.
Doors and Gates:
- There is one door (at Out) in/out of this zone, leading outside
Zone 7: Xeddefen, Ruins[edit]
This zone can only be accessed after the related quest. In shape it is similar to the first zone, with the boss-chest area collapsed. There is nothing other than a few grummites, minor loot chests and an oddly placed weak potion of healing on a ledge in the first room. You cannot proceed further than what was the second room.
Occupants:
- 4 Grummite Enemies (40% chance melee Grummite; 20% archer Grummite; 20% Magus Grummite; 20% Baliwog)
Treasure:
- 1 Chest (locked)
- 1 Chest (Healing)
- 1 Urn
- The following potions will always be found: 1 Weak Potion of Healing
Doors and Gates:
- There is one door (at Out) in/out of this zone, leading outside
