Skyrim:Alftand
|
|||
|---|---|---|---|
| # of Zones | 4 | ||
| Clearable | Yes | ||
| Dungeon | Yes | ||
| Respawn Time | 10 days or 30 days | ||
| Level | Min: 16 | ||
| Occupants | |||
| Falmer, Dwarven Automatons, Frostbite Spiders, Skeevers | |||
| Important Treasure | |||
| The Locked Room | |||
| Console Location Code(s) | |||
| Alftand01, Alftand02, AlftandZCell, AlftandExterior01, AlftandExterior02, AlftandExterior03 | |||
| Region | |||
| Winterhold | |||
| Location | |||
| Southwest of Winterhold | |||
| Special Features | |||
| # of Alchemy Labs | 1 | ||
| # of Tanning Racks | 3 | ||
| # of Forges/Anvils | 2 | ||
| # of Workbenches | 1 | ||

Alftand is a large Dwarven ruin southwest of Winterhold. It contains four zones: Alftand Glacial Ruins, Alftand Animonculory, Alftand Cathedral, and Alftand Ruined Tower, which is a separate building.
Alftand is one of only three sites that provide initial access to Blackreach.
Related Quests[edit]
- Elder Knowledge: Recover an Elder Scroll to learn an Ancient Secret.
- Discerning the Transmundane: Uncover the secrets of the mysterious Dwemer lockbox.
- Beneath Bronze WatersCC: Investigate the waters outside Bronze Water Cave.
Walkthrough[edit]
Exterior[edit]
The remains of the camp of an ill-fated expedition led by Sulla Trebatius are perched on the edge of the cliff. The camp includes two derelict shacks with holes in the walls and roof and missing doors, an unlit campfire, and several destroyed tents with bed rolls. Inside the shack farthest to the north is an adept-locked chest and a journal titled Expedition Manifest written by Sulla Trebatius, with some background information and a list of expedition members. There is also a tower housing a lift, but a closed gate, which can only be opened from the inside, blocks access. Follow the catwalks west of the camp as they pass over an icy crevice to the entrance of Alftand Glacial Ruins.
Alftand Glacial Ruins[edit]
You emerge in an icy tunnel with many crates and barrels throughout. One of the crates near the entrance has a Dwarven metal ingot on top. Follow the tunnel as it twists and turns until you come to an unlit campfire with a cooking spit that has been knocked over. Sulla's Journal is resting on a barrel to the left just before the campfire. A knapsack leans against the same barrel. Behind the campfire is a single bed roll, with two unlocked chests, one wooden and one Dwemer, beside it. There is also a pickaxe beside the fire. The tunnel continues to another camp, with blood splashed all over the floor and another unlit campfire. There are five more bed rolls, with a lute lying between two of them, and a copy of Chimarvamidium, the non-skill book version, under a bowl on top of a barrel. Continue along the tunnel until you reach a wood-slatted wall on the left with barrels and crates behind. You can see through the slats into another tunnel, with a Dwemer chest and loose coins on the floor, and a potion of minor healing on top of a barrel that you can reach from this side.
At this point, you can hear part of an argument between J'darr and J'zhar, two Khajiit brothers. Shortly past here, the tunnel turns into typical Dwemer architecture, but is still partially filled with snow and ice. Passing the remains of a Dwarven spider, eventually you enter a large room with a worktable loaded with the wreckage of two Dwarven spiders, a copy of Dwarves, v2, an empty random soul gem, an iron dagger, a copy of Dwemer Inquiries Vol III, three soul gem fragments, and a book of Research Notes. Behind the table, among the rubble is an unlocked Dwemer chest. Behind a barred doorway to the north is a lift to Alftand Animonculory; it can only be accessed from below. To the right of the barred doorway is a bed roll and a copy of Dwemer Inquiries Vol I on top of a barrel. To the south there are two Dwarven scuttles; one is blocked by rubble, while the other houses a Dwarven spider. To the west is an asecnding ramp, with another Dwarven spider near the top. The path then turns to the south and leads back into the icy tunnel. Passing a fork to the west, the tunnel leads to the area you could see through the wooden slats, including an unlocked Dwemer chest, three loose coins, a small coin purse, and a leveled potion of healing on the ground, and an apothecary's satchel on top of a barrel. Back to the west fork, the path descends past the remains of a Dwarven spider. Just before the next corner, there is a scuttle on the right from which a Dwarven spider may ambush you.
Around the corner, the tunnel continues to descend to an area where the hostile J'darr is standing over his brother's corpse. J'zhar's Journal is near his body, and has information about the brothers. Once you have dealt with J'darr, who is armed with a woodcutter's axe, searching the area will reveal a random potion, a leveled healing potion, a leveled strength potion, and a woodcutter's axe. J'zhar's pack looks like an ordinary knapsack, and contains several empty skooma bottles and two random potions. The path continues to the north past a barrel holding a bottle of alto wine, a small coin purse, and four loose coins. Just before the next opening, there is another barrel to the left holding a small coin purse, a barrel to the right with a lit lantern and a Dwemer cup, and a pickaxe and a shovel lying on the ground in between. Straight ahead through the opening is a table with Umana's Journal, some pieces of Dwemer metal, and the remains of a Dwarven spider on top.
Follow the path around the corner to a large room, with a table at the entrance holding several Dwemer items. There are several oil slicks on the ground around and on a raised area. On either wall are scuttles that house Dwarven spheres. In the northwest corner of the room, there is a table holding more pieces of metalwork and a random filled soul gem. Behind the table is a set of three pistons which thrust up vertically. You can "ride" the pistons up to access a ledge with two unlocked chests, a leveled healing potion, a leveled strength potion, two Dwarven metal ingots, and a flawless emerald. From this ledge, you may optionally use Whirlwind Sprint then jump around some pipes and grating to the south to bypass the following section, then simply follow the path around the room to the Animonculory.
Exit the room via the northeast corner. This passage has flammable gas in the air. The next room contains a forge, as well as many Dwemer metal items and the remains of three Dwarven spiders. There is also a large oil slick on the ground, and several scuttles, two of which house Dwarven spiders. In the northwestern corner is a novice-locked gate, behind which are two chests, one apprentice-locked and the other adept-locked, along with two sets of shelves holding various Dwemer items.
Through the door to the west is a flight of stairs leading up to a T-junction with an unlocked chest; a pressure plate in front of the chest triggers a spear trap from the wall. One Dwarven spider scuttles in the corridor to the south, and another can be found down a flight of stairs ending in a cave-in to the north. A cloud of flammable gas at the bottom of the northern stairs can be ignited to help fight the second spider. After it is destroyed, an adept-locked chest can be found in the rubble. Taking the path south, there is a bedroom to the east, with shelves holding a random stamina potion and a random healing potion. Opposite to the west is another caved-in area. Farther along there is another caved-in area to the east, with an apprentice-locked door opposite that leads to a second bedroom. This bedroom features two stone beds, two tables holding several pieces of Dwemer metalwork, and an unlocked chest, all guarded by a Dwarven sphere.
The path continues to the south, up a flight of stairs. At the top of the stairs is another T-junction, with two sets of shelves ahead. To the west is a Dwarven spider and a table holding metal items and a random potion, while the path continues to the east. Before turning to the south, you can look down upon the first large room (with the two Dwarven spheres and the three pistons). The path goes around the western and southern walls; a series of five horizontal steam pistons can push you off into the room below if you're not careful. There are scuttles housing Dwarven spiders in the southwestern and southeastern corners. The path traverses some rubble past the southeastern corner, and continues along the eastern wall. At the end, the path turns to the east and leads to the door to Alftand Animonculory.
Alftand Animonculory[edit]

Upon entering the zone, there is a bedroom to your left containing an unlocked chest and two tables holding several pieces of metalwork, a Falmer helmet, and a shield. Across the hall from the bedroom is a cave-in. The path continues past this to the east. There is a second caved-in area off the path to the north. At the end of the corridor is a door that opens into a large room, with pipes crossing above ahead. A gap between the metal panels under the pipes leads to an adept-locked chest. Next to the chest is the body of the Wood Elf Endrast, a member of the expedition, two lockpicks, and his journal, which describes how he ran away after being captured by the Falmer and hid here until he died.
To the right of the pipes is a flight of stairs leading up to an area covered in an oil slick. There is a Dwarven spider and a Dwarven sphere in this area, and a scuttle on the north wall that releases a second spider. Against the south wall is a set of shelves holding a random potion and various Dwemer metal items, with three chaurus egg sacs to the left of the shelves. Opposite the shelves is a table with metal items and a Falmer sword. Three more chaurus egg sacs can be found in the northeastern corner, along with a gap in the floor where you can drop down to Endrast's body. To the east is an ascending ramp with a spinning blade trap triggered by a series of pressure plates. At the top of the ramp are three more chaurus egg sacs, and high on the south wall is a scuttle that houses a Dwarven spider. Around the corner to the north, a lever on the right lowers a set of bars, allowing access to a huge vertical cavern. Take the walkway across to a caved-in area with a Dwarven spider, a novice-locked chest, and two overturned sets of shelves holding a random potion. There is a ramp leading down on your right.
Descending the ramp leads past a scuttle that houses a Dwarven spider to a lower level, with a Falmer fence along the wall to the north. Behind the fence are three more chaurus egg sacs, while an apprentice-locked door is to the east. You can look off the edge of the ramp to the west to see yet another platform below you, with a ramp coming out of the south wall behind some pipes. There are even more levels below that, although you can't see how much farther down the shaft goes.
Through the door is a treasure room with a Dwarven spider and two gates. The gate to the south is already open, with an unlocked chest behind it. Behind the expert-locked gate to the east is a table holding a Dwarven helmet, a random potion of magicka, and a leveled potion of resist element. There are also two more chests, one with a master-level lock, the other unlocked, and a lootable skeleton holding in its hands the Lockpicking skill book The Locked Room. Between the two gated areas is a caved-in section that contains nothing of interest.
Returning to the main chamber, there is no ramp down from the landing; you must jump down to the west to the next level. On landing, you find the broken ramp that was mentioned in Endrast's journal. Beside this is the body of the Orc Yag gra-Gortwog, another member of the expedition, along with a potion of minor healing. There is a cave-in to the northeast, and curving ramps leading both up and down. The ramp up to the west leads to an unlocked chest guarded by a steam piston that can be triggered by a nearby pressure plate, but which extends intermittently regardless. Above the piston is a scuttle housing a Dwarven spider. The ramp down is to the east, past a waterfall. Care must be taken, as there is another piston that can push you off the side of the ramp, and several Falmer and Dwarven spiders in the area. At the bottom is a landing along the eastern wall of the cavern. A tripwire that triggers a Falmer claw trap is just past the waterfall. Past the trap, another curving ramp continues down to a landing with a skeever near a cave-in, with a chunk of solid Dwemer metal hidden between the cave-in and the cavern wall on the far side of the rubble. From here, a straight ramp leads down to a door. The path passes under a flame spout; you can either wait for it to temporarily stop, or just go around.
The door opens into a multi-leveled room. To the left are several stone tables holding various Dwemer items. On the levels below, there are two Falmer patrolling between two empty Falmer tents and an alchemy lab. On the first level down, there is a large set of shelves against the northeast wall to the left of the first tent. The bottom shelf holds a large Dwemer strut, a piece of silver ore, an orichalcum ingot, a piece of iron ore, a Dwemer cog, a Dwemer bowl, a piece of orichalcum ore, and a silver ingot. The top shelf holds nothing of interest. In the northern corner of the lowest level of the room is the alchemy lab on a table surrounded by a salt pile, a Nordic barnacle, a sample of blisterwort, a butterfly wing, a sample of scaly pholiota, an orange dartwing, and a sample of bleeding crown. The second tent is in the western corner. Against the southeast wall is a pen, with several Dwemer items, a bottle of Nord mead, a hide shield, and a woodcutter's axe scattered among human bones. There are more shelves farther along the southeast wall that hold little of interest; however, a piece of gold ore, a piece of quicksilver ore (difficult to see on the stone slabs), and a few minor Dwemer items can be found underneath the shelves.
The path turns northwest and passes through an open door onto a balcony with metal grating that overlooks the next room. The route across the balcony to the stairs is bisected by an oil slick. The stairs lead down into the main part of the room, which houses three Falmer tents in the northern, western, and southern corners. The room has a large structure in the middle, and an oil slick covering most of the floor. There are two flame spouts firing intermittently from the main structure towards the west and north. There are three Falmer in the room, one near each of the tents. On the other side of the metal grating is a column of large shelves. The top shelf is accessible by jumping from near the top of the stairs, and holds several pieces of Dwemer metalwork. The bottom shelf holds a Dwemer dresser containing a few minor pieces of metal. Between the main structure and the shelves are bone chimes. Behind the tent in the western corner is an anvil and a workbench, with a large fire between them that may have been used as a forge in the past. To the left of the workbench along the southwest wall is another set of shelves, with piles of hot coals under them and a selection of mushrooms and charred skeever hides cooking on top. Inside the tent in the southern corner is an expert-locked Falmer chest. Past the tent is a corridor heading to the southwest and an open door, beyond which is a flight of stairs heading down.
The stairs lead to a room with three leveled Falmer, including at least one magic user. At the bottom of the first flight down, on your left is another flight up that leads to a small area, with a table holding several ruined books and a Dwarven dagger. It may be advisable to kill the nearby Falmer before looting this area to prevent unexpected interruptions. Opposite the stairs are two shelves holding more ruined books and a row of seven Falmer ears (see bugs). At the bottom of the stairs is a metal grating that divides the room into two sections, with another short flight of stairs down. The room includes two Falmer tents in the western and southern corners, several pieces of torture equipment, and four tables. Against the northeast wall are three chaurus egg sacs. To the northwest is an open gate leading to a lift which takes you up to Alftand Glacial Ruins. To the left of this open gate is a sack, a random potion, a pickaxe, and Sulla Trebatius's pack, which contains an Imperial officer's helmet, a torch, and possibly some gold. The lift takes you up to a small area on the other side of the barred doorway seen previously in the first zone. In this area is a sack of foodstuffs, nine chaurus egg sacs, and a lever on the wall that retracts the bars. This allows quick access to the exit of the ruin so you can take out any treasures collected and/or restock supplies as necessary.
Inside the tent to the west is a chaurus egg, a skeever tail, a Falmer bow, and a war axe. To the left is a torture rack with a bowl of coals and human bones, and to the left of the rack is the dead body of the High Elf Valie on a table, with shackles by her hands and feet along with a Dwarven dagger and a bottle of random poison. There is a second table with shackles on the other side of a gated cell-like area. The second table has a portion of human flesh, two pieces of leather, and lots of gory human bones. Opposite the two torture tables, against the room partition are two tables holding a scroll of Cure Wounds, an iron dagger, a thistle branch, a hawk beak, a sample of bear claws, a grass pod, a lockpick, a dragon's tongue flower, a bunch of lavender, a bunch of tundra cotton, a sample of hawk feathers, a nightshade flower, two blue mountain flowers, a red mountain flower, a flask of Dwarven oil, a rare small pearl, a silver ingot, two soul gem fragments, a garnet, a bottle of wine, a bottle of skooma, a flute, a pine thrush egg, a horse hide, a set of blue mage robes, a piece of leather, and two sacks of foodstuffs. To the left of the gory table with shackles is a tanning rack. The second tent in the southern corner contains a chaurus egg, a piece of chaurus chitin, and a quiver of Falmer arrows.
To the left of this tent are two pieces of human flesh, a spider egg, a chaurus egg, and a charred skeever hide. Beyond these items is a fire with a set of shelves being used as a cooking grate, with a small Dwemer plate metal and a charred skeever hide on top cooking. To the north against the northwest wall are two more tanning racks opposite a dead Falmer lying in front of a door.
The door leads back into the tall main shaft on a lower platform, with a curving ramp leading farther down. At the bottom of the ramp are stairs that lead down to the ground floor, where you will find three more Falmer, including at least one magic user, and a frostbite spider. There are also three empty Falmer tents. To the northeast is a short corridor that passes through a door before it turns to the northwest and descends a ramp. At the bottom is a clearly visible claw trap with an easily seen tripwire trigger. Past the trap is a door that opens into 'Alftand Cathedral'.
Alftand Cathedral[edit]

Alftand Cathedral is the final zone in Alftand; it houses a lift to the surface as well as the passage to Blackreach. Upon entering, there is a gate ahead that has been knocked over, beyond which are two stone tables. On the first table is a leveled potion of the defender, while a caved-in area to the south has a leveled healing potion among the rubble. The path continues to the right of the gate. Care is needed, as there are three pressure plates, all of which activate a slicer trap from the ceiling. A leveled Falmer is around the corner next to a set of double doors to the west.
Through the doors is the main cathedral room, with a flight of wide stairs leading up to the main floor. Inside, one or two Falmer patrol the area before the barred gate ahead, along with possibly a frostbite spider, a skeever, or a chaurus reaper. To the right of the barred gate is a Falmer tent containing a Falmer bow, a quiver of Falmer arrows, three chaurus eggs, and two chaurus egg sacs. Between this tent and the barred gate is an apprentice-locked Falmer chest, and to the southwest is a second Falmer tent containing three chaurus eggs, two skeever tails, a Falmer shield, a Falmer war axe, and a quiver of Falmer arrows. To the left of this tent is a novice-locked Falmer chest. There are thirty chaurus egg sacs, a patch of white cap mushrooms, and a patch of bleeding crown around this area.
On a platform at the top of the stairs is the lever that operates the spears blocking the gate, as well as two chests, one unlocked and the other adept-locked. Near the base of the stairs are two Falmer tents, both containing fire pits. Inside the first tent are three chaurus eggs and a Falmer war axe, while the second tent contains an unlocked Falmer chest. Near the tents is another patch of white cap mushrooms, five chaurus egg sacs, four loose chaurus eggs, and six patches of glowing mushrooms growing on the rear rock walls between the tents. Past the glowing mushrooms is a narrow path climbing to a small area with strange large mushrooms normally only seen in Blackreach, although there is nothing of interest in the area.
Past the gate, at the top of the first flight of stairs, two unlocked chests are on the right. At the top of the next short flight of stairs are two Dwarven centurions. One centurion is destroyed and is lying prone before its station, and the other activates as you approach. Past the centurions are more stairs leading up to another unlocked gate. To the right of the gate is an apprentice-locked chest. Just past the gate are the last two expedition members, the Redguard Umana and the Imperial Sulla Trebatius, who begin fighting after a brief exchange of words. You can remain hidden and listen to their exchange, then let them fight it out with each other before tackling the winner. Either victor will be hostile to you. Umana is carrying the enchanted shield Targe of the Blooded, and will therefore normally be the winner. In the center of this area is a Dwarven mechanism, with an unlocked chest next to it. If you have the Attunement Sphere, you can activate the mechanism, and the floor will retract into stairs leading down to a door to Blackreach. Behind the mechanism is a master-locked gate, which can be unlocked by the key found on the centurion you fought, behind which is a lift which will take you to Sulla's camp on the surface. Upon reaching the surface, there is a lever in front of you to the right of the gate which opens the gate, allowing future access to the lift until the zone resets.
Alftand Ruined Tower[edit]

There are two entrances to Alftand Ruined Tower. There is an entrance to the northwest of the Alftand map marker (approach from the northwest, i.e. from Frostflow Lighthouse) that enters near the top, and an entrance in an icy crevice just to the east of the upper entrance that enters at the bottom.
Entering through the lower entrance leads directly into an icy chamber, with two flights of stairs rising ahead. As you approach, two leveled Dwarven spiders will emerge from Dwarven scuttles on the walls. At the top are twin open doors; however, behind the right-hand door is a cave-in. The left-hand door leads up another flight of stairs. There is smeltable and unsmeltable Dwemer metalwork and Dwarven arrows on the floor and shelves throughout the tower. The stairs lead to a pair of closed gates on your right, and a table flanked by shelves on your left. On the shelves, in addition of Dwemer metalwork, is a piece of iron ore, a piece of silver ore, and an apprentice-locked chest with a random potion beside it. On the table to either side of a button is a piece of gold ore and a copy of the spell tome: Lesser Ward. The button opens the gates opposite, and also triggers twin flamethrower statues that fire constantly down and across the passage in front of the now open gates. There doesn't seem to be any way of disabling the fire trap from this side, or of opening the gates without triggering it. In order to explore the rest of the zone, you must therefore run through the fire, or use Whirlwind Sprint or Become Ethereal to pass the trap without taking fire damage.
Beyond the gates are stairs leading up, with a button on the left that closes the gates and stops the flames. At the top of the stairs are several pressure plates, all of which trigger spear traps from the ceiling. The passage turns around a metal grate, where a leveled Dwarven sphere emerges from a scuttle. There is a table with more metal grating over it, and a metal chair and two sets of shelves on the far side. On the table is a piece of gold ore, an iron ingot, and a silver ingot. On the shelves is another piece of iron ore. To the east are two pedestals with buttons, which also trigger the previous spear traps. To the south are two flights of stairs, with the remains of a Dwarven spider partway up. At the top, the passage turns west and continues to climb. There is an expert-locked chest and a metal dresser at this point. As you continue to the west, two more Dwarven spiders emerge from scuttles, and there are several wide sets of shelves holding a random potion of strength, a random potion of magicka, two iron ingots, a silver ingot, a piece of iron ore, and a piece of silver ore. Under the shelves on your right is an adept-locked chest. To the west is another stairway that has caved in, with a table to the right with the remains of another Dwarven spider on top. A passage to the south continues through an open door and up a spiral staircase. At the top is the zone's upper exit/entrance, with more shelves.
This zone does not connect to the other Alftand zones.
Notes[edit]
- The Alchemy ingredient small pearl cannot be harvested. Alftand is one of the few places where a small pearl can be found as part of a loot drop.
- If you travel far enough into the crevice southeast of Alftand Ruined Tower, you can activate the Alftand map marker and subsequently fast-travel to the main entrance, thereby avoiding a portion of the exterior ruins.
- While in Alftand Animonculory, you can use Become Ethereal to simply jump to the very bottom, thereby avoiding most of the zone and saving considerable time.
- You can never wait in Alftand Cathedral, not even after Elder Knowledge has been completed.
- After obtaining the Elder Scroll from Blackreach as part of Discerning the Transmundane and bringing it to Septimus Signus, he will task the player with obtaining blood samples from five Dwemer-related races of Skyrim. Four of them—High Elf, Wood Elf, Falmer, and Orc—can be found in Alftand Animonculory from the corpses of the expedition members and any dead Falmer. Unfortunately, you must return to Septimus to get the required Essence Extractor, so there's no avoiding a second trip. (Occasionally, Valie's body will be missing. This seems to happen if her body is not looted upon first discovery, and you then return after enough time has passed for the zone to respawn.)
- To the south, toward Wayward Pass, a copy of Ancestors and the Dunmer can be found laying on the ground. (map) (Note that this location is approximate, as the book is suspended high in mid-air and may fall randomly due to the vagaries of the physics engine and the nearby World Encounter.)
Bugs[edit]
- When loading from a save within the Animonculory zone, audio may become corrupted or stop altogether.
- To fix this, quit the game, then either load a save from outside of the Animonculory or the (auto)save immediately after entering the zone.
- The Falmer ears and some of the ruined books on a shelf in the Animonculory can't be interacted with.
- It may be possible to recover the Falmer ears by using a ranged area-of-effect spell.
- Several glowing mushrooms in the Cathedral can't be interacted with.
Maps[edit]
-
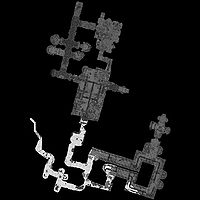
Alftand Glacial Ruins
-
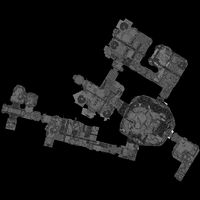
Alftand Animonculory
-
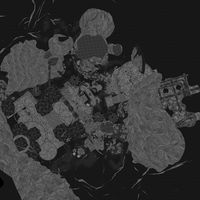
Alftand Cathedral
-
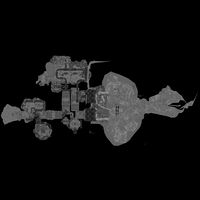
Alftand Ruined Tower


- Skyrim-Places-Dwarven Ruins
- Skyrim-Places
- Skyrim-Places-Level 16
- Skyrim-Places-Winterhold (region)
- Skyrim-Places-Alchemy Labs
- Skyrim-Places-Tanning Racks
- Skyrim-Places-Forges
- Skyrim-Places-Workbenches
- Skyrim-Places-Clearable
- Skyrim-Places-Discoverable
- Skyrim-Places-Dwarven Automaton Sites
- Skyrim-Confirmed Bugs