Skyrim:Dead Drop Falls
|
||
|---|---|---|
| Added by | Dawnguard | |
| # of Zones | 2 | |
| Clearable | No | |
| Respawn Time | 10 days | |
| Occupants | ||
| None | ||
| Console Location Code(s) | ||
| DLC1HunterCave01, DLC1HunterCave02 | ||
| Location | ||
| Fort Dawnguard | ||
| Special Features | ||
| # of Fishing SuppliesCC | 1 | |
| Ore Veins | ||
| # of Corundum | 4 | |

Dead Drop Falls is a cave system only accessible through the northeastern section of Fort Dawnguard. It contains two zones, Dead Drop Falls and Dead Drop Mine. The entrance is found between three practice dummies and the armored husky paddock. There are a few glowing mushrooms growing on the wall to the right of the entrance.
Dead Drop Falls[edit]


You enter into a natural cave system. Follow the passage, and you'll see a waterfall directly ahead. There are many types of fungi throughout the caves and mine, including blisterwort, imp stool, Namira's Rot, and fly amanita. Above you on the left is a ledge with an unlocked chest. It can be reached with simple jumping; you can empty it when entering, or leave it until the end, as you will pass it on the way out. The only way to proceed is to drop into the hole formed by the water. You will land safely below in water; however, your follower won't join you (see notes).
At the bottom, to the west is a section of dry land with a lit brazier and a narrow tunnel that leads up and around a circular, shallowly flooded shaft. At the top, the path joins a short passage and passes a metal gate, which can be lowered from the other side by exiting Dead Drop Mine. The passage continues past the gate to a concealed door with a lever on the left and a small coin purse on a crate to the right. The door opens to the ledge with the unlocked chest in the first chamber.

Heading north from the bottom of the drop leads into a huge, shallowly flooded chamber, with many rock pillars sticking up out of the water linked by well-lit paths and earthen or rock bridges. Following the wall to the west will lead you to an unlocked chest. Returning to the path to the east, you will find a dead skeever caught in a bear trap. If you have the Fishing creation, some Fishing Supplies can be found here. Fish from Underground waters can be caught here. A search of the land beneath the pillars yields only a few fungi. At the top of the first ramp is a pressure plate that triggers a poison dart trap. Across the following bridge, on your right is a tripwire that triggers a spear trap from under the table behind. On the wooden table is an empty chest, an iron dagger, and three loose septims, with three food barrels and a sack beside it. The path continues to the north. At the bottom of the next ramp is another tripwire triggering a crossbow mount trap.
Continue up until you reach a raised wooden bridge in two halves, with a lever on the left. If you look to the south, you will see an archery target hanging from a stone pillar with a pressure plate in the middle of it, while next to the lever beside you is a quiver of steel bolts. Pulling the lever will lower the second half of the bridge, but raise the first half; shooting the pressure plate with a bolt or arrow will lower the first half. Once both are lowered, you can cross. At the far end is another raised wooden bridge to the north, and a lever that lowers it in front of you. This forms a ramp to a ledge above. The ledge continues to the west and a tunnel blocked by a metal gate. Look to the south to see another archery target with a pressure plate in the middle. Hit it once to raise the first gate, but there is a second one behind. Move into the tunnel and hit the plate again to lower the first gate and raise the second.
You enter a cave with three pressure plates on the ground; on one of them is a copy of Uncommon Taste. To the north is a tunnel blocked by another metal gate, above which is an archery target and pressure plate. On either side of the cave are ledges. If you climb to the right of the gate, you can easily reach this ledge, where you will find an unlocked chest. The other ledge is reachable using a single word of the Whirlwind Sprint dragon shout; however, there is nothing of interest on it. To raise the gate, you need to weigh down each of the pressure plates, then shoot the plate on the wall. This gate stays open permanently, so you can reclaim the items you dropped once it's up. Beyond the gate is a tunnel with another gate at the end, and above on a wooden platform is another archery target and pressure plate. Shooting the target will only raise the gate for a few seconds, so stand close and run or use Whirlwind Sprint to reach the tunnel in time.
Behind is a treasure trove containing an unlocked chest, with a straw bale to the right with two pickaxes and two ebony ores on top. In the middle of the room is a long wooden table with quivers of exploding steel bolts of fire, ice, and shock, and a copy of the rare Confessions Of A Khajiit Fur Trader. Against the northwest wall is a set of shelves holding three iron ingots, one gold ingot, a large coin purse, a red and a purple mountain flower, and four food sacks. There are two satchels containing minor loot attached to the left side of this set of shelves. To the east is a pile of sacks and three food barrels. To the right of these is a lever to raise the gate you entered through. A wooden door to the south leads to Dead Drop Mine.
Dead Drop Mine[edit]
Dead Drop Mine is a small corundum mine containing four corundum ore veins. You enter into a narrow tunnel heading south, and come to a room with several barrels and sacks scattered around. On your right, one of the barrels has a salt pile on top. Against the east wall is a long wooden table with three corundum ingots, an iron dagger, and two pieces of corundum ore on top. To the left of the table is a small cage, and to the right is a woodcutter's axe and a pickaxe on a crate. There is a corundum ore vein on the ground by the south wall, and another by the west wall, with the final two veins on a lit wall to the north. Between the second and third veins are a couple of straw bales, with another piece of corundum ore on top. To the south, past a couple of empty carts, is a narrow tunnel that leads to a wider tunnel heading west. On the left is a crate with three more iron ingots and an iron battleaxe on top.
Ahead on the right are some wooden steps leading up and around to a couple of platforms, the second of which has an unowned bed roll, a copy of the unique book The Sultry Argonian Bard, v1, and a chair and a small square table holding a flute, a quiver of steel bolts, an iron dagger, and two loose septims. Along the far edge of the platform is a pile of sacks, with two armed crossbows on top. Following the lower path, the passage turns south, passing on the right a set of shelves holding two potions of cure disease, six bottles of Nord mead, a bowl of vampire dust, copies of The Aetherium Wars and Troll Slaying, three pieces of mudcrab chitin, a charred skeever hide, and two bulbs of garlic. To the right is a barrel with a potato and two carrots on top. The tunnel continues to a wooden door to the east that leads back into Dead Drop Falls. Returning to the first zone through this door, you will find yourself behind the lever-operated gate described near the start of the walkthrough, with a pickaxe on a crate just under the lever.
Notes[edit]
- Followers will not drop down the falls with you; you'll be on your own after that point until you return to the start.
- You can take them with you if you tell them "wait here" and then sprint into them to push them down into the falls.
- Serana may follow you down, but may get stuck on the ledge just outside the concealed door.
- Magelight can also be used to trigger the pressure plates on the archery targets.
Maps[edit]
-
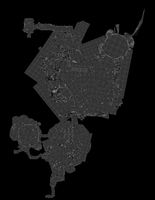
Dead Drop Falls
-
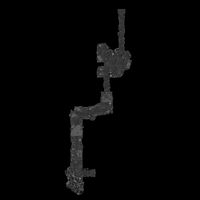
Dead Drop Mine

