Arena:Crystal Tower
|

Quick Walkthrough[edit]
- Go to sleep and receive another vision from Ria Silmane.
- Travel to the Mages Guild of Lillandril, Summurset Isle.
- Retrieve a diamond from the Priests in the Temple of Mad God.
- Return the diamond to the Mages Guild to learn of the location of the Crystal Tower.
- Recover the fifth piece of the Staff of Chaos from the Crystal Tower.
- Survive yet another attack from Jagar Tharn.
Detailed Walkthrough[edit]
Sleep, sleep, sleep[edit]
Ria Silmane will visit you the next time you sleep after retrieving a piece of the Staff of Chaos from Elsweyr. She will tell you:
"You have recovered the fourth piece! I honor your bravery. Listen closely now my friend, for Tharn has begun in earnest to look for you. Do not fear, he does not know your true identity, but he can sense the Staff's power. With four of the eight pieces, you stand out like a lantern at night. I urge you to caution. The fifth piece of the Staff lies in an ancient stronghold of sorcery called the Crystal Tower. It was said that the southern tip of the Dragon's Teeth, which stretches from the ice covered mounts of High Rock to the wooded forests of Valenwood, could be seen on the horizon from the top parapet of the Tower. This would lead me to believe it is not far south of the majestic mountain range. You must find the Tower and gain access to recover the fifth piece of the Staff of Chaos..."
Lillandril, Part 1[edit]
Asking around about the Crystal Tower leads you eventually to the Mages Guild in Lillandril, Summerset Isle. Corim Ashlen, the Loremaster of the Guild, tells you that they had a diamond that would tell them where the Crystal Tower is, but it was stolen by the Priests of the Mad God. The Guild also drew power from this diamond and for its safe return, are willing to share the tower's location. If you complete this task, the location of the Temple of Mad God is marked on your map.
Temple of Mad God[edit]
This temple, located a short way southeast of Lillandril, is a two-level dungeon with medium-sized levels full of monsters and monks. They are not much more difficult than the knights of the Temple of Agamanus in the previous quest, but their attacks are fast and dangerous. Don't underestimate them just because they aren't wearing armor. There are not many treasures here; in fact, this dungeon is almost empty, so the rewards of exploring will be mostly experience and loot from your battles.
On the first level, the way down is in the south central section of the dungeon. There's a lot of water on this level. If you choose to follow the water far to the west and then south and then east, you will find the way down no problem, but it's definitely the longer and more dangerous way. You can stay on the floor and make your way south and west (but not too far west) and you'll get there more directly and with fewer encounters.
The second level has a normal layout, but is quite large and full of endless chambers. If you find the large central treasure chamber (64,46), you'll find that you are too late. The treasure has been moved, but you also discover a note with a clue to its new location:
- A note on the floor instructs someone to move things to the secure storage area in the Northeast, "before any meddlers arrive"... Indeed, the room has been emptied.
The diamond is in the northeast section of the level. You want to head more north than east, as there are some dead ends if you go too far east. Thanks to the regular layout (no pits, no water), it's not hard to find.
When you get to the room with the diamond, answer the riddle to unlock the door.
- The area above the door is inscribed with the following:
- -
- What flares up
- And does a lot of good,
- And when it dies,
- Is just a piece of wood?
Answer with "torch", "torches", "match" or "matches", grab the diamond (16,3), and get back to Lillandril.
Upon answering the riddle:
- The door moves slightly as the lock disengages
Upon grabbing the diamond:
- You have found the Diamond Corim Ashlen sent you to recover. Only he can use it to see the Crystal Tower's location...
(Beware the explorer's temptation; for just behind the diamond is a cascade of raised platforms beckoning you to ascend the stairs. You will find that you can walk around the entire outer parameter of the dungeon. If you dare to step over the edge, you may find that you can walk on air in an endless cavern. You may find a duplicate dungeon where the paths are the same, but all the walls are invisible. You just might be able to return from your journey to complete your quest, or drop to the floor, and find that you are now trapped forever. This truly is the Temple of Mad God.)
Lillandril, Part 2[edit]
Back at the Mages Guild, return the diamond so they can mark the location of the Crystal Tower on your map.
Crystal Tower[edit]
"The Crystal Tower dominates the area, rising like an accusatory finger pointing at the sky above. This bastion of sorcery seemingly transcends normal human conceptions, existing in many planes other than this. You can sense the fifth piece of the Staff of Chaos, somewhere above..."
Upon accessing the dungeon, you may receive rather disheartening messages:
- All who enter this place, abandon hope...
- You enter the halls of the Crystal Tower, greeted by strange sounds and sights...
This dungeon is the reverse of all the other dungeons you've found so far in that you have to go up. Therefore, you are looking for green dots on your dungeon map rather than the blue dots you're used to searching for. In preparation, you may need lots of Potions of Heal True, Potions of Resist Shock (for use against homunculi), and a few Potions of Free Action (for use against medusa and spiders). Potions of Resist Fire could also be helpful, depending on your chosen stats and class.
The Crystal Tower has four levels. They are all small, though, so at least it doesn't take long to fully explore each of them and pick up their many treasures. The treasures here contain a lot of magic items, such as torcs, bracelets, and crystals.
The way up on the first level is in the northwest section. If you have Passwall, the most direct way is to just cut through straight north and loop a bit east. Otherwise, make your way around as closely west as you can. The last corridor that leads to the exit, is the home of many trolls. There is a chance you will meet your first vampire on this level. He's a very tough fight, and powerful magic is needed to beat him. Like with trolls, weapons can hurt him, but not defeat him. It's best to avoid him if you can't magically harm him, as his fireballs can cause a lot of damage.
The second level is curiously icy, and ice creatures abound. The way up is in the northeast corner. If you have Passwall, you can just head east and cut through the wall. Otherwise, when you get to the east wall you will have to make your way south and then back north. Here you will face many ice golems and homunculi. There is a room (12,15) on this level where, if you enter it and the door closes behind you, you cannot then leave the room by normal means. There's no need to enter it at all, though, because it only contains one ice golem and one pile of treasure. There is a trench in front of the door and you cannot reach the door from the other side of the trench. If you are in this room and the door is indeed closed, there are only four ways out (short of reloading the game):
-
- Levitate over the trench and open the door.
- Use Passwall to cut through the walls to a place you can scale the trench and climb out.
- Rest and hope you encounter a monster that will open the door in its effort to get at you.
- Jump towards the door; when you reach the door you will stop for a split second and your mouse will appear, so you can open door. This method can be difficult to accomplish, and may require several attempts.
This section has a single waterway entrance (41,19) which can sometimes become blocked by hovering homunculi. You may need to use Passwall to enter at a separate location. Also the entire far west corridor and southwest area contain a section that is separate from the main dungeon. This area has another three loot piles and a chest, but can only be reached by using a spell such as Passwall.
The third level, The Bestiary, is possibly the most interesting of all the dungeons: it's a zoo! Interestingly, there are buttons for each section, with which you can unlock all doors. This is not necessary, though, since you can open all but two doors by yourself and kill the monsters one by one and being open to the possibility of the specimens attacking you in group might not be the best of ideas...
There are monsters (including medusa and a stone golem) in cages with troll zookeepers guarding them, of which you learn as you advance in the level and kill the creatures, by receiving the messages:
- On this troll's body you find a crudely drawn map, obviously of this level. In the SE corner is a large, red 'x'. The map also shows an illegible scrawl just NW of this room, marking a location just beyond the cell door...
- You suddenly realize that the illegible scrawl may have been a warning in trollish...
- You can see pits behind the creatures. This must be what the Troll keepers use to feed the captive specimens...
The trolls, which lurk mainly by the buttons, are important: they carry keys. There is one magically-locked door that cannot be passed without a diamond key; it is in the southeast, and behind is the way up. Any of the trolls might carry a diamond key (it's random); loot each corpse to find the key. There is another troll that carries a steel key (initially at 43,33, but he'll move to you if he sees you), and that key unlocks a door to another area (35,45). You can also find a steel key in one of the medusae in the southwestern cells.
If you don't get a troll corpse with a diamond key, there is a diamond key on the floor (36,34).
Open the diamond key door (7,45), defeat the fire daemon awaiting you behind it, and go up.
As you enter the next level, you're struck with a realization:
- As the icy air blows by you, freezing the very breath in your lungs, you realize that only the most powerful of magics could sustain the varied environments you have witnessed in this tower...
The fourth level is more mundane. It also has a steel key lying around (2,23) and a steel key door (48,43). The key is not necessary, but it's a somewhat shorter path to the Staff piece if you can get it. Go north to get the key, being notified as you approach:
- You see a small key on the floor of this icy chamber, but other things seem to draw your attention
Go back south and go west while hugging the southern wall. Cut north when you have to, then loop back around to the room with the riddle door:
- To enter within, thou must find,
- The meaning of this passage...
- -
- "In a marble hall as white as milk,
- "Lined with skin as soft as silk,
- "Within a fountain crystal clear,
- "A golden apple, doth appear,
- "No doors there are to this stronghold,
- "Yet thieves break in to steal the gold...
The answer is "Egg" or "An Egg" and the Staff piece is found within (36,37).
Upon answering correctly:
- Thou may proceed mortal, to thy peril...
Answering incorrectly:
- Too quick with thy answer. Think, and try again...
Grabbing the Staff Piece:
- You attach the fifth piece of the Staff and for a moment feel a surge of energy pass into your body, almost as if the incomplete Staff were a live thing...
If you can't find the key, just take the long way around north, then west, then south. Behind the door to the staff piece, you'll encounter two wraiths.
Ambush[edit]
You will receive yet another ambush from Jagar Tharn, but this time his tone is changed:
"I have underestimated you, that is clear. You have not only defeated the useless creatures I have sent against you, but managed to survive the Crystal Tower, a feat that in and of itself could be legend. It is sad that I am forced to destroy you. Prepare, for my minions arrive..."
Notes[edit]
- There are lots of trolls in the Crystal Tower. One way to deal with them is to beat them down with weapons, then rest for zero hours. You don't gain the experience from them if you do this, but this can help maintain your resources at lower levels. You can still loot them, which is especially helpful if you are looking for the keys mentioned previously.
- The Crystal Tower can be found in the Lore section for more information and references in future games.
- Each specimen cell in Level 3 has a description of the creature it holds, including:
- Rats
- Goblins
- Lizard Man
- Snow Wolf — Warning, specimen has ice breath attack.
- Orcs
- Skeleton
- Minotaur
- Spider — Warning, this specimen is highly poisonous.
- Ghoul — Warning, highly cannabilistic. Do not feed.
- Hell Hound — Warning, this specimen is highly aggressive.
- Zombie — Warning, this specimen causes disease.
- Wraith — Warning, specimen has spellcasting abilities.
- Homoculus — Warning, specimen has spellcasting abilities.
- Ice Golem — Warning, this specimen has a damage aura.
- Stone Golem — Warning, this specimen throws rocks.
- Fire Daemon — Warning, this guardian is extremely dangerous.
- Medusa — Warning, gaze attack. Do not stare.
- Ominously, you may also find an extra cell without occupant, reading:
- This cell is empty. On a plaque to one side has been hastily etched your name. It seems someone has been expecting you...
- Other, fundamentally unimportant messages you may receive crossing the Third Level are:
- A heavy, musky scent wafts through the rough hewn corridors. In the distance you can hear what sounds to be low growls...
- The stench of offal and excrement is almost unbearable. Nearby you can hear strange sounds issuing from what looks like cell doors...
- Caution: Specimens may inhabit these tunnels (When entering the pits beneath the cells)
Maps[edit]
-
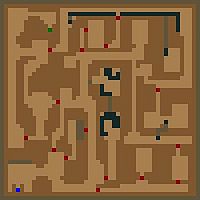
First Level
-
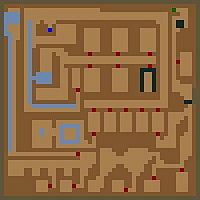
Second Level
-
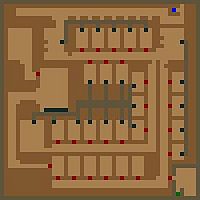
Third Level
-
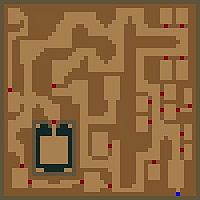
Fourth Level


Quest Log[edit]
| Crystal Tower () | ||
|---|---|---|
| Stage/ Index |
Finishes Quest | Journal Entry |
| 0 | (Date): The Mages of Lillandril have marked on your Summurset Isle map the location of the Temple of the Mad God... | |
| 1 | (Date): Marked on your continental map is the crucible of magic, known as the Crystal Tower, in the province of Summurset Isle... | |
| Prev: Halls of Colossus | Up: Main Quest | Next: Crypt of Hearts |