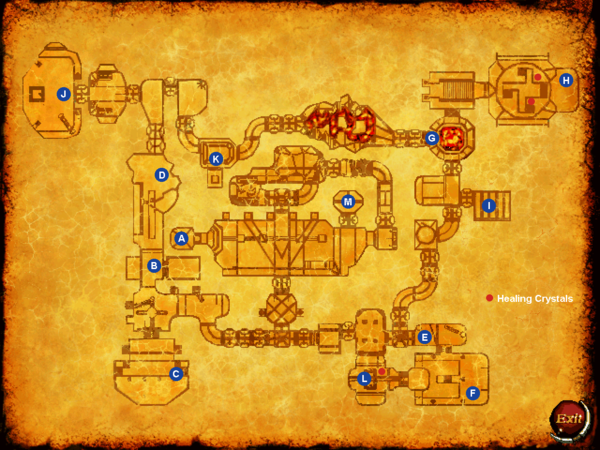
Battlespire:Level 2a

Contents
- 1 Quick Walkthrough
- 2 Detailed Walkthrough
- 2.1 Point A
- 2.2 Point B - Magicka Congeries
- 2.3 Point C - Upper Study
- 2.4 Point D - Cavern & Bridge
- 2.5 Point E
- 2.6 Point F - Conjury Hall
- 2.7 Point G - Fire Pit Room
- 2.8 Point H - Summoning Hall
- 2.9 Point I - Storage
- 2.10 Point J - Lecture Hall
- 2.11 Point K - Teleportal
- 2.12 Point L - Guard Point
- 2.13 Point M - Storage
- 3 Enemies
- 4 Bugs
- 5 Map
Here, you will learn more about the fall of the Battlespire as well as some information regarding the politics of the Daedra. They are searching for something called the "voidguide". You must find a piece of this strange item and a Meht Sigil of Entry to continue.
This level contains quite a few good magic items. However, in addition to facing more Scamps, Vermai, and Dremora, you will also face many powerful Spider Daedra.
Quick Walkthrough[edit]
- You arrive from The Weir Gate at Point A.
- Make your way to Point E, click the coffin against the wall to reveal a switch. This opens a door behind you.
- Enter the secret room and talk to Perthan Vorn. Kill him (he's quite powerful) and get the Meht Sigil of Entry.
- Descend into the pit at Point D and activate the lever using the password "bell tower". A book of riddles and answers can be found at Point C. The lever creates a bridge above you.
- Cross the bridge and move onto Point J. Activate the lever on the southeast wall (it does either 3/4 or 1/2 of your total health of damage, so heal up first). Take the voidguide piece from the secret closet which opens in the north wall.
- Take the voidguide piece to Rishaal at Point K. After some conversation, she should give you a Zyr Sigil of Entry. Enter the door behind her with the password "horse".
- Enter the teleporter to move on to the second half of this level.
Detailed Walkthrough[edit]
Point A[edit]

Your trip aboard the Star Galley from The Weir Gate passes without incident. But as soon as you enter this level, it becomes apparent the way back has been cut off; you are marooned here, at least for the moment.
Take a quick look around and you will notice a scroll near your landing point. It contains some very useful information from your friend, (Vatasha or Josian). Among its contents:
- The Bad News:
- Wizards and guards are dead with no prisoners found.
- Daedra everywhere.
- Scamps are weak, but sneaky pack fighters.
- Vermai are stupid and very tough.
- Paxti Bittor is the traitor.
- Daedra may have some codes and keywords.
- Many rooms are inaccessible.
- Teleporters don't work.
- Floating symbols are magic sigils, and deadly!
- The Good News:
- Boss daedra is named Sumeer and has a mass teleportation artifact.
- Vatasha/Josian is sticking close to Sumeer and will try escape.
- Command and security are sloppy, possibly due to politics.
- Suggestions:
- Teleportal to north near tiger rug has a password which may be nearby.
- Find out how daedra got here. Bittor was master of teleportation and voidgates.
- Search for codes and keys and clues and weapons.
- Search for more clues from Vatasha/Josian.
Your friend also left behind some healing potions for you...hopefully he or she's surviving a little better than you. As you adventure around you find that monsters are carrying four different sigils, Zyr, Meht, Web and Roht.
Point B - Magicka Congeries[edit]


There is a magical door here, to which is bound a riddle:
- Some live in me, some live on,
- And some shave me to stride upon.
- I rarely leave my native land.
- Until my death I always stand.
- High and low I may be found
- Both above and under ground.
This may appear daunting, but fortunately the answer can be found book of riddles stashed at nearby (Point C). The answer to this riddle is "tree" (alternative answers are "trees", "tree trunk", "trunk", "wood", and "timber"). Once the password is successfully entered, the door opens.
Press the button on the far wall and the altar in the center of the room slides away, revealing a scroll and a gem. The scroll indicates the gem is an item recharging device.
Point C - Upper Study[edit]


There are two scrolls under the platform here. One is Codex Arcana, Volume III, but of more interest is The Kendhall Book of Riddles, a collection of four riddles along with their answers. All four riddles are used somewhere on this level, so keep this close to you (Points B, D, G and K).
Point D - Cavern & Bridge[edit]


You come across a large pit with a door on the other side, but the yawning chasm is far too wide to jump. Search to the left to find a narrow, sloping walkway leading down to the lower level. You find a chest guarded by some Vermai, but on more careful inspection you also find a small lever behind some crates, protected with a riddle:
- I rise above the roofs below
- Finger up-raised to heaven.
- I speak in clear tones
- That aim for others
- To gather where I call.
Once again, the answer is given in the Book of Riddles found at Point C. The answer is "bell tower" (alternative answers are "tower", "steeple", "bell towers", "towers", "steeples", "church tower", "temple", and "shrine"). Pull the lever and a bridge extends across the pit to grant access to the portal beyond.
Point E[edit]


In your travels you come across a coffin lying up against the wall. On closer inspection you notice some sort of device just behind it. You touch the coffin and activate some sort of spell, moving the coffin to the side, revealing a button. You cautiously press the button to reveal a secret entrance on the opposite wall.
Point F - Conjury Hall[edit]

Through the secret chamber you found at Point E, you find a Spider Daedra. After some futile conversation you find that he appears to know the location of one of the void guide pieces. After a little convincing (the hard kind) you manage to find a Meht sigil of entry among his possessions. You find later that this was a powerful Spider Daedra named Vorn.
Point G - Fire Pit Room[edit]


You come across yet another door bound by a riddle:
- Armor bright
- Gleaming white
- A single rank
- Their faces blank
- Now hid by night
- Now bold by light
- Bright red the land
- Where soldiers stand
Looking in your trusty Book of Riddles, you find the answer to be "teeth" (alternative answers are "tooth", "mouth", and "tongue").
The room on the west side of the riddle door is a deep, open-air chasm filled with lava. You must make your way across the tops of protruding stone spires to reach the other side. Beware, as a Dremora guards the riddle door here. East of the riddle door is a small room containing a deep well (also filled with lava) and guarded by some angry Spider Daedra.
If you approach Point G by way of Points B, D and K, you will encounter the chasm room first; if you arrive by heading north from Point E, you will find yourself in the well room.
Point H - Summoning Hall[edit]

Make your way to the stairs leading into this chamber. The way appears barred by a portcullis, but standing on the rug before it triggers its opening. Inside this large room are a pair of healing crystals, a Dremora, and some rather nice magic weapons scattered about the walls. But more importantly, at the back of the room you will run into a rather bored-sounding Daedra by the name of Zenaida Nacarra. She doesn't appear menacing (yet, at least) so approach and speak to her.
Among the things you can learn are that Vorn has a Meht Sigil of Entry (Point G) and that the Scamps have made off with the pieces of the voidguide. Further attempts at conversation won't go so well, with Zenaida accusing you of being the wanted Vatasha Trenelle/Josian Kaid. However, you can use this to your advantage and strike a bargain to cause havoc among her competitors. She will even give you a Roht Sigil of Entry that Rishaal mysteriously "lost".
Point I - Storage[edit]

You find the corpse of Battlemage Arcem Terastang here, along with a scroll seeking vengeance. Nearby you find various magic items, once the possessions of the ill-fated mage.
Point J - Lecture Hall[edit]


The entryway to this room is blocked by a Meht Sigil of Warding. Use the corresponding Sigil of Entry found at Point G you pass through unhurt. The room is also guarded by a trio of Daedra, so be on guard. Take a look around; there is a lever on the wall to the right of the entrance. Pull it, and you get hit with a powerful defense spell. However, a secret panel wall to the north opens, revealing a piece of the voidguide. Take it.
Point K - Teleportal[edit]

You come across a strange sight here, a small girl. Speak to her, and you will quickly find this is not the case; her name is Rishaal Tamir and not only is she a Daedra, she's the one the Scamps answer to. Rishaal is looking for a lost piece of the voidguide, which it appears the Daedra need to operate some sort of device. She promises a "reward" if you return it to her.
Once you have the piece of the voidguide from Point J, return and deliver it to Rishaal. Your reward is a Zyr Sigil of Entry, which allows you to access the "secret parts" of Battlespire.
With the Sigil from Rishaal in hand, open the door. It is protected by a riddle once again:
- Loadbearer, Warrior
- Spirited, Brave
- Fleet-foot, Ironshod
- Faithful One, Slave
The answer can again be found in the Book of Riddles: "horse" (alternative answers are "horses", "pony", "ponies", "steed", "destrier", and "courser"). Inside you find a teleport pad protected by a Zyr Sigil of Warding. With the corresponding Sigil of Entry in hand, pass through to access the second half of the level.
Point L - Guard Point[edit]

The Zyr Sigil of Entry you received at Point K, also allows you entry into this storage room. Inside, you will find a decent stash of magic items. Move some crates on the west wall to reveal a lever, and pull it to reveal a hidden stash of loot beneath the planks in the center of the room. Additionally, this reveals another switch in the floor, which when activated opens the door on the east wall to Point F (useful if you have not found the secret entrance at Point E). There is also a healing crystal in this room.
Point M - Storage[edit]

This room is protected with a Roht Sigil of Warding, which you can bypass with the Sigil of Entry obtained from Zenaida Nacarra at Point H. The chests and bags in this room merely contain some random loot.
Enemies[edit]
Total number found in level 2a and level 2b:
- 18x Dremora
- 30x Scamp
- 22x Spider Daedra
- 30x Vermai
Bugs[edit]
- The scroll near the entrance is visible but may be irretrievable.
- Rarely, Perthan Vorn at Point F may become unreachable. Save before approaching him.
- Dremora Gatanas may not be present at Point J, though his dialogue remains accessible if you speak to the Vermai or Perthan in the room.
Map[edit]
.png)
| Prev: The Weir Gate | Up: Quests | Next: Administration, Labs and Library, Part 2 |