Oblivion:Moss Rock Cavern
|
|||
|---|---|---|---|
| # of Zones | 1 | ||
| Occupants | |||
| Necromancer Enemies, Undead, Raelynn the Gravefinder (2 boss-level Necromancers) |
|||
| Important Treasure | |||
| 2 boss-level Chests | |||
| Console Location Code(s) | |||
| MossRockCavernExterior, MossRockCavern | |||
| Region | |||
| Great Forest | |||
| Location | |||
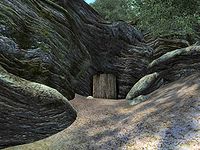
| North of the Imperial City, north of the Red Ring Road near Roxey Inn | |||
Moss Rock Cavern is a small cave north of the Imperial City containing necromancers and undead (quest-related). It contains only one zone, Moss Rock Cavern.
Related Quests[edit]
- The Gravefinder's Repose: Help the innkeeper deal with a local Necromancer.
Notes[edit]
- This cave can be entered and fully explored without initiating the related quest, but Raelynn the Gravefinder will not be present.
- Two statues to Daedric Princes can be found in the cave, one of Namira and one of Molag Bal. The necromancers seem to have placed various offerings to the statuette of Molag Bal.
- This cave contains 3 Cairn Bolete plants and 8 Wisp Stalk plants.
Exterior[edit]
- The exterior is located at coordinates: Tamriel 11, 26
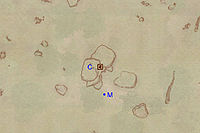
- This location's map marker (M on map) is named Moss Rock Cavern (editor name MossRockCavernMapMarker). The entrance door is N of the marker, 60 feet away.
- The following plants can be found near the entrance: 5 Monkshood plants and 4 Primrose plants
Zone 1: Moss Rock Cavern[edit]
This cave is fairly straightforward. Upon entering through door Out, you will find yourself in a room containing two enemies, two minor loot chests, and the cave's only intersection. It is advisable to lure the two enemies back into the entrance tunnel, as the fighting might alert other enemies in adjacent rooms. In the northwest corner of the room is a Hard-locked wood door (C) leading to Raelynn's chamber. If you are only interested in the related quest, you can immediately pick the lock and fight her. The other option is to first explore the entire zone until you find the key to the door.
The path to the east leading through most of the zone is simple: fight your way through the enemies you encounter (searching a minor loot chest on the way) until you reach the final room. In the large rectangular chamber you will find three undead enemies. As they are on a lower level, try to take advantage of the high ground by killing them when they are below you or attempting to climb up.
The final room holds two enemies, one of them a boss-level necromancer (A). Try to fight the first enemy in the passage so you can deal with the stronger necromancer alone. The room also features a necromancer's chest (k) containing the key to Raelynn's room and a good chance of loot, a bed (b) in the northeast corner with one sample each of nightshade and ogre's teeth nearby, and a Daedric statue. Three zombie corpses are sprawled on an altar in the middle of the room.
Backtrack to the wood door and open it with the key. In the room beyond you will find Raelynn (Q) and a second boss-level necromancer (A). Try to concentrate first on Raelynn, then the other necromancer. Also in the room are two boss chests (B), a minor loot coffin, a Daedric statuette, and an assortment of gems.
Occupants:
- Raelynn the Gravefinder (non-respawning; does not appear until related quest is started) at location Q on map
- 2 boss-level Necromancers at A
- 4 Necromancer Enemies (each 50% probability Necromancer, 50% Undead)
- 3 Undead
- 3-4 Nuisance Animals
Treasure:
- 2 boss-level Chests (Necromancer variety; both locked) at locations B on map
- 1 Chest 03
- 2 Chests 04
- 1 Coffin 01
- 1 Necromancer's Chest (contains Necromancer's Moss Rock Key, 25% chance soul gem, 10% jewelry, 10% potion, 50% scroll; non-respawning) at k
- The following plants will always be found: 3 Cairn Bolete plants and 8 Wisp Stalk plants
- The other following items will always be found: 1 Flawed Pearl, 1 Flawed Sapphire, 1 Flawed Topaz, 1 Nightshade, 1 Ogre's Teeth, 1 Ruby, and 1 Topaz
- Some of the above items are clustered at B: 1 boss-level Chest (Necromancer variety; locked), 1 Flawed Pearl, 1 Flawed Sapphire, 1 Flawed Topaz, 1 Ruby, and 1 Topaz
Doors and Gates:
- There is one door (at Out) in/out of this zone, leading outside
- 1 Wood Door at C (locked, Hard lock, opened by Necromancer's Moss Rock Key)
Other:
- 1 bed at location b on map


