Shivering:Knotty Bramble
|
|||
|---|---|---|---|
| # of Zones | 3 | ||
| Occupants | |||
| Grummites (1 boss-level Grummite) |
|||
| Important Treasure | |||
| 1 Blind Watcher's Eye plant Lorenz Bog-Trotter's Skull 1 boss-level Chest 1 boss-level Chest 2 Hollowed Amber Limbs 1 Hollowed Amber Stump 1 Madness Ore Deposit |
|||
| Console Location Code(s) | |||
| XPKnottyBrambleExterior, XPKnottyBramble01, XPKnottyBramble03, XPKnottyBramble02 | |||
| Region | |||
| Dementia | |||
| Location | |||
| Southeast of The Fringe, and south of the Hill of Suicides | |||
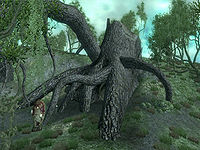
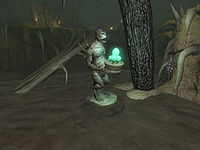
Knotty Bramble is a medium-sized root cave southeast of the Gates of Madness, just off Pinnacle Road, containing Grummites (quest-related). It contains three zones: Knotty Bramble, Knotty Bramble, Hatchery, and Knotty Bramble, Lost Crypt.
Related Quests[edit]
- A Liquid Solution: Find the Ultimate Cure.
- Ghosts of the Hill of Suicides: Help free five wandering souls.
- The Museum of Oddities: Una Armina wants you to find "Oddities" for her museum.
Notes[edit]
- This cave can be entered, fully explored and all items retrieved without starting the related quests. Note that the pool statue in Knotty Bramble, Hatchery will not dispense "aquanostrum" before A Liquid Solution is initiated.
- This cave contains 2 Screaming Maw plants, 13 Watcher's Eye plants, 36 Root Stalk plants, 100 Withering Moon plants, and 1 Blind Watcher's Eye plant.
- The location codes for Knotty Bramble, Hatchery and Knotty Bramble, Lost Crypt are misnumbered.
Exterior[edit]
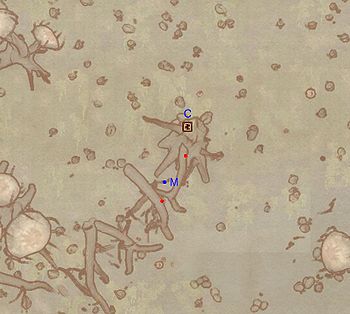
- The exterior is located at coordinates: SEWorld 0, -4
- This location's map marker (M on map) is named Knotty Bramble (editor name XPKnottyBrambleMapMarker). The entrance door is NNE of the marker, 70 feet away.
- 2 Grummites (Dementia) are near the entrance
- The following plants can be found near the entrance: 7 Black Tar plants, 5 Blister Pod plants, 2 Putrid Gigantea plants, 5 Fungus Stalk plants, 2 Letifer Orca Planta plants, and 9 Mushroom Tree Sapling plants
Zone 1: Knotty Bramble[edit]
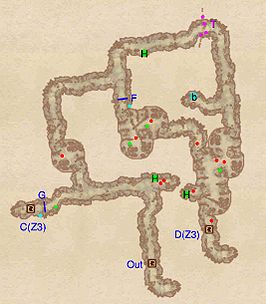
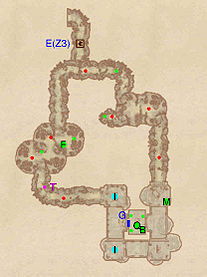
There are two doors leading to Knotty Bramble, Hatchery: C and D. While the former is very close to the entrance, the twisted roots at G can only be opened from the other side; so your only choice is the long path to D. While you progress through this mainly linear zone, make sure to loot all of the hollowed amber stumps (H) you encounter. The twisted roots at F are also opened from the other side, which forces you to head straight, past 4 root spikes (T). A bedroll (b) can be found in a room nearby. Finally, exit through door D leading to Knotty Bramble, Hatchery.
Occupants:
- 6 Grummites (Dementia)
- 4 Grummites (Dementia; group list)
Treasure:
- 2 Hollowed Amber Limbs (1-4 Amber; non-respawning) at locations H on map
- 1 Hollowed Amber Stump (1-4 Amber; non-respawning) at H
- 2 Hollowed Stumps
- 2 Hollowed Stumps (Healing)
- The following plants will always be found: 2 Screaming Maw plants, 16 Mushroom Tree Sapling plants, 9 Watcher's Eye plants, 21 Root Stalk plants, and 54 Withering Moon plants
Traps:
- 4 Root Spikes traps at location T on map
Doors and Gates:
- There are three doors in/out of this zone
- 1 door (at Out) leads outside
- 2 doors (at D and C) lead to the zone Knotty Bramble, Hatchery
- 2 Twisted Roots (opened remotely) at F and G
Other:
- 1 bedroll at location b on map
Zone 2: Knotty Bramble, Hatchery[edit]
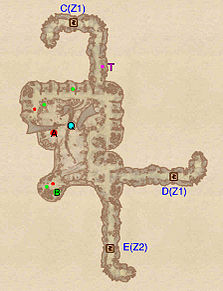
Upon entering from door D, you will find yourself on the higher level of a large room - take advantage of your position to snipe at the boss-level Grummite at A and to avoid a confrontation with all three of the nearby grummites. From the upper level you can return to the first zone via door C or proceed to jump down into knee-deep water for access to Knotty Bramble, Lost Crypt through door E. Before exiting, make sure to loot the boss chest (B) in the southwestern corner of the higher level. In the middle of the lower level is a statue (Q) that dispenses "aquanostrum", if the quest A Liquid Solution is active.
Occupants:
- 1 boss-level Grummite (Dementia) at location A on map
- 1 Grummite Magus (Dementia)
- 1 archer Grummite (Dementia, always best possible level)
Treasure:
- 1 boss-level Chest (Grummite variety) at location B on map
- 1 Hollowed Stump (Healing)
- 1 Urn (Healing)
- 1 Urn (Healing)
- The following plants will always be found: 27 Grummite Egg Mound plants, 9 Mushroom Tree Sapling plants, 2 Root Stalk plants, and 12 Withering Moon plants
Traps:
- 1 Spore Pod trap at location T on map
Doors and Gates:
- There are three doors in/out of this zone
- 2 doors (at C and D) lead to the zone Knotty Bramble
- 1 door (at E) leads to the zone Knotty Bramble, Lost Crypt
Other:
- 1 Pool Statue at location Q on map
Zone 3: Knotty Bramble, Lost Crypt[edit]
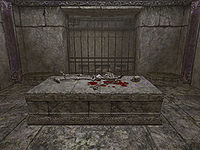
This zone is fairly simple: just make your way around in a clockwise fashion. Along the way, ensure you loot the madness ore deposit at M. If you move the body of the northernmost (male) Preserved Zealot at I, you will discover a push button; pressing it will open the secret wall at G. What you discover is an enclosed mausoleum dedicated to Lorenz Bog-Trotter, his head encircled by nightshade and his hand still clutching an ebony dagger replica. You will need his skull (Q) for an unmarked quest. Also inside is a boss-chest (B). If you do not wish to reanimate the two Zealots, take care not to move behind Lorenz when grabbing the skull. However, this will prevent you from accessing the two chests along the western wall of the chamber. Complete the loop and jump down a hole to return to door E. Don't forget to pick up the "odd" blind watcher's eye at F.
Occupants:
- 2 Grummites (50% chance melee Grummite; 25% archer Grummite; 25% Magus Grummite, always best possible level)
- 5 Grummite Enemies (40% chance melee Grummite; 20% archer Grummite; 20% Magus Grummite; 20% Baliwog)
- 2 dead Preserved Zealots at locations I on map (Altmer, one male and one female, may be resurrected)
Treasure:
- 1 Blind Watcher's Eye plant at location F on map
- Lorenz Bog-Trotter's Skull at Q
- 1 boss-level Chest (Zealot variety) at B
- 1 Madness Ore Deposit (1-4 Madness Ore; non-respawning) at M
- 1 Chest (locked)
- 2 Hollowed Stumps
- 2 Hollowed Stumps (Healing)
- 1 Urn
- 1 Urn (Healing)
- The other following items will always be found: 4 Nightshades and 1 Ebony Dagger Replica (pretty but worthless)
- The following plants will always be found: 7 Mushroom Tree Sapling plants, 4 Watcher's Eye plants, 13 Root Stalk plants, and 34 Withering Moon plants
- Some of the above items are clustered at location Q: 4 Nightshades, 1 Ebony Dagger Replica (pretty but worthless), and Lorenz Bog-Trotter's Skull
Traps:
- 1 Spore Pod trap at location T on map
Doors and Gates:
- There is one door (at E) in/out of this zone, leading to the zone Knotty Bramble, Hatchery
- 1 Secret Wall at G which can be opened by moving the northernmost Zealot's body off the stone altar, revealing a small push button underneath.
