Oblivion:Underpall Cave
|
|||
|---|---|---|---|
| # of Zones | 5 | ||
| Occupants | |||
| Vampire Enemies, Undead (1 boss-level Necromancer) |
|||
| Important Treasure | |||
| 1 boss-level Coffin | |||
| Console Location Code(s) | |||
| UnderpallCaveExterior, UnderpallCave, UnderpallCave02, UnderpallCave03, UnderpallCave04, UnderpallCave05 | |||
| Region | |||
| Great Forest | |||
| Location | |||
| West-southwest of Bruma, just north of the Orange Road | |||
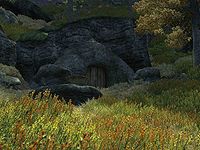
Underpall Cave is a large cave between Bruma and Chorrol containing necromancers (plugin-related). It contains five zones: Underpall Cave, Underpall Keep, Underpall Keep - North Wing, Underpall Keep - South Wing, and Underpall Reflecting Chamber.
Related Quests[edit]
- The Sword of the CrusaderKotN: Retrieve the Sword of the Crusader and reconsecrate it.
Notes[edit]
- This cave leads to an underground fort, Underpall Keep. Three of the zones are within the keep.
- The only necromancer is in the fifth zone, the Underpall Reflecting Chamber.
- This area is associated with the official plug-in Knights of the Nine, which makes a few minor changes to the fifth zone (Underpall Reflecting Chamber), including the addition of the tomb of Lord Berich Vlindrel.
- This cave contains 8 Cairn Bolete plants and 6 Wisp Stalk plants.
- Underpall Cave also appeared in ESO.
Exterior[edit]
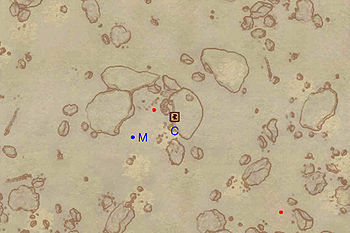
- The exterior is located at coordinates: Tamriel -3, 32
- This location's map marker (M on map) is named Underpall Cave (editor name UnderpallCaveMapMarker). The entrance door is ENE of the marker, 50 feet away.
- 1 Wilderness Creature (Forested Mountains variety) is near the entrance
- 1 Wilderness Creature (Mountains variety) is near the entrance
- The following plants can be found near the entrance: 6 Clouded Funnel Cap plants, 1 Milk Thistle plant, and 17 Monkshood plants
Zone 1: Underpall Cave[edit]
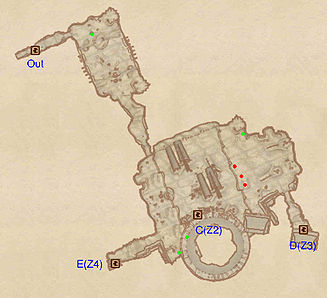
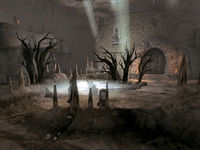
This zone is pretty straightforward; follow the corridors and rooms until you find yourself in a big chamber with a graveyard and the outer walls of a fort. Through door C you will be able to reach Underpall Keep.
There are two ledges in the big chamber, high above the entry level. They are located on the both sides of the chamber. The eastern ledge can be reached through Underpall Keep North Wing (door D). It contains a chest and allows you take out the three Skeleton Archers that were shooting at you. From here you will only be able to jump down off the ledge; it is advisable to try to land on the trees to reduce the distance you fall. The western ledge can be reached through Underpall Keep South Wing (door E). It holds one chest and a Cairn Bolete plant.
Occupants:
- 3 Skeleton Archers
Treasure:
- 2 Chests 01 (1 locked)
- 2 Chests 03
- One of the chests is inaccessible (the chest just west of door C is inside the wall of the keep).
- The following plants will always be found: 3 Cairn Bolete plants and 5 Wisp Stalk plants
Doors and Gates:
- There are four doors in/out of this zone
- 1 door (at Out) leads outside
- 1 door (at C) leads to the zone Underpall Keep
- 1 door (at D) leads to the zone Underpall Keep - North Wing
- 1 door (at E) leads to the zone Underpall Keep - South Wing
Zone 2: Underpall Keep[edit]
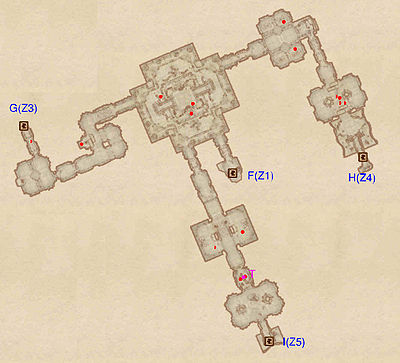
Unlike the first zone, this zone is quite complex. You enter through door F, and at the end of a small corridor you will find yourself in a big chamber with three enemies. From this point three corridors depart: one in the southwest corner of the room; one in the northwest corner; and, one in the northeast corner.
- The corridor in the northeast corner will lead you to only one or two enemies and door H to Underpall Keep - South Wing.
- The corridor in the northwest corner will lead you to door G to Underpall Keep - North Wing. Be careful, as in the last chamber you could end up fighting with up four enemies at the same time.
- The corridor in the southwest corner will lead you to door I to Underpall Reflecting Chamber. Apart from enemies, the only obstacle you will find on your way is a Cave In trap (at T) between the two rooms which might prove useful in fighting against the two enemies there.
Occupants:
- 1 Melee Skeleton
- 1 Bones Undead
- 3 Skeleton Archers
- 1-4 Zombie Undead
- 0-1 Zombie Undead (always best possible level)
- 3-4 Undead Enemies (each 83% probability Undead, 17% Rat)
- 1 Nuisance Animal
Traps:
- 1 Cave In trap at location T on map
Doors and Gates:
- There are four doors in/out of this zone
- 1 door (at F) leads to the zone Underpall Cave
- 1 door (at G) leads to the zone Underpall Keep - North Wing
- 1 door (at H) leads to the zone Underpall Keep - South Wing
- 1 door (at I) leads out of dungeon to Underpall Reflecting Chamber
Zone 3: Underpall Keep - North Wing[edit]
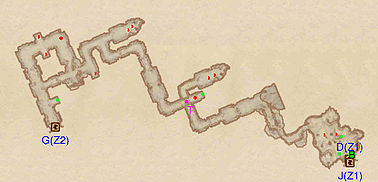
You enter this zone from door G and go straight ahead. Be careful of enemies here, as you might wind up fighting up three of them at the same time. Continue along the corridors until you arrive at a dead end with an enemy and a Spike Pit trap (at T). You can try to make an enemy fall down this trap but this could alert the enemies on the lower part of this level. If you jump over the gap you can loot a minor chest.
If you fall down into the trap (try dropping at the sides of the hole where you may miss the spikes), you gain access to an otherwise inaccessible area. After you drop into the trap, you will be unable to return the way you came: the only way out is to continue out door D and jump down from the ledge outside that door. On the way, you will pass through a room with one or two enemies, two minor loot chests and the boss-level coffin (B).
Occupants:
- 0-1 Vampire Enemy (each 50% probability Vampire, 33% Undead, 17% Vampire Beast)
- 2 Skeleton Archers
- 0-10 Undead Enemies (each 83% probability Undead, 17% Rat)
Treasure:
- 1 boss-level Coffin (Undead variety) at location B on map
- 1 Chest 01
- 1 Chest 02 (locked)
- 2 Chests 04
Traps:
- 1 Spike Pit trap at location T on map
Doors and Gates:
- There are three doors in/out of this zone
- 2 doors (at D and J) lead to the zone Underpall Cave
- 1 door (at G) leads to the zone Underpall Keep
Zone 4: Underpall Keep - South Wing[edit]
You enter this zone from door H. In the first room you enter you can find up to four Skeleton Archers shooting at you from inaccessible ledges. Unless you possess on-target spells, arrows, or a summoned creature that has a ranged attack, you may find fighting these enemies quite challenging.
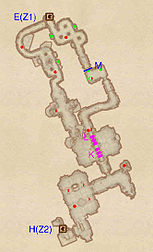
Another interesting part of this level is a bridge filled with twelve Pressure plates (K)and six Swinging Mace Traps (T). They will make it difficult to move across the bridge and could get in your way while fighting against the enemies on the far side. If you fall off the bridge you will have to backtrack all the way to gate M, which you will have to pick open (unless you have a Telekinesis spell) since the key is on the other side of that door.
Further ahead is the above-mentioned gate M which has a leveled lock but which is opened by the key that lies in front of it. Be careful as it could be knocked away during the fighting with the enemy in that room. Once you arrive at the end of this level jump through the frame to the left of door E to finish exploring this level. When you arrive at a dead-end turn back round and enter the western ledge in Underpall Cave through door E.
Occupants:
- 3-5 Bones Undead
- 2-6 Skeleton Archers
- 1 Nuisance Animal
Treasure:
- 1 Chest 03
- 2 Coffins 01
- 1 Coffin 01
- Underpall Gate Key at location k on map, opens gate M
Traps:
- 6 Swinging Mace traps at L, activated by the 12 Pressure Plate triggers at K
Doors and Gates:
- There are two doors in/out of this zone
- 1 door (at E) leads to the zone Underpall Cave
- 1 door (at H) leads to the zone Underpall Keep
- 1 Gate at M (locked, opened by Underpall Gate Key at k)
Zone 5: Underpall Reflecting Chamber[edit]
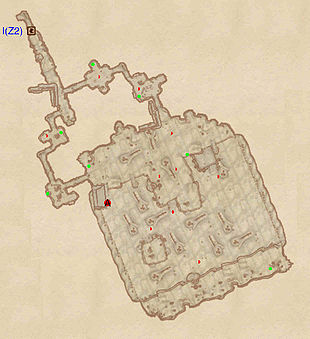
Once you enter this zone, follow the first corridor until you reach an intersection. Both passageways eventually lead you to the huge final chamber and both contain enemies and minor loot chests. The decision should be taken according to your character; if you're a spellcaster or a marksman you will find the eastern passage better as you end up away from the Boss-level Necromancer (A) while if you are a warrior or a back-stabbing assassin the western passage will take you closer to him.
If you have the Knights of the Nine plug-in, and have reached The Sword of the Crusader quest, the Adept will not appear and an additional five wraiths materialize instead.
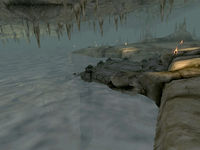
This zone also features a large underground lake with some Slaughterfish. There is one underwater chest in the lake (on the north side, next to the dock) and one floating chest (on the south side), both containing gold.
Occupants:
- 1 boss-level Necromancer at location A on map
- 0-6 Undead Enemies (each 83% probability Undead, 17% Rat)
- 0-4 Slaughterfish
Treasure:
- 3 Chests 01 (1 locked)
- 1 Chest 03
- 1 Chest 03
- 1 Chest 04
- 1 Coffin 01
- The following plants will always be found: 5 Cairn Bolete plants and 1 Wisp Stalk plant
Doors and Gates:
- There is one door (at I) in/out of this zone, leading to the zone Underpall Keep
