Skyrim:Ansilvund
This article is about the location. For the quest, see Ansilvund (quest).
|
|||
|---|---|---|---|
| # of Zones | 2 | ||
| Clearable | Yes | ||
| Dungeon | Yes | ||
| Respawn Time | 10 days or 30 days | ||
| Level | Min: 8 | ||
| Occupants | |||
| Draugr, Necromancers, Fjori, Holgeir, Lu'ah Al-Skaven |
|||
| Important Treasure | |||
| 2920, Sun's Dawn, v2 Ghostblade Spell Tome:Transmute Mineral Ore Unusual Gem |
|||
| Console Location Code(s) | |||
| AnsilvundExterior, Ansilvund01, Ansilvund02 | |||
| Region | |||
| Eastmarch | |||
| Location | |||
| North of Riften East of Cragslane Cavern |
|||
| Special Features | |||
| # of Alchemy Labs | 2 | ||
| # of Arcane Enchanters | 2 | ||
| Ore Veins | |||
| # of Iron | 1 | ||

Ansilvund is a medium-sized Nordic ruin north of Riften containing draugr and necromancers. It contains two zones: Ansilvund Excavation and Ansilvund Burial Chambers.
The ruins are the remains of the tomb built by Holgeir in memory of Fjori, as described in the book Of Fjori and Holgeir.
Related Quests[edit]
- Ansilvund: Kill Lu'ah Al-Skaven in Ansilvund.
- Arniel's Endeavor: Uncover an ancient Dwemer secret. (radiant)
- Dungeon Delving: Do a favor by retrieving an item from a cave. (radiant)
- No Stone Unturned: Find the 24 gems to restore the Crown of Barenziah.
- Onmund's Request: Help Onmund negotiate the return of a family amulet from Enthir. (radiant)
- This location is one of many potential targets for one or more of the Radiant quests.
Walkthrough[edit]
Exterior[edit]
The entrance is guarded by a leveled necromancer, usually found near the cooking spit, inside the ruined tower, or mining ore. In one of the cooking pots is a dead mudcrab, with a wooden table nearby which has a copy of Of Fjori and Holgeir, two red and two green apples, and a rock warbler egg on top. There is an iron ore vein a short distance north of the cooking spit. Inside the tower is an apprentice-locked chest, several food sacks, and a barrel containing ingredients with a small coin purse on it. Beside the chest is a hay pile you can sleep on. An alchemy lab is on the opposite wall, built into a table, with samples of fly amanita, bleeding crown, a nightshade flower, a bunch of lavender, and four random healing, magicka, or stamina potions. Beside the table is a bucket containing a random potion of magicka. On top of the tower is an unlocked boss chest, which can only be reached using at least two words of the Whirlwind Sprint dragon shout. To reach it, stand on the small rocky outcropping almost directly above the excavation entrance and face west toward the lowest part of the tower. Alternatively, you can ride a horse to the top of the tower. Immediately to the right of the entrance to the excavation is a thistle.
Ansilvund Excavation[edit]
The passage descends to the east, passing a wooden table on the left which holds two pickaxes, a pair of iron boots, two leather helmets, and a leveled blacksmith's potion. At the bottom, as you enter a chamber with a rock pillar surrounded by scaffolding and a raised walkway, there is an iron ore vein on the right. Under the scaffolding, to the south, is a path that ends with a draugr standing guard near some dead frostbite spiders, with a ledge above that will provide a shortcut back from the final zone. The only way to proceed is up the ramp found on the north side, around the back of the structure. There is a leveled draugr patrolling the wooden walkway. Follow the path around the pillar and along the walkway. Ahead is a ramp leading up, and a passage continues ahead. Before following the passage, climb the ramp to a small landing to find a novice-locked chest.
The passage continues heading east, passing stacks of crates and posts that are supporting the ceiling. As you pass under a wooden slatted section, you can peer through and see a leveled necromancer sitting watching two draugr mining the back wall. At least one of these draugr is leveled. The floor is coated with an oil slick, and an oil lantern hangs above. There is a stack of barrels against the east wall with a random potion of magicka on top; however, it may become dislodged during the skirmish. To the left of where the draugr were working, next to the passage you just come through, is an adept-locked chest, beside another stack of barrels. There are numerous pickaxes throughout the site, and several of the barrels contain ingredients.
There is a passage to the left of the first barrels continuing east. The passage twists and turns before you come to a pressure plate that triggers a falling boulders trap on the left, which can be used against a conjurer on a platform above you. The path onward is around the corner, on the other side of the pressure plate. The next room has several growths of both white cap and imp stool fungi. There is a wooden ramp on the left up to a platform where the mage is found. There is a table with two mummified draugr and a random potion on top. Beside the table is an apprentice-locked chest, and at the other end of the platform there is a small table and chair, with a random poison on the table. Ahead, there is a draugr patrolling above the next passage, which can either be killed from here with a bow or ranged magic or left until later.
If you wish to skip a section of the ruins, the area with the draugr can be reached by standing on the table with the dead draugr and using two words of the Whirlwind Sprint dragon shout. (One word is not enough, while three words will send you through to the other side of the hallway.) Otherwise, proceed back down the ramp and continue along the passage heading east. However, move cautiously, as there is a tripwire which triggers a swinging mace in the hallway ahead. As you pass the mace, the ground will shake, and you will hear:
|
I am Lu'ah Al-Skaven. Who are you to disrupt my work? Begone, or I will add you to my army of the dead! |
This chamber is brightly lit by a brazier in the center of the room, behind which is a platform where you will see another mage and draugr. You will need to pass under the platform to find the ramp up. The front of the platform has a long table with another mummified draugr, while to the rear are several crates, barrels, and five more lootable mummified draugr on the ground. There is also a ramp descending to the south into a chamber containing three leveled mages standing or sitting around a central campfire. On your right, on the platform are three unowned bed rolls, with several crates and food sacks to the right of the ramp. Around the fire on the ground are many bottles of wine, and against the opposite wall is an arcane enchanter with a salt pile on top. Under the platform are many crates and barrels with several ingredients and foodstuffs on top, including: two taproots, a bowl of Spriggan sap, a bunch of tundra cotton, a bulb of garlic, a loaf of bread, several pieces of cheese, some potatoes, and some cabbages. Hanging under the platform is a garlic braid.
Continue to the west into some catacombs, where numerous draugr are slumbering. As you enter, you again hear the voice:
|
Rise from your graves to defeat this worm. |
The draugr will now rise, which can lead to a challenging fight. Once you've dealt with them, you will see a passage on your right. A short distance past this is a cave-in, with an unlocked chest among the rubble. Return to the passage and follow it. Before entering the next room, take note of the circular floor, and the ceiling spikes. Skirt around this area to the wooden stairway. Two large urns are tucked away under the stairs, and three random filled soul gems are also in the room: one on a sideboard, and two in stands to the right. At the top of the stairs, an apprentice-locked chest is straight ahead, a sideboard to the right has three loose septims and two lockpicks on top, and to the left are two more large urns and a food sack. A narrow balcony to the northwest holds a potion and a large coin purse. Another draugr can be observed mining down below to the west, and either left or dealt with by ranged magic or bow. Beside the draugr is a small round table with a random empty soul gem and two random potions. Stairs in front of you lead down into this room, and at the bottom, a passage heads south before taking a couple turns.
Descending deeper underground, continue along until you reach a turn to the left by some wooden planking. Here you should take care, as there is a tripwire which triggers some rocks to fall from the right. Looking around, you will see a wooden platform supporting a stone bridge spanning the room. A draugr, a random atronach, and a conjurer are all guarding this area. Before heading down to the wooden platform, look to the right for some candles on a section of stone statuary. A large coin purse is behind this stone structure. Head up the incline on the far side of the room to find four puzzle pillars and an associated lever on one side of the bridge, and an iron portcullis on the other.
On the table below the puzzle are three random potions, Lu-ah's Journal, and another copy of Of Fjori and Holgeir. The book contains clues to solve the pillar puzzle. The solution can also be seen carved into the wall behind the table, below the pillars, but the symbols are partially obscured by rubble and weeds. The solution from left to right is Eagle—Snake—Whale—Snake. Activate the pillars to arrange them in the correct order, then pull the lever to open the portcullis and proceed across the bridge. There is an additional trap on the bridge; the middle section has a pressure plate that activates a flamethrower statue trap from the right. In the next room, an unlocked chest is in a darkened alcove to the right, and the doors straight ahead lead to Ansilvund Burial Chambers.
Ansilvund Burial Chambers[edit]
The first of six successive pressure plates is found a few steps into this area, hidden under vines. The first, third, and fifth trigger poison dart traps, while the second, fourth, and sixth trigger swinging blade traps. All pressure plates are fairly obvious and can be avoided by sticking to the right-hand wall, then moving to the left between the fifth and sixth plates. There are several burial urns in this zone. Straight ahead to the east is an adept-locked gate. On the ground in front of the gate lies a skeleton with a dagger and lockpick. The gate opens to a room which contains a chest with a leveled lock. Behind this chest is a pull chain that stops any activated swinging blades, and to the right lies a dead draugr that can be looted. There is another lootable dead draugr in the upper burial space to the left of the chest. There is a seventh and final pressure plate in this area, in front of the next passage; it activates multiple swinging blades in the passage ahead. The chain in the previous room will also stop these blades, and there is another chain to stop the blades on the left-hand side at the far end of the passage. The next room is fairly large, with multiple levels. There are three flame spout traps in a row between the two pillars in the center of the room, one of which may have one or more of the draugr lying on it dead. The pillars support a caged walkway that passes from a balcony to the south to a balcony to the north, passing a caged area. There are also three draugr patrolling here. A copy of the Illusion skill book 2920, Suns' Dawn, v2 is on a trapped pedestal, which will trigger poison darts from the pillar behind you. A large urn is nearby. To the west, eight sarcophagi are arranged around another trapped pedestal holding the Ansilvund key. Taking the key triggers more poison darts from the pillar behind you, and all eight sarcophagi open, although only five draugr will rise. You will also hear the voice again:
|
I shall have vengeance for the death of my husband. Rise! |
Once you have the key, go up the stairs to find an adept-locked chest. A series of stone bridges spans the room. The Ansilvund key unlocks the first master-locked gate to the right. An unlocked chest is in this caged section of the bridge system. Continue across to the balcony to the north, where you find three large urns, and farther along the wall, a set of shelves holding two bottles of alto wine, a woodcutter's axe, and a pair of iron boots. To the right of these is a wooden door. Behind the door is an alcove containing a few human bones, but nothing of interest. Opposite is a caged bridge with another master-locked gate that is opened using the same key as before. The bridge crosses to a small balcony, with a partially buried urn and another wooden door. Through this door is a passage that leads to a room with wooden supports, and a draugr attacking what appears to be a gold ore vein (see bugs) with their weapon. Water covers the floor in the next room, and a leveled conjurer will be patrolling on the walkway crossing above. A wooden ramp up to the next level is in the back of the cavern, to the north. At the top of the ramp, on a stone ledge to the right next to some candles, is an empty petty soul gem and an iron dagger.
Across the stone bridge is another door, which leads back to the previous room on a walkway high above. Halfway across is a lit brazier. After the brazier, there are four more pressure plates lining the walkway. The first triggers a spike wall from the left, the next two trigger two fire spout traps, and the last triggers another spiked wall from the right. Before proceeding, a leveled draugr will run out of the door ahead of you and along the walkway. If you stay where you are, the draugr will likely be killed by activating the traps as it tries to cross. Open the doors at the end of the walkway to find a leveled necromancer patrolling left to right. A random potion of magicka and two burial urns are either on or around a collapsed table on the left, at the bottom of the stairs. Straight ahead is an open area with two thrones. Upon passing the thrones, you hear Lu'ah Al-Skaven again:
|
I could not raise him, but I will raise an army to avenge his defilement! |
Six more draugr awaken from their slumber. Three of the alcoves by the thrones contain mummified draugr, with a large urn in front. The passage continues to the north. As the room opens up through some scrub brush, you will see a trapped pedestal straight ahead. First, notice another circular floor section with ceiling spikes. If you want to reach the pedestal, skirt around the circular floor. While there is a piece of random armor lying on the pedestal, taking it triggers a poison dart trap from either side. Up ahead, there is a single draugr patrolling the hallway, which contains a total of three large urns and two burial urns. After several turns, the passage ends with double iron doors that lead to the final area.
Opening the doors reveals the final area of the ruins. Awaiting you is Lu'ah Al-Skaven, a powerful necromancer. Two powerful draugr or dragon priests, Holgeir and Fjori, will also emerge from upright sarcophagi that she controls. There are three skeletons lying on the ground, any of which she may raise to aid her, and in front of her is an altar with a dead draugr and two random potions of magicka on top. Between the sarcophagi is a stone table with a built-in arcane enchanter, an unusual gem, and a plinth where the ghostblade will be placed as a reward for releasing the captive spirits of Holgeir and Fjori. You do not have to be on the related quest to encounter these foes and gain the ghostblade prize. After the fight, loot Lu'ah Al-Skaven for her key. Next, when standing at the altar, facing back towards the entrance, notice two sets of stairs. The stairs on the right lead up to an unlocked chest buried in some rubble. The exit is up the stairs to the left. The master-locked door at the top of the stairs will be unlocked with Lu'ah's key. In the room beyond are two barrels of ingredients, several burial urns, a large urn, an unlocked boss chest, an unowned single bed, an alchemy lab, and a long wooden table with a spell tome: Transmute Mineral Ore, a note (which tells of the death of Lu'ah Al-Skaven's husband, Saeel Al-Skaven), two random potions, and a dragon's tongue flower on top. To the right of the table is a kettle containing two pieces of iron ore that you can try the new spell on. To the left of a door on the far wall is a set of shelves holding a deathbell flower, a bowl of frost salts, a bowl of bone meal, a dragon's tongue flower, two random empty soul gems, a random dagger, a set of novice robes of conjuration, a pair of boots, and four common books. The door leads back to Ansilvund Excavation, opening to a passage that soon ends at a wooden spiral staircase with a barrel of ingredients and several food sacks at the bottom. At the top of the staircase is a cage with a door that requires Lu'ah's key to open. This brings you to the ledge above the dead frostbite spiders, with easy access from here to the exit.
Notes[edit]
- To the east of the camp is a quicksilver ore vein, and farther east is an iron ore vein. Between the two, but to the south, is a corundum ore vein.
- If you return to the ruin after completing the eponymous quest and the location has reset, most draugr will not respawn. A small number of skeleton enemies will take their place along with the necromancers, making for a much easier path through the ruin.
Bugs[edit]
- There is a gold ore vein that cannot be mined, found on the wall to the right, just after the room that holds the key and skill book. There is a draugr attempting to mine it, with a battleaxe.
 The Unofficial Skyrim Patch, version 1.0, fixes this bug.
- Holgeir reanimated by Lu'ah may spawn as a dragon priest at sufficiently high player level, in which case he may be pushed out of bounds of the dungeon upon exiting his sarcophagus, making the fight with Lu'ah easier, but also making his loot inaccessible. ?
Maps[edit]
-
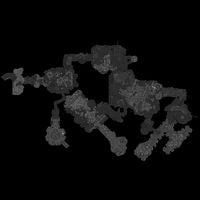
Ansilvund Excavation
-
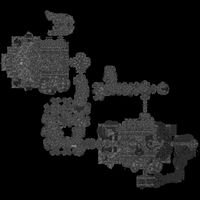
Ansilvund Burial Chambers


- Skyrim-Places-Nordic Ruins
- Skyrim-Places
- Skyrim-Places-Level 8
- Skyrim-Places-Eastmarch
- Skyrim-Places-Iron Veins
- Skyrim-Places-Alchemy Labs
- Skyrim-Places-Arcane Enchanters
- Skyrim-Places-Clearable
- Skyrim-Places-Discoverable
- Skyrim-Places-Warlock Lairs
- Skyrim-Places-Caves
- Skyrim-Bugs Fixed by the Unofficial Skyrim Patch
- Skyrim-Unconfirmed Bugs